
Indulging in a sweet treat is always a delight, and these Mini Crème Brûlée Cheesecakes are no exception. With their rich, creamy filling and a perfectly caramelized top, they offer a unique twist on a classic dessert. Join me as I guide you through an easy recipe that will impress your friends and family. Get ready to whip up these decadent delights that are sure to satisfy any sweet tooth!
Ingredients
To make Mini Crème Brûlée Cheesecakes, you need some simple ingredients. Here’s the list of what you will need:
– 1 cup graham cracker crumbs
– 4 tablespoons unsalted butter, melted
– 2 cups cream cheese, softened
– 1 cup granulated sugar
– 2 large eggs
– 1 teaspoon vanilla extract
– 1 teaspoon lemon juice
– 1 cup heavy cream
– 2 tablespoons brown sugar (for topping)
Each ingredient plays a key role in making this dessert rich and creamy. The graham cracker crumbs mix with butter to create a sweet crust. Cream cheese forms the base of the cheesecake, giving it that smooth texture. Sugar is vital for sweetness, while eggs help bind it all together.
Don’t forget the vanilla and lemon juice! They add depth and brightness. Finally, the heavy cream makes it all decadent. The brown sugar on top gives that classic crème brûlée crunch. For the full recipe, check out the [Full Recipe].
Step-by-Step Instructions
Preheat the Oven and Prepare the Muffin Tin
First, preheat your oven to 325°F (163°C). Then, grab a muffin tin and line it with paper liners. This step helps keep the cheesecakes from sticking. If you don’t have liners, lightly grease the tin with some cooking spray or butter.
Make the Crust Layer
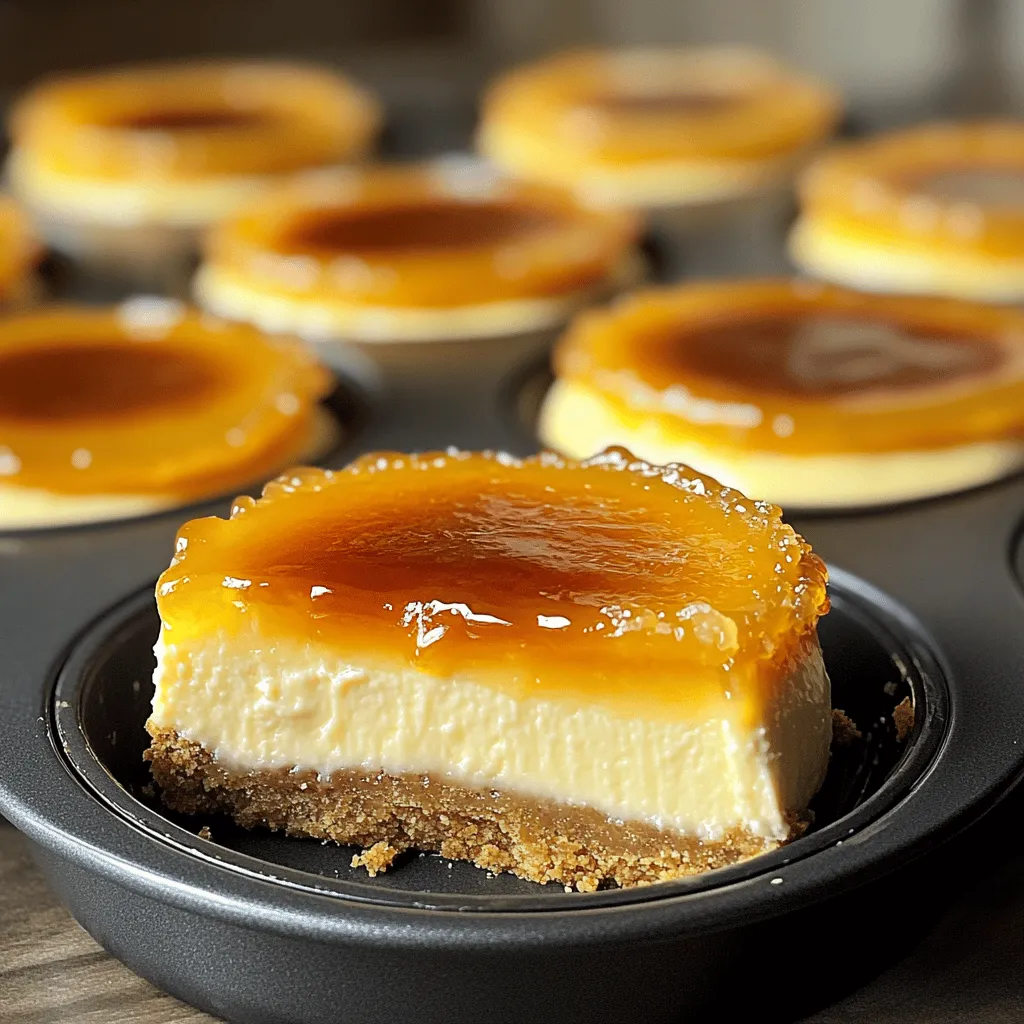
In a mixing bowl, combine 1 cup of graham cracker crumbs with 4 tablespoons of melted butter. Mix it well until crumbly. Take a tablespoon of this mixture and press it into the bottom of each muffin cup. This forms a tasty crust layer that will hold the cheesecake filling.
Prepare the Cheesecake Filling
Next, in a large mixing bowl, beat 2 cups of softened cream cheese until it’s smooth. Gradually add 1 cup of granulated sugar, mixing until it’s light and fluffy. Then, add in 2 large eggs, one at a time. Mix well after each egg. Now, stir in 1 teaspoon of vanilla extract and 1 teaspoon of lemon juice. Finally, fold in 1 cup of heavy cream until the filling is completely smooth.
Fill and Bake the Cheesecakes
Now it’s time to fill the muffin tin! Evenly distribute the cheesecake filling over the crusts, filling each cup about ¾ full. Place the muffin tin in your preheated oven. Bake for about 20-25 minutes. The edges should be set, but the centers can still jiggle slightly. After baking, let them cool to room temperature.
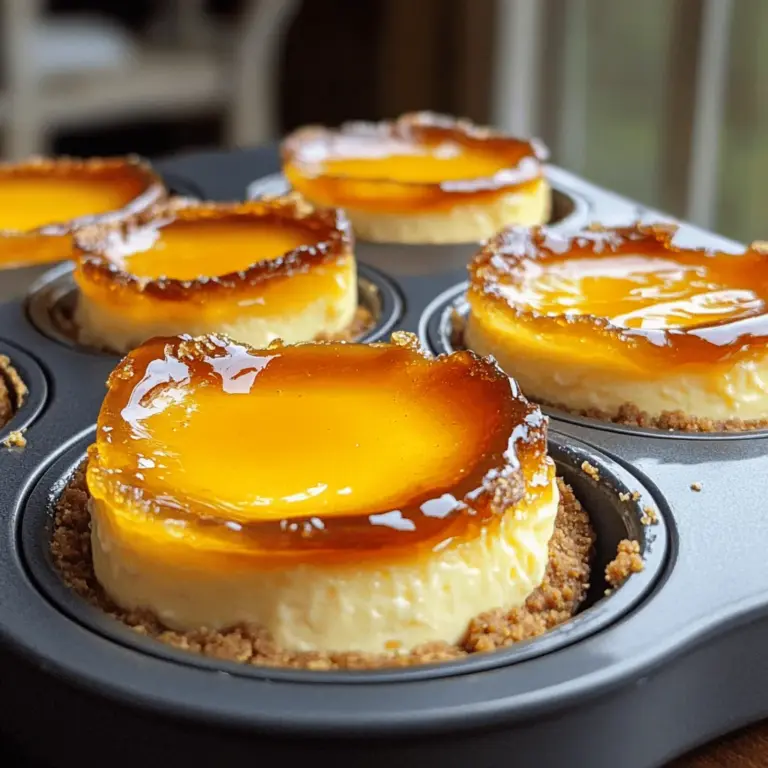
Chill and Caramelize the Topping
Once the cheesecakes cool, refrigerate them for at least 4 hours. Overnight is even better for the best texture. Before serving, sprinkle a thin layer of brown sugar on top of each cheesecake. Use a kitchen torch to caramelize the sugar until it bubbles and turns golden brown. If you don’t have a torch, you can broil them in the oven on high for about 2 minutes. Just keep a close eye on them to prevent burning. Enjoy your mini Crème Brûlée cheesecakes! For a detailed guide, check the Full Recipe.
Tips & Tricks
Achieving the Perfect Texture
To get that creamy, light texture, use softened cream cheese. Cold cream cheese will stay lumpy, so make sure it sits out for at least 30 minutes. When mixing, beat until the mixture is smooth and fluffy. This step is key for a silky cheesecake. Don’t overmix after adding the eggs; mix just until combined. Overmixing can cause cracks later.
Using a Kitchen Torch vs. Broiling
A kitchen torch is the best tool for caramelizing the sugar on top. It gives you control and creates a perfect crust. Hold the torch about 2 inches above the sugar. Move it slowly to avoid burning. If you don’t have a torch, broiling is a fine option. Set your oven to broil and watch closely. It should only take about 2 minutes. Keep the oven door slightly open to monitor the color.
Serving Suggestions
Mini crème brûlée cheesecakes shine when served cold. Remove them from the tin and place them on a pretty plate. You can add fresh berries or mint leaves for color. A drizzle of chocolate sauce or caramel adds extra flair. For a fun twist, serve them in small jars. Guests will love the cute presentation and the delightful taste.
For the complete recipe, check out the Full Recipe section.
Variations
Flavor Variations
You can add fun twists to your mini crème brûlée cheesecakes. Here are a few ideas:
– Chocolate: Mix in melted chocolate to the filling. This gives a rich taste.
– Strawberry: Blend fresh strawberries into the cream cheese for a fruity flavor.
– Coffee: Add espresso powder for a delightful coffee kick.
Feel free to experiment with flavors. Each twist makes the treat even more special.
Topping Ideas
Toppings can elevate your cheesecakes. Here are some tasty options:
– Fresh Fruit: Use berries, banana slices, or citrus for brightness.
– Chocolate Sauce: Drizzle chocolate sauce for a sweet finish.
– Caramel Sauce: A swirl of caramel adds a rich flavor.
Choose toppings that match your cheesecake flavor. This makes each bite exciting.
Gluten-Free Options
Making gluten-free mini cheesecakes is easy. Here’s how:
– Crust: Use gluten-free graham crackers or almond flour for the crust.
– Filling: All main ingredients are gluten-free. Just check labels to be safe.
You can enjoy these treats without worry. Everyone can indulge in this dessert delight. To see the full recipe, refer to the section above.
Storage Info
Proper Storage Guidelines
To keep your mini crème brûlée cheesecakes fresh, let them cool completely. Then, cover each cheesecake with plastic wrap or place them in an airtight container. Store them in the refrigerator for up to 5 days. This helps maintain their creamy texture and flavor. If you stack them, place parchment paper between layers to prevent sticking.
Freezing Instructions
You can freeze these cheesecakes for longer storage. First, chill them in the fridge overnight. Then, wrap each cheesecake in plastic wrap and place them in a freezer-safe container. They can stay frozen for up to 2 months. When you’re ready to enjoy them, move them to the fridge to thaw overnight.
Reheating Tips
These cheesecakes are best served cold, but if you prefer them warm, reheat them gently. Place the cheesecake on a microwave-safe plate. Heat it in the microwave for 10-15 seconds at a time, checking often. Avoid overheating, as it can change the texture. After warming, brûlée the tops again for that signature caramel crust. For the full recipe and more tips, check the complete guide!
FAQs
Can I make these ahead of time?
Yes, you can make these mini crème brûlée cheesecakes a day or two ahead of time. After baking, let them cool completely. Then, cover them and chill in the fridge. The flavors improve with time, which makes them even more delicious!
What can I substitute for cream cheese?
If you’re looking for a substitute for cream cheese, try mascarpone or ricotta cheese. Both give a smooth texture. You can also use Greek yogurt for a tangy flavor. Just keep in mind that this may change the taste slightly.
How do I know when the cheesecakes are done?
Check the edges of the cheesecake. They should be set while the center still has a slight jiggle. This slight jiggle means they will firm up in the fridge. Overbaking can lead to a dry texture, so keep an eye on them!
What’s the best way to reheat mini cheesecakes?
To reheat mini cheesecakes, use a microwave. Heat them in short bursts, about 10-15 seconds. Check often to avoid overheating. You want them warm, not hot. If you plan to serve them cold, just take them out of the fridge before serving.
Can I use a different crust?
Absolutely! If you want to switch things up, use a cookie crust instead. Oreos or vanilla wafers work great. You can also try a nut-based crust for a gluten-free option. Just crush the cookies or nuts and mix with melted butter, then proceed as usual.
For the full recipe, check out the details above!
In this post, we explored how to make delicious mini cheesecakes. I shared the key ingredients, easy steps, and helpful tips to ensure perfect results every time. You learned ways to customize flavors and toppings, plus storage methods.
Mini cheesecakes can be a fun treat for any occasion. With a few ingredients and some simple steps, you’ll impress everyone. Enjoy baking and sharing these tasty delights!
