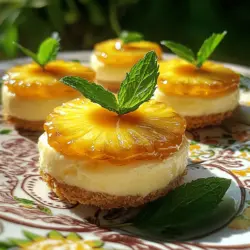
Imagine diving into a sweet, tropical treat with your own Individual Mini Pineapple Upside-Down Cheesecakes! These little delights combine creamy cheesecake filling with a buttery crust and a caramelized topping. Whether you’re a baking pro or a novice, I’ll guide you through each step. Follow along, and soon you’ll impress your friends and family with a dessert that’s both fun and delicious! Let’s get started!
Ingredients
Ingredients for the Crust
To make the crust, gather these simple items:
– 1 cup graham cracker crumbs
– 2 tablespoons sugar
– 1/4 cup unsalted butter, melted
These ingredients create a sweet and buttery base. The graham crackers give a nice crunch. The sugar adds just the right touch of sweetness, while melted butter helps everything stick together.
Ingredients for the Cheesecake Filling
For the creamy cheesecake filling, you will need:
– 8 oz cream cheese, softened
– 1/2 cup sugar
– 1 teaspoon vanilla extract
– 2 large eggs
– 1/4 cup sour cream
This mix makes the cheesecake rich and smooth. The cream cheese is key for that classic texture. Sugar sweetens it up, and vanilla brings in a nice flavor. Eggs act as a binder, while sour cream adds creaminess.
Ingredients for the Topping
For the delicious topping, get these items:
– 1 can (8 oz) pineapple slices, drained (reserve juice)
– 1/4 cup brown sugar
– 2 tablespoons unsalted butter
The topping adds a fruity, sweet layer. Pineapple brings a bright taste. Brown sugar and butter create a lovely caramel flavor that makes the cheesecakes extra special.
These ingredients come together in a delightful way, making your individual mini pineapple upside-down cheesecakes shine. For the complete recipe, check out the Full Recipe section.
Step-by-Step Instructions
Preparing the Crust
First, preheat your oven to 350°F (175°C). In a bowl, mix the graham cracker crumbs, sugar, and melted butter. Stir until it looks like wet sand. Next, take about 2 tablespoons of this mixture and place it in each muffin tin cup. Press down using a spoon or your fingers to make a firm layer. Bake it for 5-7 minutes until it sets. Let the crust cool a bit before moving to the next step.
Making the Topping
For the topping, grab a small saucepan. Melt the butter over medium heat. Add the brown sugar and reserved pineapple juice. Stir this mix until it becomes smooth. Carefully add the pineapple slices into the pan. Cook for about 2-3 minutes until they get a nice caramel color. Remove from heat and set aside.
Preparing the Cheesecake Filling
In a clean bowl, beat the softened cream cheese until smooth. Slowly mix in the sugar, then add the vanilla extract. Next, add the eggs one at a time, mixing well after each. Finally, add the sour cream and blend just until combined. This filling will be creamy and rich!
Assembling and Baking Cheesecakes
Now it’s time to put it all together. Place one caramelized pineapple slice on each crust in the muffin tin. Pour the cheesecake filling over the pineapple, filling each cup about 3/4 full. Bake these in your preheated oven for 18-20 minutes. The edges should set, but the center can still jiggle slightly. After baking, let them cool for about 30 minutes at room temperature. Then, chill them in the fridge for at least 2 hours before serving. To serve, gently run a knife around the edges to loosen them and flip them upside down for a beautiful display. Enjoy your delicious mini cheesecakes! For more details, check the Full Recipe.
Tips & Tricks
Tips for Perfect Cheesecakes
To make your mini cheesecakes shine, follow these tips:
– Use room temperature cream cheese. This helps mix smoothly.
– Mix the batter gently. Overmixing can add too much air.
– Bake in a water bath. It keeps the cheesecakes moist and helps them cook evenly.
– Cool them slowly. Rapid cooling can cause cracks in the tops.
Common Mistakes to Avoid
Avoid these common pitfalls for the best results:
– Forgetting to preheat the oven. Always preheat for even baking.
– Using cold ingredients. Cold cream cheese can lead to lumps.
– Overbaking. The center should jiggle slightly when done.
– Skipping the chilling step. Chilling gives the perfect texture.
Serving and Presentation Suggestions
Presentation makes all the difference! Here are some ideas:
– Serve on a colorful plate for a fun touch.
– Add fresh mint leaves for color and freshness.
– Drizzle with caramel sauce for extra sweetness.
– Top with a dollop of whipped cream for creaminess.
For the full recipe, check out the details above and enjoy making these delightful treats!

Variations
Alternate Fruit Toppings
You can switch up the fruit on these mini cheesecakes. Try using peaches, cherries, or even strawberries. Fresh fruit adds a vibrant taste and look. For a tropical twist, mango or kiwi work great too. Simply slice the fruit and caramelize it like you do with pineapple. Each fruit will give a unique flavor, keeping your dessert exciting.
Gluten-Free Crust Options
If you need a gluten-free option, use almond flour or gluten-free graham crackers. Mix it with melted butter and sugar just like in the original recipe. Press it into the muffin tin to create your crust. This way, everyone can enjoy your mini cheesecakes without worry.
Flavor Variations for Cheesecake Filling
You can add different flavors to the cheesecake filling for a fun twist. Try adding lemon zest for a citrus zing. Almond extract can give a nice flavor too. If you love chocolate, mix in cocoa powder or melted chocolate. Each flavor can change the taste, making it a new dessert each time. For more ideas, check the Full Recipe for guidance.
Storage Info
How to Store Mini Cheesecakes
Store your mini cheesecakes in the fridge. Place them in an airtight container. This keeps them fresh for up to five days. Make sure they are cooled completely before covering. This prevents condensation and sogginess.
Freezing Instructions
You can freeze these mini cheesecakes if you want to save some for later. Wrap each cheesecake tightly in plastic wrap. Then place them in a freezer-safe bag or container. They can last in the freezer for up to three months. To enjoy, thaw them overnight in the fridge before serving.
Reheating Tips
If you want to warm them up, use a microwave. Heat them for about 10 to 15 seconds. Check them frequently to avoid overheating. You can also serve them cold; they taste great either way!
For the full recipe of these delightful treats, check out the [Full Recipe].
FAQs
How long can I keep the mini cheesecakes in the fridge?
You can keep the mini cheesecakes in the fridge for up to five days. Make sure to store them in an airtight container. This will help keep them fresh and tasty. If you want to enjoy them longer, consider freezing them.
Can I make the crust without graham crackers?
Yes, you can make the crust without graham crackers. Try using crushed cookies like vanilla wafers or even oats. Just remember to adjust the sugar and butter as needed. The texture might change, but it will still be delicious.
What can I substitute for sour cream in the filling?
You can use plain Greek yogurt as a great substitute for sour cream. It gives a nice creamy texture and adds a bit of tang. If you want something different, try using buttermilk or cream cheese mixed with a little milk.
How do I know when the cheesecakes are done baking?
You know the cheesecakes are done when the edges look set but the center still jiggles a bit. This means they’re creamy inside. Let them cool and chill before serving for the best texture.
We explored the key ingredients for making mini cheesecakes, from the crust to the topping. I shared step-by-step instructions to guide you through the process. I also provided tips for perfection, highlighted common mistakes, and suggested storage methods. You can explore variations for different flavors and dietary needs.
Now, you can make your own yummy mini cheesecakes with confidence. Enjoy creating and sharing delicious treats!