Introduction
In recent years, mini desserts have surged in popularity, captivating the hearts and taste buds of dessert lovers everywhere. The charm of mini desserts lies in their ability to deliver all the indulgence of traditional sweets in a perfectly portioned size, making them ideal for sharing or enjoying solo. Among these delightful treats, the Mini Biscoff Cheesecake stands out as a unique and flavorful option that promises to satisfy even the most discerning sweet tooth.
At the heart of this mouthwatering creation are Biscoff cookies, renowned for their caramelized flavor and crunchy texture. Originating from Belgium, these cookies have become a beloved choice worldwide, often paired with coffee or enjoyed as a snack on their own. Their distinctive taste, which combines hints of cinnamon and brown sugar, provides an irresistible foundation for cheesecakes, enhancing the overall flavor profile in a way that is both comforting and sophisticated.
The Mini Biscoff Cheesecake is not just a dessert; it’s an experience perfect for gatherings, special occasions, or simply when a sweet craving strikes. Whether you’re hosting a party, celebrating a birthday, or wanting to treat yourself, these mini cheesecakes are sure to impress.
In this article, we’ll delve into the allure of Biscoff cookies, explore the essential ingredients that make this cheesecake so delightful, and provide you with a step-by-step guide to creating these delicious treats from scratch.
The Allure of Biscoff Cookies
Biscoff cookies, also known as speculoos, have a rich history that dates back to the 18th century in Belgium. Traditionally baked for St. Nicholas Day, these spiced biscuits have become a staple in households around the world, particularly in Europe and North America. Their unique flavor profile, characterized by a blend of cinnamon, nutmeg, and a hint of caramelization, sets them apart from other cookie varieties.
One of the remarkable aspects of Biscoff cookies is their texture—crisp yet buttery, making them the perfect companion for coffee or tea. They are not just delicious on their own; they also serve as an excellent base for various desserts. The popularity of Biscoff spread, a creamy, luscious version of the cookies, has further solidified the cookie’s status in the dessert realm. This versatile spread can be slathered on toast, spooned into oatmeal, or used as an ingredient in countless recipes, including the Mini Biscoff Cheesecake.
The marriage of Biscoff cookies with cheesecake results in a decadent dessert that balances creamy and crunchy textures while delivering a burst of flavor. The use of Biscoff in desserts speaks to the cookie’s versatility and the growing trend of incorporating unique flavors into classic recipes.
Understanding the Ingredients
To create the perfect Mini Biscoff Cheesecakes, it’s essential to understand the role of each ingredient involved in the recipe. Here’s a breakdown of the key components that will contribute to the overall success of your cheesecakes:
1. Biscoff Cookies: These cookies are the star of the show. Not only do they provide the crust, but they also infuse the cheesecake with their unique flavor. When crushed, they form a crumbly base that adds both texture and taste to the dessert.
2. Cream Cheese: Quality cream cheese is crucial for achieving a smooth and creamy cheesecake filling. Look for full-fat cream cheese for the best taste and texture. It should be softened to room temperature before mixing to ensure a lump-free filling.
3. Powdered Sugar: This ingredient serves to sweeten the cheesecake without the graininess that granulated sugar might introduce. The fine texture of powdered sugar helps create a velvety filling.
4. Vanilla Extract: A splash of vanilla extract elevates the flavor of the cheesecake, adding warmth and depth to the overall taste profile. Opt for pure vanilla extract for the best flavor.
5. Heavy Whipping Cream: This ingredient is key to achieving that light, airy texture in the cheesecake. Whipping the cream to soft peaks and folding it into the cream cheese mixture creates a luscious filling that melts in your mouth.
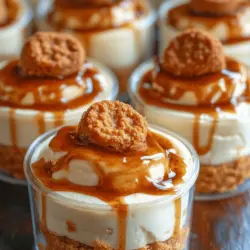
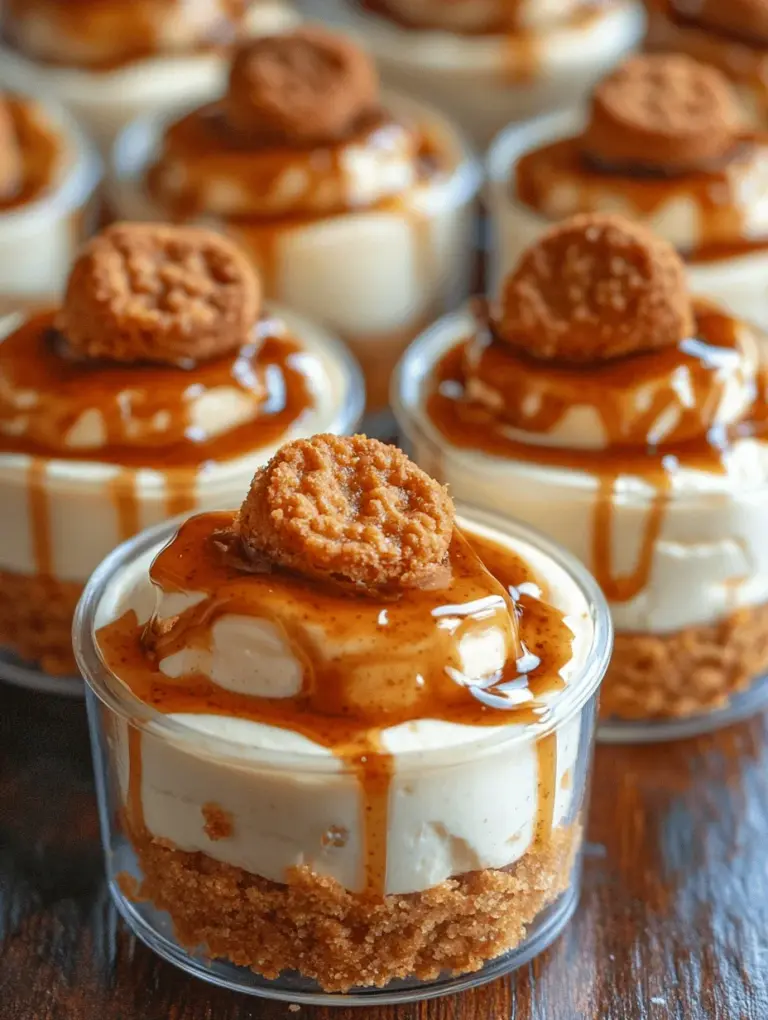
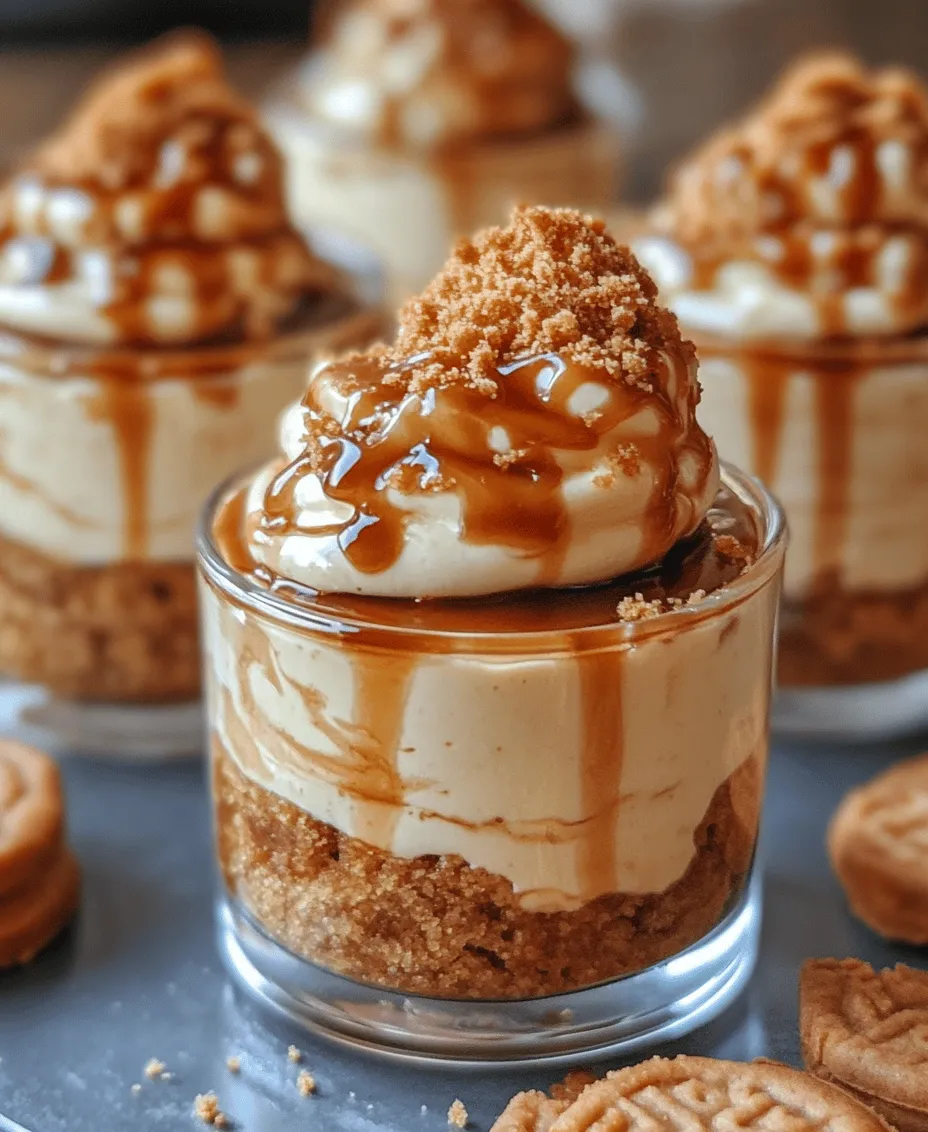
6. Optional Garnishes: While the cheesecakes are delightful on their own, garnishing them with additional Biscoff cookies, whipped cream, or even a drizzle of Biscoff spread can enhance their presentation and add extra layers of flavor.
Understanding the significance of each ingredient will help you appreciate the care that goes into crafting these Mini Biscoff Cheesecakes and ensure that you achieve the desired results.
Step-by-Step Guide to Making Mini Biscoff Cheesecakes
Preparing the Biscoff Cookie Crust
The first step in creating your Mini Biscoff Cheesecakes is to prepare the crust. This provides the foundational layer that supports the creamy filling while adding a satisfying crunch. Here’s how to make the crust:
1. Crush the Cookies: Start by placing your Biscoff cookies in a food processor. Pulse them until they resemble fine crumbs. If you don’t have a food processor, you can place the cookies in a zip-top bag and crush them with a rolling pin.
2. Mix with Butter: In a mixing bowl, combine the crushed Biscoff cookies with melted butter. The butter helps to bind the crumbs together, ensuring that the crust holds its shape. Stir the mixture until all the crumbs are evenly coated with butter.
3. Press into Muffin Tins: Line a muffin tin with cupcake liners for easy removal. Using a spoon or your fingers, press the cookie mixture firmly into the bottom of each liner, creating an even layer. Make sure to compact the crumbs well to form a sturdy base that won’t crumble when you remove the cheesecakes.
4. Chill the Crust: Once the crusts are pressed into the muffin tin, place the tin in the refrigerator for about 15-20 minutes to allow the crusts to set. This step is crucial as it helps the butter solidify, giving the crust a firmer texture.
Crafting the Creamy Cheesecake Filling
With the crust prepared, it’s time to move on to the cheesecake filling. Follow these steps for a perfectly creamy and delicious filling:
1. Beat the Cream Cheese: In a large mixing bowl, beat the softened cream cheese with an electric mixer on medium speed until it’s smooth and creamy. Scrape down the sides of the bowl to ensure everything is well mixed.
2. Add Sugar and Vanilla: Gradually add the powdered sugar and vanilla extract to the cream cheese mixture, continuing to beat until fully incorporated. The mixture should be fluffy and light.
3. Whip the Cream: In a separate bowl, whip the heavy whipping cream until soft peaks form. This step is essential for achieving that light texture in the cheesecake filling. Be careful not to over-whip, as this can create a grainy texture.
4. Fold the Cream into the Cheesecake Mixture: Gently fold the whipped cream into the cream cheese mixture using a spatula. Be careful to maintain the airiness of the whipped cream, which adds to the overall lightness of the cheesecake.
5. Fill the Crusts: Once the filling is well combined, spoon or pipe the cheesecake mixture into the prepared Biscoff cookie crusts. Fill each crust to the top, smoothing the surface with a spatula for an even finish.
By following these steps, you will create a rich and indulgent filling that complements the crunchy Biscoff cookie crust beautifully. The combination of flavors and textures will undoubtedly make your Mini Biscoff Cheesecakes a hit at any gathering or simply as a delightful treat for yourself.
Stay tuned for the next part of this article, where we will cover the chilling process, garnishing options, and tips for serving these delectable cheesecakes!
Importance of Room Temperature Cream Cheese for a Smooth Mixture
When it comes to making the perfect cheesecake, the temperature of your cream cheese is a crucial factor that can significantly affect the final texture of your Mini Biscoff Cheesecakes. Using room temperature cream cheese allows for a smoother mixture, which is essential for creating that rich, creamy consistency that is characteristic of any great cheesecake. Cold cream cheese can lead to lumps and an uneven texture, which can detract from the overall experience of your dessert.
To achieve this, take the cream cheese out of the refrigerator at least 30 to 60 minutes before you begin your recipe. This simple step ensures that the cream cheese softens adequately and mixes seamlessly with other ingredients, resulting in a luscious cheesecake filling.
Step-by-Step Guide to Combining Ingredients and Avoiding Lumps
1. Prepare Your Ingredients: Once your cream cheese is at room temperature, gather all your ingredients—sugar, vanilla extract, and spices. Having everything within reach will streamline the mixing process.
2. Mix the Cream Cheese First: Using an electric mixer or a stand mixer fitted with a paddle attachment, beat the room temperature cream cheese alone for about 1-2 minutes before adding any other ingredients. This initial mixing helps to smooth out the cream cheese and eliminates any lumps.
3. Gradually Add Sugar: Once the cream cheese is smooth, slowly add in the granulated sugar. Mixing it in gradually allows the sugar to dissolve properly into the cream cheese, ensuring a silky texture.
4. Incorporate Other Ingredients: Now, add the vanilla extract and any additional spices you prefer, such as cinnamon or nutmeg. Beat the mixture until fully combined, ensuring that everything is evenly distributed.
5. Check for Lumps: Use a rubber spatula to scrape down the sides of the bowl and check for any lumps. If you notice any, continue to mix until the filling is completely smooth.
Whipping the Heavy Cream
Whipping cream is an essential component of this cheesecake recipe, as it adds lightness and a fluffy texture to the filling. Here’s how to whip cream to stiff peaks effectively:
1. Cold Equipment: Start with cold heavy cream and ensure your mixing bowl and beaters are also cold. This helps the cream whip up better, creating a more stable structure.
2. Begin Whipping: Pour the cold heavy cream into your mixing bowl and begin whipping it on medium speed. Gradually increase to high speed as the cream starts to thicken.
3. Watch for Stiff Peaks: After about 3-5 minutes, the cream will begin to form soft peaks. Continue to whip until stiff peaks form—this means that the cream holds its shape and doesn’t droop when the beaters are lifted.
Techniques for Folding Whipped Cream into the Cheesecake Mixture Without Deflating It
Folding whipped cream into the cheesecake mixture is a delicate process that requires care to maintain the airiness of the whipped cream. Here’s how to do it properly:
1. Add a Small Amount First: Take a scoop of the whipped cream and add it to the cheesecake mixture. This helps to lighten the mixture and makes it easier to incorporate the rest.
2. Use a Folding Motion: Using a rubber spatula, gently cut through the center of the mixture, scrape along the bottom of the bowl, and fold the whipped cream over the cheesecake mixture. Turn the bowl as you do this to ensure the mixture is evenly incorporated.
3. Repeat Until Combined: Continue to fold gently until no white streaks remain. Be careful not to over-mix, as this can deflate the whipped cream and compromise the light texture of the cheesecake filling.
Assembling the Mini Cheesecakes
Once your cheesecake filling is ready, it’s time to assemble your Mini Biscoff Cheesecakes.
1. Prepare Your Crusts: If you haven’t done so already, make your Biscoff cookie crust by combining crushed Biscoff cookies with melted butter. Press the mixture firmly into the bottom of mini cheesecake pans or cupcake liners.
2. Fill the Crusts: Use a spoon or piping bag to carefully fill each crust with the cheesecake mixture. Fill each cup to just below the top to allow for expansion during chilling.
3. Achieve a Smooth Finish: For a professional look, use an offset spatula to smooth the tops of the cheesecakes. This small step can elevate the appearance of your desserts.
Chilling for Perfection
Chilling is one of the most important aspects of making cheesecakes. Proper chilling ensures that your Mini Biscoff Cheesecakes set correctly and develop their full flavor.
1. Chill Time: Place the assembled cheesecakes in the refrigerator for at least 4 hours, but overnight is ideal. This long chilling period allows the flavors to meld and the texture to firm up.
2. Impact on Texture and Flavor: Chilling not only helps the cheesecake set but also enhances the overall flavor. Allowing the cheesecakes to rest in the fridge helps all the ingredients harmonize, resulting in a rich and creamy dessert that is bursting with flavor.
Serving Suggestions
When it comes to serving your Mini Biscoff Cheesecakes, presentation can make all the difference. Here are some ideas to elevate your dessert experience:
1. Garnishing: Consider topping each cheesecake with a dollop of whipped cream and a drizzle of Biscoff spread for an indulgent touch. Crushed Biscoff cookies sprinkled on top can also add a delightful crunch.
2. Presentation Tips: Arrange your mini cheesecakes on a decorative platter or individual dessert cups to enhance their visual appeal. You can also garnish with fresh mint leaves or edible flowers for a pop of color.
3. Pairing Suggestions: These cheesecakes pair wonderfully with a variety of beverages. Consider serving them alongside a cup of coffee, a glass of dessert wine, or even a fruity iced tea. For an extra touch, offer a selection of fresh fruits or a light fruit compote on the side.
Nutritional Information
Understanding the nutritional content of your desserts can help you enjoy them responsibly. Here’s a general breakdown of the nutritional information for a Mini Biscoff Cheesecake (per serving):
– Calories: Approximately 250-300 kcal
– Total Fat: 18g
– Saturated Fat: 10g
– Cholesterol: 60mg
– Sodium: 200mg
– Total Carbohydrates: 25g
– Dietary Fiber: 0g
– Sugars: 12g
– Protein: 4g
While these mini cheesecakes are a delightful indulgence, portion control is essential. Enjoying a single cheesecake as a treat rather than overindulging allows you to savor the flavors without feeling guilty.
Conclusion
The journey of making Mini Biscoff Cheesecakes is not only about the end result but also the joy of creating something delicious from scratch. The intricate process—from preparing the crust to assembling and chilling—culminates in a delightful dessert that is sure to impress your family and friends.
Don’t hesitate to experiment with this recipe by adding your own unique touches or variations. Perhaps you could incorporate different flavored extracts or mix in some chocolate chips for an extra twist. The possibilities are endless!
Ultimately, the joy of baking is in sharing these sweet creations with loved ones, creating lasting memories around the table. So, gather your ingredients, roll up your sleeves, and let the delicious adventure begin!