
When it comes to indulgent desserts, few treats can rival the iconic flavor of Oreo cookies. The combination of rich chocolate wafers and cream filling has captured the hearts (and taste buds) of cookie lovers everywhere. Enter Oreo Bliss Balls—a delightful no-bake dessert that merges the beloved taste of Oreos with the creaminess of cream cheese and a luscious chocolate coating. Whether you’re hosting a party, looking for a sweet snack to enjoy at home, or searching for the perfect treat to impress your friends, these bliss balls are sure to be a hit.
The popularity of Oreo Bliss Balls stems not only from their delicious flavor but also from their simplicity. This recipe is incredibly accessible, making it perfect for bakers of all skill levels. With just a handful of ingredients and minimal effort, you can create these delightful morsels that are as pleasing to the eye as they are to the palate. In this guide, we’ll explore the components that make Oreo Bliss Balls irresistible, followed by a detailed step-by-step process to ensure your dessert comes out perfect every time.
Understanding the Ingredients
To create the perfect Oreo Bliss Balls, it’s important to understand the role of each ingredient. Let’s take a closer look at what makes these treats so special:
Oreo Cookies
At the heart of this recipe are Oreo cookies. Known for their distinctive flavor profile, Oreos are a classic American cookie that combines dark, chocolatey wafers with a sweet, creamy filling. Their versatility is one of their greatest strengths; while classic Oreos are the go-to choice for this recipe, you can also experiment with various flavors such as double-stuff, mint, or birthday cake Oreos. Each variation brings a unique twist to the final product, allowing you to customize your Oreo Bliss Balls to suit your taste preferences or the theme of your event.
Cream Cheese
The creamy, rich texture of the filling in Oreo Bliss Balls is achieved through the addition of cream cheese. This ingredient is essential, as it not only adds a velvety mouthfeel but also binds the crushed Oreos together to form a cohesive dough. When mixed with the crushed cookies, cream cheese enhances the overall flavor profile, ensuring that the bliss balls are not too sweet while maintaining a decadent richness. For those seeking a lighter option, consider using reduced-fat cream cheese, which works equally well without sacrificing flavor.
Chocolate Chips
To coat the Oreo Bliss Balls, chocolate chips are a must. You have the option to choose from different types of chocolate—dark, milk, or white—depending on your preference. Dark chocolate adds a deeper, more intense flavor, while milk chocolate offers sweetness and creaminess. White chocolate, on the other hand, provides a beautiful contrast and a sweeter finish. The choice of chocolate not only impacts the taste but also the appearance of the finished product, making it an important consideration in the recipe.
Coconut Oil
While coconut oil is optional, it can significantly enhance your chocolate coating. When melted with the chocolate chips, coconut oil helps to achieve a smooth and shiny finish that makes the Oreos look professionally crafted. Additionally, using coconut oil can prevent the chocolate from hardening too quickly, giving you more time to work with it. If you’re looking for a subtle tropical flavor, coconut oil can also add a hint of sweetness that complements the Oreos beautifully.
Decorative Toppings
To elevate your Oreo Bliss Balls, consider adding decorative toppings. Options include colorful sprinkles, crushed Oreos, or even finely chopped nuts. These toppings not only provide a fun visual element but also contribute additional texture and flavor. Sprinkles can add a festive touch for celebrations, while crushed Oreos enhance the overall Oreo experience. Feel free to get creative with your toppings to match the occasion or your personal style.
Step-by-Step Instructions
Now that you’re acquainted with the key ingredients, let’s dive into the detailed step-by-step instructions for making Oreo Bliss Balls. Follow these guidelines to ensure a smooth preparation process and delicious results.
1. Crushing the Oreos
The first step in creating Oreo Bliss Balls is to crush the Oreo cookies. This can be done using a food processor, which is the easiest method, or by placing the cookies in a resealable plastic bag and crushing them with a rolling pin. The goal is to achieve a fine powder, as this will ensure the best texture for your bliss balls. If you prefer a bit of crunch, you can leave some larger pieces, but be mindful that too many chunks may affect the binding process.
2. Combining Ingredients
Once you have your crushed Oreos, it’s time to bring the ingredients together. In a mixing bowl, combine the crushed Oreos with softened cream cheese. Using a spatula or your hands, mix the ingredients until they are fully incorporated and form a cohesive dough. The mixture should be thick enough to hold together when rolled into balls. If it feels too dry, a little extra cream cheese can help achieve the desired consistency.
3. Shaping the Balls
With your dough ready, it’s time to shape it into balls. Use a tablespoon or small cookie scoop to portion the mixture, ensuring that each ball is roughly the same size for even coating. Roll each portion between your palms to create smooth, round balls. This step is crucial, as even-sized balls will cook uniformly and look visually appealing. Once shaped, place the balls on a baking sheet lined with parchment paper.
4. Chilling Process
Before coating the Oreo Bliss Balls in chocolate, it’s essential to chill them. Refrigerate the balls for at least 30 minutes, or until they are firm enough to handle. Chilling allows the cream cheese to set, making it easier to dip or coat them in melted chocolate. This step is vital for maintaining the shape of the balls during the coating process.
5. Melting the Chocolate
While the bliss balls are chilling, you can prepare the chocolate coating. There are two common methods for melting chocolate: using a microwave or a double boiler. If using a microwave, place the chocolate chips (and coconut oil, if using) in a microwave-safe bowl and heat in 30-second intervals, stirring in between, until fully melted and smooth. If you prefer the double boiler method, fill a saucepan with a few inches of water and bring it to a simmer. Place a heatproof bowl over the saucepan, ensuring it doesn’t touch the water, and add the chocolate chips. Stir until melted and smooth.
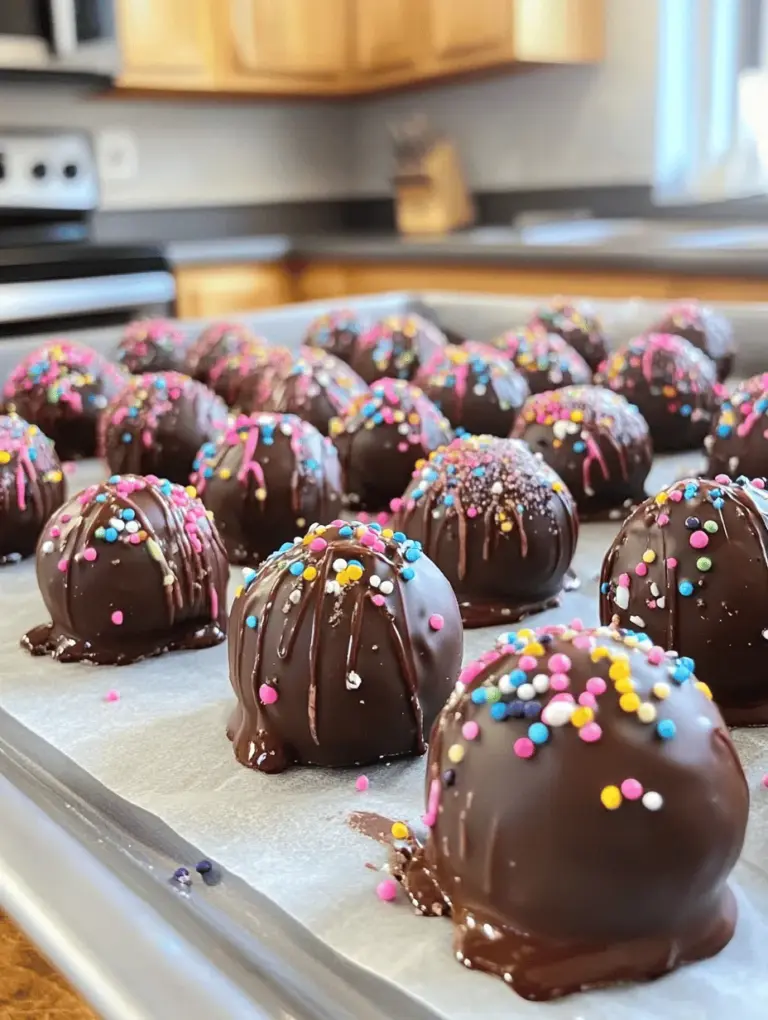
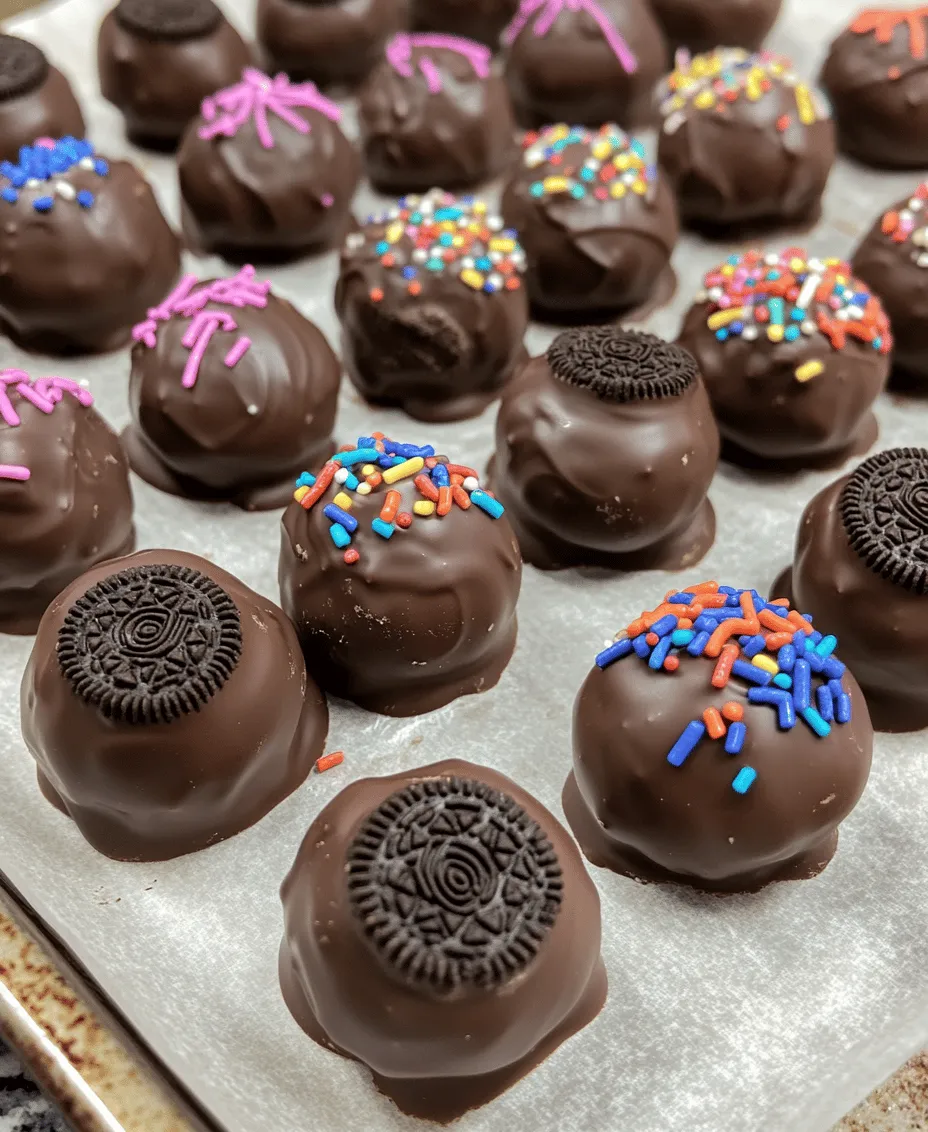
Once the chocolate is melted, it’s time to coat the bliss balls. Make sure to work quickly, as chocolate can set fast. Dip each chilled ball into the melted chocolate, using a fork to lift it out and allowing the excess chocolate to drip off. Place the coated balls back onto the parchment-lined baking sheet. This is your opportunity to sprinkle on any decorative toppings before the chocolate hardens.
With these initial steps, you’re well on your way to creating delicious Oreo Bliss Balls that are sure to please everyone. The combination of flavors and textures will leave a lasting impression, making them a memorable addition to any gathering or a delightful treat for yourself. In the next part of this article, we will cover additional tips for achieving the best results, along with answers to common questions about Oreo Bliss Balls. Stay tuned for more sweet inspiration!
Dipping Technique
To achieve the perfect finish for your Oreo Bliss Balls, mastering the dipping technique is essential. Begin by melting your chocolate coating, whether it’s dark, milk, or a white chocolate variant. Use a microwave-safe bowl and heat the chocolate in short bursts of 15-20 seconds, stirring in between to prevent it from burning. Once your chocolate is smooth and completely melted, it’s time to dip your bliss balls.
Using a fork or a toothpick, carefully lower each ball into the melted chocolate. Ensure that the ball is fully submerged, allowing the chocolate to coat it evenly. Lift it out and gently tap the fork against the edge of the bowl to let any excess chocolate drip off. Be careful not to pierce the ball; you want to maintain its integrity. For a smooth finish, you can also swirl the ball around a bit in the chocolate before lifting it out.
Once coated, place the dipped bliss balls on a parchment-lined baking sheet. This method not only protects your surface but also ensures that the chocolate doesn’t stick. Remember, consistency is key; if the chocolate is too thick, it may not adhere well to the balls, while too thin may result in a poor coating.
Decorating
Now that your Oreo Bliss Balls are dipped, it’s time to elevate their visual appeal with some creative decorations. Here are a few fun ideas:
1. Drizzle: Melt some contrasting chocolate (like white chocolate if you used dark) and use a fork to drizzle it over the coated bliss balls for a professional touch.
2. Crushed Oreos: Before the chocolate sets, sprinkle crushed Oreo crumbs on top of each ball for an extra Oreo flavor and a visually striking effect.
3. Sprinkles: Use colorful sprinkles to give your bliss balls a festive appearance, perfect for parties or celebrations.
4. Nuts or Coconut: For texture, consider rolling some of the balls in crushed nuts or shredded coconut before the chocolate hardens.
5. Edible Glitter: For a touch of glam, sprinkle edible glitter over the chocolate layer to give your treats a sparkling finish.
These simple decorations not only enhance the visual appeal but also allow you to customize your Oreo Bliss Balls for any occasion, whether it’s a birthday party or a cozy movie night.
Final Chill
After decorating, it’s crucial to allow the chocolate to set properly. Place the baking sheet with your Oreo Bliss Balls in the refrigerator for at least 30 minutes. This final chill is important as it helps the chocolate harden, giving the bliss balls their signature look and ensuring that they are easy to handle when serving. Plus, chilling enhances the flavor meld, making every bite even more delicious.
Nutritional Information
Understanding the nutritional profile of Oreo Bliss Balls can help you enjoy them as part of a balanced diet. Each bliss ball typically contains around 100 calories, depending on the size and specific ingredients used.
Nutritional Breakdown (per ball):
– Calories: 100
– Total Fat: 5g (Saturated Fat: 3g)
– Cholesterol: 10mg
– Sodium: 50mg
– Total Carbohydrates: 14g (Dietary Fiber: 0g, Sugars: 9g)
– Protein: 1g
While these treats are indulgent, enjoying them in moderation can fit into a healthy lifestyle. Pairing them with fresh fruit or nuts can provide balance, and serving them on special occasions can make them feel even more special.
Storage and Shelf Life
To keep your Oreo Bliss Balls fresh and delicious, proper storage is essential. Place the bliss balls in an airtight container and store them in the refrigerator. When stored this way, they can last for up to a week without losing flavor or texture.
For those looking to prepare in advance, Oreo Bliss Balls freeze beautifully. Simply layer them in an airtight container with parchment paper between each layer to prevent sticking. They can be frozen for up to three months. When you’re ready to enjoy them, simply transfer the desired amount to the refrigerator a few hours before serving to allow them to thaw.
Variations and Customizations
One of the best aspects of Oreo Bliss Balls is their versatility. Here are some delightful variations to consider:
– Flavor Additions: Incorporate flavor extracts such as mint or almond into the cream cheese mixture for a twist. A teaspoon of peanut butter can also be mixed in for a nutty flavor.
– Different Cookies: While Oreos are a classic choice, feel free to experiment with other cookie types. Chocolate chip cookies, vanilla wafers, or even graham crackers can create unique flavor profiles.
– Healthier Alternatives: For a lighter version, consider using reduced-fat cream cheese or opting for sugar-free Oreos. You can also substitute part of the cream cheese with Greek yogurt for added protein without compromising taste.
Oreo Bliss Balls in Popular Culture
Oreo-based desserts have gained immense popularity in recent years, with social media platforms showcasing countless variations of this beloved cookie. From TikTok trends to Pinterest boards, Oreo Bliss Balls have secured a spot as a favorite among dessert enthusiasts. Their visual appeal, combined with the rich flavor of Oreos, makes them a hit at gatherings, parties, and family celebrations.
Food blogs and culinary shows often highlight the versatility of Oreos, and with the rise of dessert-themed accounts on Instagram, these bliss balls have become a staple in many kitchens. Their simple recipe and delicious results make them an ideal treat for anyone looking to impress guests or indulge in a sweet snack.
Conclusion
The joy of making and sharing Oreo Bliss Balls is undeniable. Their simplicity and the delightful combination of flavors make them a versatile option for any occasion. Whether you’re preparing them for a festive gathering, a cozy night in, or simply to satisfy your sweet tooth, these indulgent bites are sure to bring smiles all around.
Encourage your friends and family to join in the fun of making Oreo Bliss Balls. The process is not just about creating a delicious treat but also about enjoying the shared experience of baking and decorating together. So, gather your ingredients, unleash your creativity, and savor the delightful experience of making these blissful snacks!