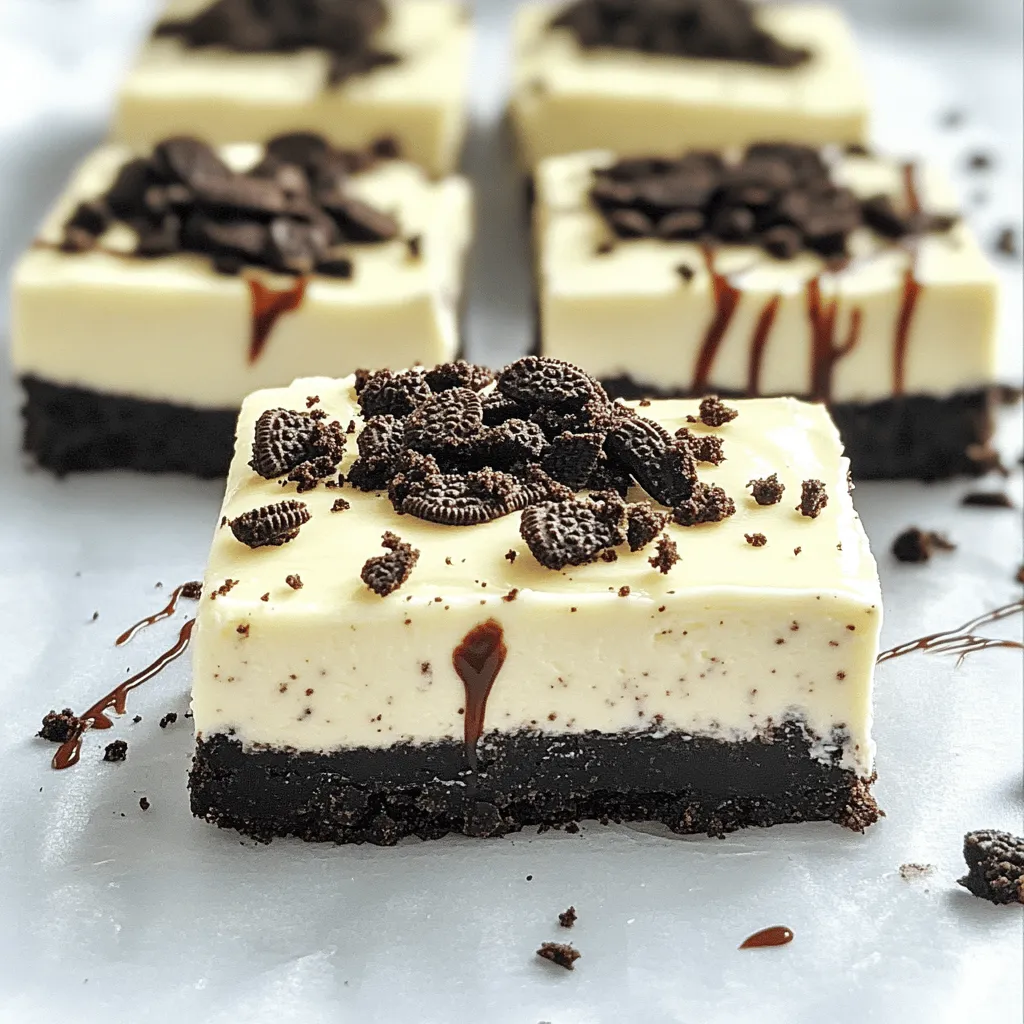
Looking for a dessert that’s easy to make and tastes amazing? You’ve found it! My No-Bake Oreo Cheesecake Bars are the perfect treat for any occasion. With just a handful of ingredients, you can whip up this creamy, crunchy delight in no time. Plus, they require no baking, making them a fun option for everyone, even kids! Ready to impress your friends and family? Let’s dive into the recipe!
Why I Love This Recipe
- Easy to Make: This no-bake cheesecake bars recipe is simple and requires minimal effort, making it perfect for any occasion.
- Creamy Texture: The combination of cream cheese and whipped cream creates a rich, velvety filling that melts in your mouth.
- Oreo Goodness: With crushed Oreos in both the crust and filling, these bars are a chocolate lover’s dream come true.
- Perfect for Sharing: Cut into squares and served chilled, these bars are ideal for parties or gatherings, making sharing easy and enjoyable.
Ingredients
List of Ingredients for No-Bake Oreo Cheesecake Bars
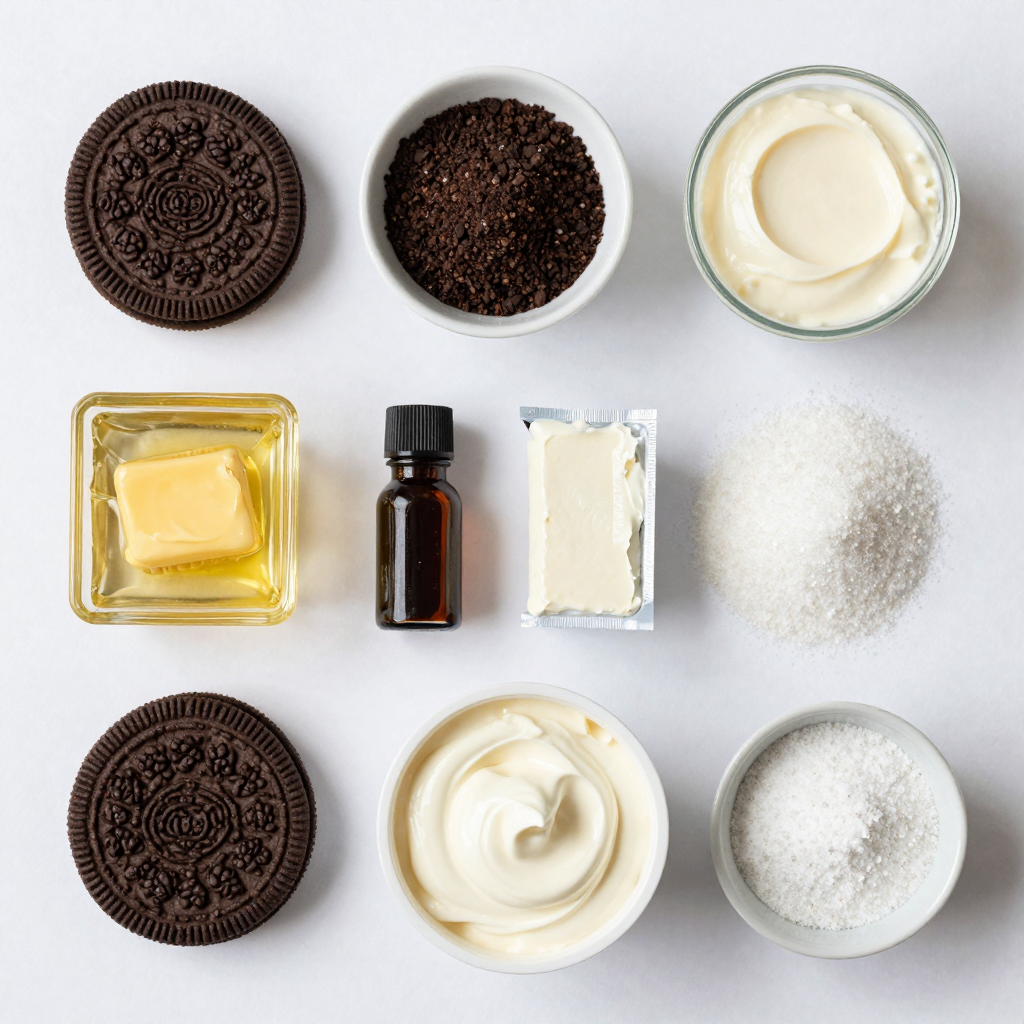
To make these tasty bars, gather the following ingredients:
– 24 Oreo cookies (plus extra for topping)
– 1/4 cup unsalted butter, melted
– 16 oz (2 packages) cream cheese, softened
– 1/2 cup granulated sugar
– 1 teaspoon vanilla extract
– 1 cup heavy whipping cream
– 1/4 cup powdered sugar
– Pinch of salt
These ingredients blend together to create a rich and creamy dessert. Each part plays a vital role in building the flavor and texture.
Optional Toppings and Garnishes
You can add fun toppings to make your cheesecake bars even better. Here are some ideas:
– Crushed Oreo cookies for extra crunch
– Whipped cream for a light finish
– Chocolate syrup for a sweet drizzle
– Fresh berries for a fruity touch
These options can change the look and taste. You can mix and match to find your favorite!
Ingredient Substitutions
Sometimes, you may need to swap ingredients. Here are some easy replacements:
– For cream cheese, try mascarpone or Greek yogurt.
– Use dairy-free cream cheese for a vegan option.
– Swap regular Oreo cookies with gluten-free ones.
– If you don’t have heavy cream, use coconut cream instead.
These substitutions can fit your taste and dietary needs while keeping the bars delicious.
Step-by-Step Instructions
Preparation of the Crust
To start, you need to make the crust. Take 24 Oreo cookies and crush them in a food processor. Aim for fine crumbs. Then, mix these crumbs with 1/4 cup of melted butter. Stir until the mixture looks like wet sand. Next, line an 8×8 inch baking dish with parchment paper. Leave some paper hanging over the edges. This helps with easy removal later. Press the cookie mixture firmly into the bottom of the dish. Make sure it is even and compact. Place the dish in the fridge while you prepare the filling.
Making the Cheesecake Filling
Now, it’s time for the filling. In a large bowl, beat 16 oz of softened cream cheese with 1/2 cup of granulated sugar. Add 1 teaspoon of vanilla extract. Mix until it’s smooth and creamy. In another bowl, pour in 1 cup of heavy whipping cream and add 1/4 cup of powdered sugar. Whip this until stiff peaks form. This step is key for a light texture. Gently fold the whipped cream into the cream cheese mixture. Be careful not to deflate it. Then, fold in some coarsely chopped Oreo cookies for extra crunch.
Assembling and Chilling the Dessert
It’s time to put it all together. Spread the cheesecake filling evenly over your chilled Oreo crust. Use a spatula to smooth the top. Cover the dish with plastic wrap and place it back in the fridge. Let it chill for at least 4 hours. This helps the bars to set properly. When they are ready, lift them out using the parchment overhang. Cut into squares and sprinkle more Oreo crumbs on top. Enjoy your delicious no-bake Oreo cheesecake bars!
Pro Tips
- Use Cold Cream Cheese: Ensure your cream cheese is softened but not too warm to maintain the perfect texture in your filling.
- Chill Thoroughly: Allow the cheesecake bars to chill for a full 4 hours or overnight for the best texture and flavor.
- Customize with Toppings: Feel free to add different toppings like chocolate drizzle or whipped cream for an extra touch.
- Use a Sharp Knife: To achieve clean cuts, dip your knife in hot water and wipe it dry between slices.
Tips & Tricks
How to Achieve the Perfect Cheesecake Texture
To get that smooth, creamy texture, use room temperature cream cheese. Cold cream cheese makes lumps. Beat the cream cheese until it’s fluffy. Then, gently fold in the whipped cream. This keeps the mix light and airy. Always chill the bars long enough. They need at least 4 hours to set.
Common Mistakes to Avoid
One common mistake is rushing the chilling time. If you cut the bars too soon, they will fall apart. Another mistake is not crushing the Oreos finely enough. Large pieces won’t hold the crust well. Lastly, avoid overmixing the filling. This can make the cheesecake dense instead of creamy.
Recommended Tools for Success
For this recipe, a food processor is key. It makes crushing Oreos quick and easy. A large mixing bowl helps when you beat the cream cheese. Use a spatula to fold in the whipped cream gently. Parchment paper is also handy for easy removal.
Variations
Flavor Variations
You can switch up the flavor of your No-Bake Oreo Cheesecake Bars to keep things fun. Try a mint chocolate version by adding mint extract to the filling. Mix in some chopped mint Oreos for a cool twist. For a peanut butter flavor, substitute half of the cream cheese with peanut butter. This gives a rich, nutty taste that pairs well with Oreos. The options are endless, so feel free to get creative!
Alternative Crust Options
If you’re looking for a different crust, use graham crackers instead of Oreos. Crush them the same way. For a gluten-free option, almond flour or gluten-free cookies work great. You can also try a nut crust, using finely ground nuts combined with a bit of butter. Each crust adds a unique taste and texture to your bars.
Serving Suggestions
Serving these cheesecake bars can be a fun experience. Cut them into small squares for easy sharing. Top with whipped cream and extra Oreo crumbles for a nice touch. For a festive look, add fresh berries or a drizzle of chocolate sauce. Serve them at parties or family gatherings, and watch everyone smile with delight!
Storage Information
How to Store No-Bake Oreo Cheesecake Bars
To store your No-Bake Oreo Cheesecake Bars, first, let them chill completely in the fridge. Once they are set, cut them into squares. Place them in an airtight container. Keep the container in the fridge. This keeps the bars fresh and tasty.
Freezing and Thawing Instructions
You can freeze these cheesecake bars for later. Wrap each square in plastic wrap. Then, place them in a freezer-safe bag. This helps prevent freezer burn. When you want to eat them, take them out. Let them thaw in the fridge overnight for the best results.
Shelf Life and Best Practices
These cheesecake bars last about 5 days in the fridge. Make sure to check for any signs of spoilage before eating. If they look good and smell nice, they are safe to enjoy. For the best taste, eat them fresh. If you freeze them, they can last up to 2 months. Enjoy your dessert at its best!
FAQs
Can I make these bars ahead of time?
Yes, you can! These bars are perfect for making a day or two in advance. This allows the flavors to blend well. Just store them in the fridge until you’re ready to serve.
What can I use instead of cream cheese?
If you want a different option, try using mascarpone cheese or ricotta cheese. Both give a nice creamy texture. They also add a unique flavor twist to your bars.
How long do these bars need to chill?
These bars need to chill for at least 4 hours. This time helps the cheesecake filling set properly. If you can wait longer, it will taste even better!
Is there a dairy-free version of this recipe?
Yes! You can use dairy-free cream cheese or coconut cream. These swaps work well and keep the bars rich and creamy. Just make sure your cookies are also dairy-free.
Why is my cheesecake filling not setting?
If your filling is not setting, it could be due to a few reasons. Maybe the cream cheese wasn’t soft enough or the whipped cream wasn’t whipped to stiff peaks.
You learned how to make No-Bake Oreo Cheesecake Bars. We covered the key ingredients, preparation steps, and tips for success. Variations let you customize this treat. You can store them easily, ensuring they’re ready to enjoy later.
Now, you can impress your friends and family with this simple dessert. Enjoy experimenting and making it your own!