Looking for a dinner option that’s both tasty and simple? Spinach and feta stuffed chicken checks all the boxes! This dish brings juicy chicken and a rich, creamy filling together. Perfect for impressing guests or enjoying a cozy night in. In this guide, I’ll show you how to make this delicious meal, step by step. Get ready to add some flavor to your dinner table!
Why I Love This Recipe
- Delicious Flavor Combination: The pairing of spinach and feta creates a rich and tangy filling that complements the chicken perfectly.
- Healthy Ingredients: This recipe is packed with nutritious spinach and lean chicken, making it a wholesome meal option.
- Easy to Prepare: With simple steps and readily available ingredients, this dish can be made by home cooks of all skill levels.
- Impressive Presentation: Serving this stuffed chicken will surely wow your guests, making it a great choice for dinner parties or special occasions.
Ingredients
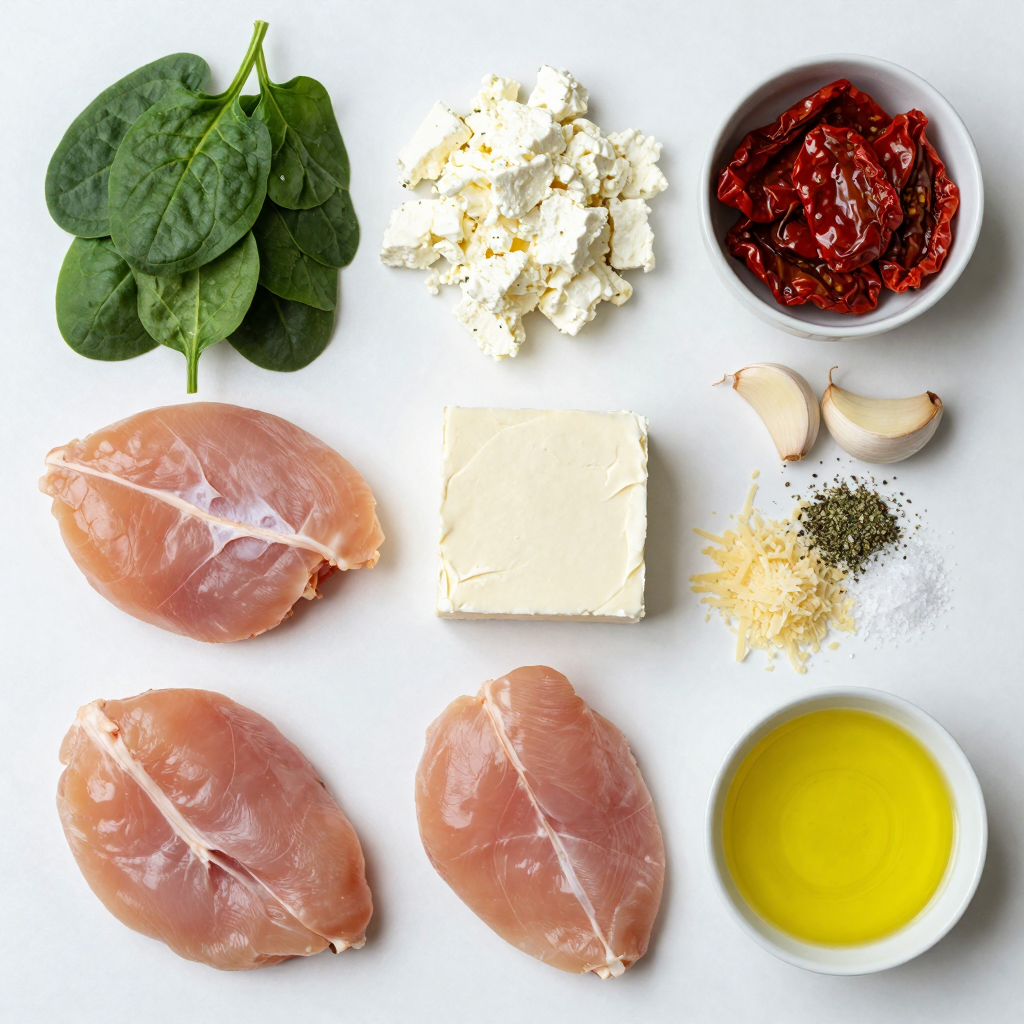
Detailed list of ingredients
– 4 boneless, skinless chicken breasts
– 2 cups fresh spinach, chopped
– 1 cup feta cheese, crumbled
– 1 cup cream cheese, softened
– 2 cloves garlic, minced
– 1/4 cup sun-dried tomatoes, chopped (optional)
– 1 teaspoon dried oregano
– 1 teaspoon salt
– 1/2 teaspoon black pepper
– 2 tablespoons olive oil
– 1/4 cup grated Parmesan cheese (for topping)
Notes on ingredient selection
Choosing the right spinach can make a big difference. Fresh spinach has a better taste and texture than frozen spinach. Always wash it well before chopping.
Feta cheese adds a salty, tangy flavor. Look for high-quality feta for the best taste. You can try sheep’s milk feta for a creamier option.
Cream cheese keeps the filling smooth. If you’re looking for a lighter choice, you can swap it for Greek yogurt. It adds creaminess with fewer calories.
These simple choices enhance your dish, making your spinach and feta stuffed chicken shine.
Step-by-Step Instructions
Preparation steps
Preheating the oven
Set your oven to 375°F (190°C). This step ensures your chicken cooks evenly.
Preparing the spinach and feta mixture
In a medium bowl, combine:
– 2 cups fresh spinach, chopped
– 1 cup feta cheese, crumbled
– 1 cup cream cheese, softened
– 2 cloves garlic, minced
– 1/4 cup sun-dried tomatoes, chopped (optional)
– 1 teaspoon dried oregano
– 1 teaspoon salt
– 1/2 teaspoon black pepper
Mix these ingredients well until they form a creamy filling. This blend adds great flavor to your chicken.
Cooking instructions
Slicing chicken breasts for stuffing
Take each of your 4 boneless, skinless chicken breasts. Carefully slice them horizontally to create a pocket. Make sure not to cut all the way through; you want a nice space for the filling.
Searing chicken in a skillet
Heat 2 tablespoons of olive oil in a large oven-safe skillet over medium heat. Once hot, add your stuffed chicken breasts. Sear them for about 4-5 minutes on each side until they are golden brown. This step locks in moisture and flavor.
Baking the stuffed chicken
After searing, sprinkle 1/4 cup of grated Parmesan cheese on top of each breast. Then, transfer the skillet to your preheated oven. Bake for 20-25 minutes or until the chicken reaches an internal temperature of 165°F (74°C). This ensures your chicken is fully cooked and safe to eat.
Tips for ensuring chicken is cooked through
Checking internal temperature
Use a meat thermometer to check the thickest part of the chicken. It should reach 165°F (74°C) for safe consumption. This step is key to avoid any undercooked meat.
Importance of resting time
After removing the chicken from the oven, let it rest for 5 minutes before slicing. This resting period allows the juices to redistribute, making your chicken more tender and juicy.Enjoy your cooking!
Pro Tips
- Use Fresh Ingredients: Fresh spinach and high-quality feta cheese will enhance the flavor of the dish significantly.
- Don’t Overstuff: Be careful not to overstuff the chicken breasts as this can make them difficult to sear and may cause the filling to spill out during cooking.
- Let it Rest: Allowing the chicken to rest for a few minutes after baking helps the juices redistribute, making for a more tender and juicy chicken.
- Experiment with Herbs: Feel free to add or substitute herbs like basil or thyme to complement the flavors of the spinach and feta mixture.
Tips & Tricks
Cooking tips for perfect stuffed chicken
To avoid dry chicken, use a meat thermometer. Cook the chicken until it reaches 165°F. This ensures juiciness while keeping it safe to eat. Also, let the chicken rest for a few minutes after baking. This keeps the juices inside.
Seasoning is crucial. Use salt and pepper inside the filling. A little extra salt on the outside helps, too. You can add herbs like oregano or thyme for more flavor.
Serving suggestions
Pair your stuffed chicken with sides like quinoa or steamed veggies. A fresh salad also works well. For a beautiful plate, serve the chicken on a bed of rice. Garnish with fresh herbs or lemon wedges for a pop of color. This makes the dish more appealing.
Common mistakes to avoid
One common mistake is overstuffing the chicken. If you pack too much filling inside, the chicken won’t cook evenly. It may also burst while cooking.
Using too much heat during searing can dry out the chicken, too. Keep the heat medium instead of high. This helps the chicken brown while staying moist. Following these tips will help you create a delicious meal that impresses everyone.
Variations
Ingredient swaps
You can swap goat cheese for feta. Goat cheese adds a tangy twist. You might also want to add fresh herbs like basil or dill for extra flavor. These herbs can enhance the dish and add freshness.
Flavor enhancements
Spices can boost the flavor of your chicken. Try adding paprika for warmth or cayenne for heat. Nuts like pine nuts or walnuts add crunch. Just sprinkle them on top or mix them into the stuffing.
Vegetarian alternative
For a meat-free option, use different veggies as stuffing. Try mushrooms, zucchini, or bell peppers. You can also use tofu or tempeh instead of chicken. These options are tasty and keep the meal balanced.
Feel free to get creative with this dish!
Storage Info
How to store leftovers
To keep your Spinach and Feta Stuffed Chicken fresh, store it in the fridge. Use airtight containers for best results. This helps prevent moisture loss and keeps flavors intact. Make sure to cool the chicken to room temperature before sealing it. Store it in the fridge for up to three days.
Reheating tips
When reheating, the goal is to keep the chicken moist. The best way to do this is in the oven. Preheat the oven to 350°F (175°C). Place the chicken in a baking dish and cover it with foil. This traps steam and keeps it juicy. Heat for about 15-20 minutes, or until warm throughout. You can also use a microwave, but be careful not to overcook.
Freezing for future meals
To freeze your stuffed chicken, wrap each piece tightly in plastic wrap. Then, place it in a freezer bag. Remove as much air as possible. This helps prevent freezer burn. You can freeze it for up to three months. To thaw, place the chicken in the fridge overnight. For reheating, use the oven again to maintain moisture. This keeps your meal as delicious as when you first made it.
FAQs
Can I make Spinach and Feta Stuffed Chicken ahead of time?
Yes, you can prepare the stuffed chicken in advance. First, follow the steps to mix the spinach and feta filling. Stuff the chicken breasts, then cover them tightly. You can store them in the fridge for up to 24 hours before cooking. This makes it easy to whip up a tasty meal on a busy day. Just remember, if you prepare it ahead of time, let it sit at room temperature for about 15 minutes before cooking. This helps the chicken cook evenly.
What can I serve with it?
This dish pairs well with many sides. Here are some great options:
– Quinoa or rice to soak up the juices
– A fresh green salad for crunch
– Roasted or steamed vegetables for color
– Garlic bread for a hearty touch
These sides not only complement the flavors but also add balance to your meal.
Can I grill instead of bake?
Absolutely! Grilling adds a nice smoky flavor. Here’s how to do it:
1. Preheat your grill to medium heat.
2. Stuff the chicken breasts as usual.
3. Use toothpicks to secure the openings, if needed.
4. Brush the chicken with olive oil to prevent sticking.
5. Place the stuffed chicken on the grill. Cook for about 6-7 minutes per side.
6. Check that the chicken reaches an internal temperature of 165°F (74°C).
Grilling gives a delicious char that enhances the dish.
In this blog, we explored how to make Spinach and Feta Stuffed Chicken. We discussed the key ingredients, giving tips on quality and alternatives. Then, we provided step-by-step instructions for preparation and cooking, along with tips to avoid common mistakes. We also covered storage methods and variations to keep things fresh.
Overall, making this dish can be simple and enjoyable. With practice, your meals can impress family and friends. Try these tips, and enjoy your cooking!