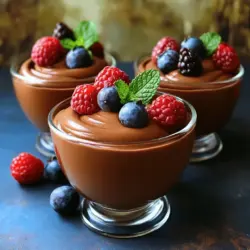
Dairy-Free Chocolate Mousse
Indulge in a delightful Dairy-Free Chocolate Mousse that's smooth, velvety, and easy to make! With simple ingredients like chilled coconut milk and rich dark chocolate, this vegan dessert is perfect for impressing guests or treating yourself. Discover tips for achieving the perfect texture and creative serving ideas that add flair. Ready to whip up this irresistible treat?