Go Back
- 1 cup creamy peanut butter - 1/2 cup unsweetened cocoa powder - 1/2 cup honey or maple syrup - 2 large eggs - 1/4 teaspoon salt - 1/2 teaspoon vanilla extract - 1/2 cup mini chocolate chips - 12 mini peanut butter cups, halved For this recipe, you can swap honey for maple syrup if you prefer. Both options add sweetness but give a different taste. You can also try crunchy peanut butter for more texture. This gives your brownie bites a nice crunch. If you want to reduce sugar, use a sugar-free sweetener that works for baking. When choosing peanut butter, I love using brands like Jif or Skippy. They offer a smooth texture that blends well. For cocoa powder, Hershey’s is a great choice for rich flavor. I recommend Ghirardelli for chocolate chips. Their mini chips melt perfectly and add a delightful taste. Start by preheating your oven to 350°F (175°C). This step is key to baking. Next, grab a mini muffin tin. Line each cup with paper liners. This makes it easier to remove the bites later. You want to ensure each bite stays intact when you serve them. In a large bowl, combine the creamy peanut butter and unsweetened cocoa powder. Add honey or maple syrup, along with the eggs, salt, and vanilla extract. Stir until you have a smooth batter. This mix is rich and full of flavor. Now, gently fold in the mini chocolate chips. They add a nice surprise in every bite. Scoop the batter into the lined muffin tins. Fill each cup halfway. This allows space for the peanut butter cups. Place half a mini peanut butter cup on top of each brownie. Press it down slightly into the batter. Bake in the oven for 12-15 minutes. The edges should look set. Use a toothpick to check the center. If it comes out clean, they’re ready! Let the bites cool in the tin for about 5 minutes. Then, move them to a wire rack to cool completely. Baking time is key for great brownie bites. I bake mine for 12 to 15 minutes. Check them at 12 minutes. The edges should look set. A toothpick should come out clean but not dry. If it comes out with wet batter, they need more time. Remember, they will firm up as they cool. One common mistake is over-mixing the batter. This can lead to tough brownie bites. Mix just until smooth. Another mistake is not using the right oven temperature. Always preheat your oven. Using a hot oven gives the best rise and texture. Also, don’t skip the paper liners. They help with easy removal. To ensure the perfect brownie bite, focus on the peanut butter cups. Press them in gently, but do not sink them all the way down. This keeps the chocolate warm and melty. Use good quality cocoa powder for rich flavor. Lastly, let them cool properly before you dig in. This helps them set and taste amazing! {{image_2}} You can switch up the flavor by using different types of peanut butter cups. Try dark chocolate, white chocolate, or even flavored cups like caramel or mint. Each type brings a unique taste to your brownie bites. If you use dark chocolate cups, the treats become rich and deep. For a fun twist, mix and match flavors for an exciting surprise in every bite. You can use different sweeteners to change the taste and health profile. Instead of honey, try agave or coconut sugar. These options can give a different flavor and sweetness. If you want a thicker batter, add a bit of almond flour or oat flour. This change helps create a chewier texture. Always remember to adjust the amount based on the sweetness level you prefer. Mix-ins can enhance your brownie bites. Consider adding chopped nuts, dried fruit, or even coconut flakes. Each addition will bring new flavors and textures. For a chocolate lover's dream, toss in more chocolate chips or chunks. If you want a fruity touch, add fresh berries or banana slices. Get creative with your mix-ins and make these treats your own! To keep your peanut butter cup brownie bites fresh, store them in an airtight container. Place parchment paper between layers to prevent sticking. Keep the container in a cool, dry place. This helps keep the bites soft and tasty. If you live in a warm area, consider refrigerating them to maintain freshness. Freezing is a great way to save your treats. First, let the brownie bites cool completely. Then, place them on a baking sheet in a single layer. Freeze them for about two hours. Once frozen, transfer them to a freezer bag. Seal it tightly, removing as much air as possible. They can stay frozen for up to three months. These brownie bites last for about a week at room temperature. If stored in the fridge, they can last up to two weeks. To reheat, place them in the microwave for about 10 seconds. This will make them warm and gooey again. For a crispy edge, pop them in the oven at 350°F for a few minutes. Enjoy them warm for the best taste! Yes, you can use crunchy peanut butter. It adds a nice texture. The bites will have little nutty bits that make them fun. Just remember, it may change the creaminess a bit. I love the mix of flavors you get with crunchy peanut butter. Check the edges of the brownie bites. They should look set but not dry. Insert a toothpick into the center. If it comes out clean or with a few moist crumbs, they are ready. Keep an eye on the time. They usually take 12 to 15 minutes. These brownie bites shine on their own. You can serve them with whipped cream for a light touch. A drizzle of melted chocolate adds extra joy. For a fun twist, try pairing them with vanilla ice cream. It really makes this treat special! You learned how to make delicious peanut butter cup brownie bites. We covered the key ingredients, measurement tips, and suggested brands. I shared step-by-step instructions to prep, mix, and bake. We also discussed storage methods and answered common questions. Remember to avoid common mistakes for perfect bites. Feel free to try different flavors and mix-ins. Enjoy baking these treats, and share them with friends!

Peanut Butter Cup Brownie Bites

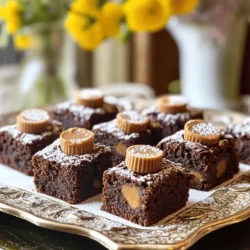
Indulge in the rich goodness of Peanut Butter Cup Brownie Bites, a delightful treat that combines creamy peanut butter with chocolatey goodness! These easy-to-make bites are perfect for any occasion, and they're ready in just 25 minutes. With simple ingredients like cocoa powder and mini chocolate chips, you'll love how quick and delicious they are.

Ingredients
  

1 cup creamy peanut butter

1/2 cup unsweetened cocoa powder

1/2 cup honey or maple syrup

2 large eggs

1/4 teaspoon salt

1/2 teaspoon vanilla extract

1/2 cup mini chocolate chips

12 mini peanut butter cups, halved

Instructions
 

Preheat your oven to 350°F (175°C) and line a mini muffin tin with paper liners.

    In a large mixing bowl, combine the creamy peanut butter, unsweetened cocoa powder, honey (or maple syrup), eggs, salt, and vanilla extract. Mix until smooth and well combined.

      Fold in mini chocolate chips gently into the batter.

        Scoop the brownie batter into the mini muffin tins, filling each cup about halfway.

          Place a halved mini peanut butter cup on top of each brownie bite, pressing down slightly to settle it into the batter.

            Bake in the preheated oven for 12-15 minutes or until the edges look set and a toothpick inserted into the batter comes out clean.

              Allow the brownie bites to cool in the tin for about 5 minutes before transferring them to a wire rack to cool completely.

                Prep Time: 10 minutes | Total Time: 25 minutes | Servings: 24 brownie bites

                  - Presentation Tips: Arrange the brownie bites on a decorative platter and dust with powdered sugar for an elegant touch. Consider serving with dollops of whipped cream or a drizzle of melted chocolate for extra indulgence!