
Introduction
Cinnamon rolls are more than just a pastry; they are a beloved treat that has graced breakfast tables and dessert platters for generations. The soft, pillowy texture combined with the warm, spicy aroma of cinnamon makes them a comfort food that transcends age and occasion. Whether enjoyed on a lazy Sunday morning, served during festive gatherings, or simply as a sweet indulgence on a regular weekday, homemade cinnamon rolls hold a special place in our hearts.
Baking cinnamon rolls from scratch is not just about creating a delicious treat; it’s about the experience—the joy of kneading dough, the anticipation of watching it rise, and the sheer bliss of pulling a warm batch out of the oven. As the sweet scent wafts through your home, it draws everyone in, creating a cozy atmosphere that feels like a warm hug. This recipe invites you to embrace the art of baking and discover the satisfaction that comes from crafting your very own heavenly cinnamon rolls.
The Allure of Homemade Cinnamon Rolls
While store-bought cinnamon rolls may offer convenience, they simply cannot compete with the charm and flavor of homemade versions. When you make cinnamon rolls at home, you have complete control over the ingredients, allowing you to create a treat that is not only fresher but also tailored to your tastes. The moment you start mixing flour, sugar, and butter, you’ll understand why baking from scratch is an unparalleled experience.
One of the most enchanting aspects of baking cinnamon rolls is the aroma that fills your kitchen. There’s a certain warmth that accompanies the scent of dough rising and cinnamon baking in the oven—one that can evoke cherished memories and create new ones. This sensory experience is a reminder that food is not just about nourishment; it’s about connection and comfort.
Moreover, this recipe offers incredible versatility and customization options. You can experiment with different fillings, such as nuts, chocolate, or even fruit, and add various toppings, from cream cheese frosting to a simple glaze. The possibilities are endless, allowing you to adapt the rolls to suit your preferences or the occasion, whether it’s a holiday brunch or an afternoon treat.
Ingredient Spotlight
To create the perfect heavenly cinnamon rolls, you’ll need a selection of key ingredients that work together to achieve the ideal texture and flavor. Here’s a closer look at each ingredient and its role in this delicious recipe:
– All-Purpose Flour: This is the foundation for the dough. A good quality all-purpose flour provides the right amount of structure and elasticity, allowing the rolls to rise beautifully while remaining tender and fluffy.
– Active Dry Yeast: Yeast is the magic ingredient that causes the dough to rise, creating those delightful layers we all love in a cinnamon roll. Activating the yeast properly is crucial; it ensures that your rolls are light and airy rather than dense.
– Whole Milk: Using whole milk adds moisture and richness to the dough, resulting in a soft and tender roll. The fat content in whole milk also enhances the flavor, making each bite irresistible.
– Unsalted Butter: This ingredient adds richness to both the dough and the filling. It helps create a soft texture in the rolls while also providing that delectable buttery flavor that pairs perfectly with the sweetness of cinnamon and sugar.
– Brown Sugar and Cinnamon: These two ingredients are the heart of the sweet filling. Brown sugar contributes a subtle caramel flavor and moisture, while cinnamon delivers the warm, familiar spice that makes cinnamon rolls so special.
Step-by-Step Guide to Making Heavenly Cinnamon Rolls
Activating the Yeast
The first step in creating your heavenly cinnamon rolls is to activate the yeast. This process is essential for ensuring that your dough rises properly. Start by measuring out warm water—ideally between 100 to 110 degrees Fahrenheit. If the water is too hot, it can kill the yeast; too cold, and it won’t activate.
Sprinkle the active dry yeast over the warm water and let it sit for about 5 to 10 minutes. During this time, you should see the yeast begin to bubble and froth, indicating that it is alive and ready to work its magic in the dough. This bubbling action is a sign that the fermentation process is beginning, which will ultimately lead to light, fluffy rolls.
Mixing the Dough
Once your yeast is activated, it’s time to mix the dough. In a large mixing bowl, combine the activated yeast mixture with whole milk, melted unsalted butter, sugar, and salt. These ingredients will enhance the flavor and texture of your rolls.
Next, gradually add the all-purpose flour, one cup at a time, mixing until a shaggy dough forms. You can use a wooden spoon or a dough whisk for this step. The goal is to incorporate the flour without overworking the dough at this stage.
As the dough begins to come together, transfer it to a floured surface and start kneading. Kneading is crucial for developing gluten, which gives the dough its structure. Knead the dough for about 8 to 10 minutes, or until it becomes smooth and elastic. If the dough is sticking to your hands or the surface, feel free to sprinkle a little more flour as needed.
Once the dough is kneaded to perfection, place it in a lightly greased bowl, cover it with a clean cloth or plastic wrap, and let it rise in a warm place. This initial rise should take about 1 to 1.5 hours, or until the dough has doubled in size. This step is where the magic happens; the yeast will work to create air pockets within the dough, leading to the fluffy texture we all desire in cinnamon rolls.
—
Stay tuned for the next part of the article, where we’ll delve into rolling out the dough, creating the sweet filling, and baking these heavenly cinnamon rolls to perfection!
Kneading: Tips for Optimal Texture and Elasticity
Kneading is a crucial step in achieving the perfect cinnamon roll texture. This process helps to develop gluten in the dough, which gives the rolls their wonderful chewiness and structure. For optimal results, use the palm of your hand to push the dough down and away from you, then fold it back over itself. Rotate the dough a quarter turn and repeat this motion. Aim to knead for about 8 to 10 minutes until the dough is smooth and elastic.
One effective method to test if your dough is ready is the “windowpane test.” Take a small piece of dough and stretch it between your fingers. If it stretches thin enough to become translucent without tearing, you’ve achieved the right gluten development. Additionally, keep your work surface lightly floured to prevent sticking, but be cautious not to add too much flour, as it can dry out the dough.
First Rise: The Rising Process
Once kneaded, transfer the dough to a lightly oiled bowl, cover it with a clean kitchen towel or plastic wrap, and allow it to rise in a warm, draft-free area. This first rise, also known as proofing, typically takes about 1 to 2 hours, or until the dough has doubled in size.
Several factors can influence this process: the temperature of your kitchen, the ingredients’ freshness, and the yeast’s vitality. A warmer environment will speed up the rising, while cooler temperatures will slow it down. If your kitchen is on the colder side, you can create a warmer space by placing the bowl in an oven that has been preheated to the lowest setting for just a few minutes, then turned off.
Preparing the Filling: Creating Flavorful Goodness
While the dough is rising, it’s the perfect time to prepare the sweet cinnamon filling. In a medium bowl, combine softened butter, brown sugar, ground cinnamon, and a pinch of salt. The butter should be soft enough to spread easily but not melted. Mix until well combined to form a paste-like filling.
For added depth of flavor, consider incorporating some chopped nuts, such as pecans or walnuts, or even dried fruits like raisins or cranberries. These additions can provide delightful texture and complexity to your cinnamon rolls. Once your filling is ready, set it aside until the dough has completed its first rise.
Rolling and Cutting: Achieving Uniform Rolls
After the dough has risen, punch it down gently to release any air bubbles. On a lightly floured surface, roll the dough out into a large rectangle, approximately 16×12 inches. The thickness of the dough should be about 1/4 inch. Spread your cinnamon filling evenly over the dough, leaving a small border around the edges to prevent overflow when rolling.
To roll the dough, start from the long edge and carefully roll it up into a tight log. The tighter your roll, the better your cinnamon rolls will hold their shape during baking. Once rolled, use a sharp knife or dental floss to slice the log into 12 equal pieces. To ensure even rolls, you can first cut the log in half, then cut each half into six equal pieces.
Second Rise: Light and Fluffy Texture
Place the sliced rolls in a greased baking dish, ensuring that they are close together but not touching. Cover the dish with a towel or plastic wrap and let the rolls rise again for about 30 to 45 minutes. This second rise is essential for achieving a light and fluffy texture, as it allows the yeast to work its magic one more time before baking.
During this time, the rolls will expand and fill any gaps between them. It’s important not to skip this step; otherwise, your cinnamon rolls may turn out dense and heavy. Once the rolls have puffed up and touched each other, they are ready for the oven.
Baking: Indicators of Perfectly Baked Rolls
Preheat your oven to 350°F (175°C) before you start the baking process. Once the rolls have completed their second rise, it’s time to bake them. Place the dish in the center of the oven and set a timer for about 25 to 30 minutes.
To check if the cinnamon rolls are perfectly baked, look for a golden-brown color on top, and they should feel firm to the touch. You can also insert a toothpick in the center of one of the rolls; if it comes out clean or with a few moist crumbs, your rolls are done.
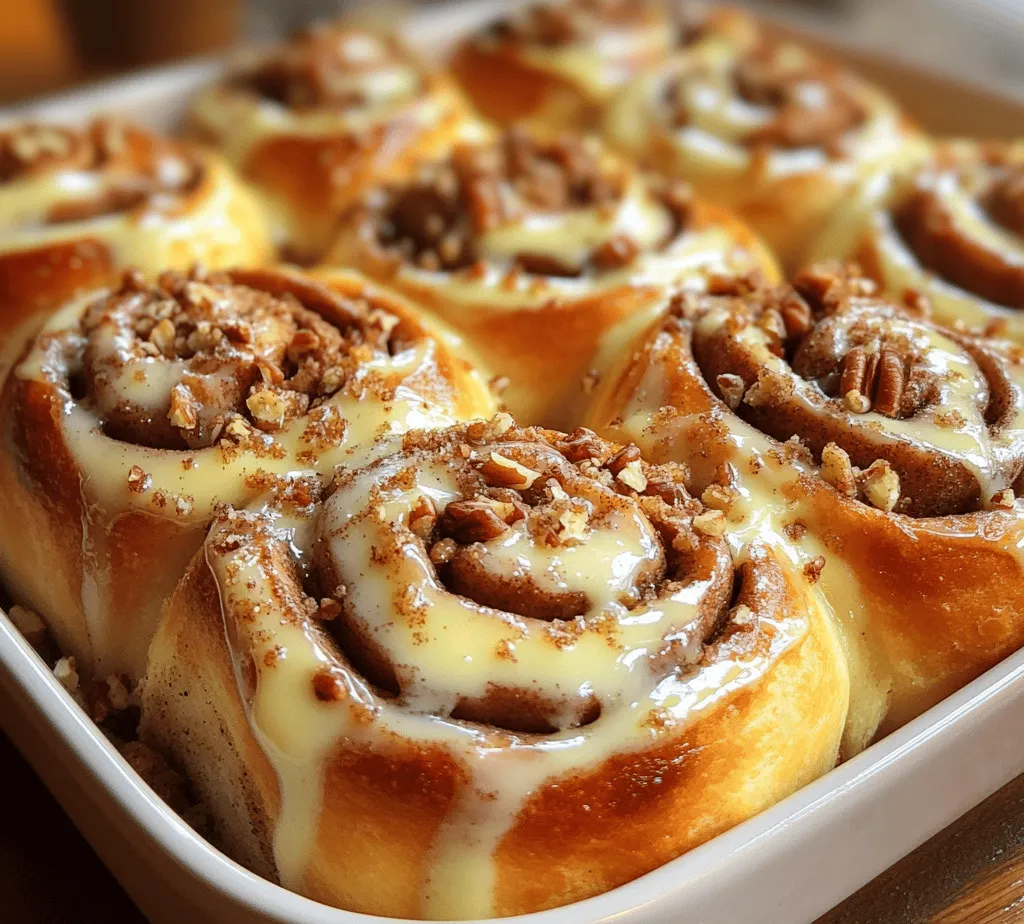
Allow the rolls to cool in the pan for about 10 minutes before adding the cream cheese glaze.
Creating the Cream Cheese Glaze
One of the highlights of homemade cinnamon rolls is the rich cream cheese glaze that drizzles over the top. To make this luscious glaze, you will need cream cheese, powdered sugar, vanilla extract, and milk. In a medium bowl, beat the softened cream cheese with an electric mixer until smooth. Gradually add the powdered sugar, mixing well to incorporate.
Next, add a splash of vanilla extract and enough milk to reach your desired consistency. For a thicker glaze, use less milk; for a thinner glaze, add a bit more. This glaze not only adds sweetness but also a creamy tang that perfectly balances the warm, spiced rolls. Drizzle generously over the rolls once they have cooled slightly for the best presentation and flavor impact.
Serving Suggestions
Cinnamon rolls are incredibly versatile and can be enjoyed at any time of the day. They make a fantastic breakfast item, a delightful addition to brunch, or a sweet dessert. To serve, consider pairing the rolls with a hot cup of coffee or tea. A creamy latte or a robust dark roast coffee complements the sweetness of the rolls beautifully.
For a cozy evening treat, serve them with hot chocolate or a glass of milk. You can elevate the presentation by dusting the rolls with a light sprinkle of powdered sugar or adding a few fresh berries on the side for a pop of color. Arrange the rolls on a rustic wooden platter or a decorative cake stand to create an inviting display that will impress your guests.
Storing and Reheating Tips
If you find yourself with leftover cinnamon rolls (though they may not last long), proper storage is key to maintaining their freshness and flavor. Allow the rolls to cool completely before storing them in an airtight container at room temperature for up to 2 days. For longer storage, you can refrigerate them for up to a week or freeze them for up to 3 months.
To reheat, simply place the rolls in a preheated oven at 350°F (175°C) for about 10 minutes. If you’re reheating from frozen, allow them to thaw in the refrigerator overnight before warming up. You can also microwave individual rolls for about 20 to 30 seconds for a quick treat, though this method may result in slightly softer rolls.
Conclusion
Baking cinnamon rolls from scratch is not just a culinary endeavor; it’s an experience filled with joy and nostalgia. The process of kneading the dough, waiting for it to rise, and finally filling and baking it creates an aroma that fills your home with warmth and comfort. There’s something inherently satisfying about watching the rolls puff up in the oven, knowing that soon you will indulge in a deliciously sweet treat.
Whether you’re making them for a special occasion, a lazy Sunday morning, or simply to enjoy with loved ones, these heavenly cinnamon rolls are sure to bring smiles and satisfaction. Don’t hesitate to share your baking experience with friends and family; the joy of creating something delicious is best when shared. Embrace the comfort of homemade cinnamon rolls and let them take you back to cherished memories while creating new ones in the process.
