
Sesame Ginger Noodle Salad Fresh and Flavorful Delight
Are you craving a dish that bursts with flavor yet is easy to make? Look no further than this Sesame

Are you craving a dish that bursts with flavor yet is easy to make? Look no further than this Sesame
![To make these rich and indulgent treats, you need a few key ingredients: - 1 cup unsalted butter, melted - 2 cups granulated sugar - 4 large eggs - 1 teaspoon vanilla extract - 1 cup all-purpose flour - 1 cup unsweetened cocoa powder - 1/2 teaspoon baking powder - 1/4 teaspoon salt - 1 cup chopped pecans - 1 cup caramel sauce (store-bought or homemade) - Sea salt for sprinkling These ingredients work together to create a fudgy brownie base with a caramel and pecan topping. The butter adds richness, while sugar brings sweetness. Eggs help bind the mix, and flour and cocoa give structure and flavor. For added flair, consider these optional garnishments: - Extra caramel sauce for drizzling - Whole pecans for a decorative touch - Whipped cream or vanilla ice cream These garnishments can elevate your brownies, making them even more appealing. To prepare your brownies, gather these essential tools: - Mixing bowls - Whisk or electric mixer - Measuring cups and spoons - 9x13-inch baking pan - Parchment paper or cooking spray - Spatula for spreading batter Having the right tools makes the process easier and more enjoyable. With these ingredients and tools, you're ready to create a delicious batch of Caramel Pecan Turtle Brownies. For the complete process, check the Full Recipe. Start by preheating your oven to 350°F (175°C). Grease a 9x13-inch baking pan. You can also use parchment paper for easy removal later. In a large bowl, mix 1 cup of melted butter and 2 cups of granulated sugar. Whisk them together until smooth. Next, add 4 large eggs and 1 teaspoon of vanilla extract. Whisk until fully blended. In another bowl, sift together 1 cup of all-purpose flour, 1 cup of cocoa powder, 1/2 teaspoon of baking powder, and 1/4 teaspoon of salt. Gradually add this dry mix to the wet mix. Be careful not to overmix. Fold in 1 cup of chopped pecans, saving a handful for later. Pour the batter into the prepared pan and smooth it out. Bake the brownies for 25-30 minutes. Check for doneness by inserting a toothpick into the center. It should come out with a few moist crumbs, not wet batter. Once done, take them out of the oven. While the brownies are still warm, drizzle 1 cup of caramel sauce over the top. Use a knife to swirl the caramel into the brownies, creating a marbled effect. For a beautiful swirl, don’t overdo it. Just a few gentle strokes with a knife will do. You want to see both brownie batter and caramel. After swirling, sprinkle the reserved pecans over the caramel. Press them down lightly so they stick. Let the brownies cool in the pan for at least 30 minutes. Before cutting, sprinkle some sea salt on top for extra flavor. Enjoy these rich and indulgent treats! Want the complete recipe? Check out the Full Recipe. To get the best texture in your brownies, focus on mixing. Mix the butter and sugar well until they are smooth. This helps create a soft, fudgy base. When you add the dry ingredients, stir just until combined. Overmixing can make them tough. Also, bake them until a toothpick shows few moist crumbs. This means they are perfectly baked. One common mistake is not measuring your ingredients correctly. Use measuring cups for accuracy. Another mistake is skipping the resting time. Let the brownies cool before slicing. This helps them set and makes cutting easier. Lastly, don’t forget the sea salt. It adds a nice touch that enhances the sweet flavors. Sprinkling sea salt on top of the warm brownies adds flavor. The salt balances the sweetness of the caramel and chocolate. Use a light hand. Too much salt can overpower the taste. I suggest adding it right before serving for the best effect. This little step takes your brownies from good to great! For the full recipe, check out the [Full Recipe]. {{image_2}} You can make your Caramel Pecan Turtle Brownies unique by adding different nuts or chocolates. Try walnuts or almonds if you want a twist. You can also swap in dark chocolate chips for a richer taste. Mixing in some white chocolate can add a fun contrast, too. To make these brownies gluten-free, use a gluten-free flour blend instead of all-purpose flour. This change keeps the texture soft and rich. Check that your caramel sauce is gluten-free as well. Many store-bought options are, but always read the label. If you want a quick treat, try a no-bake version. Use crushed graham crackers as the base. Mix them with melted butter and press them into a pan. Then, layer melted chocolate and caramel on top. Finally, sprinkle with pecans. Chill until set, and you have a delicious dessert without baking. For the full recipe, refer to the Caramel Pecan Turtle Brownies. To keep your caramel pecan turtle brownies fresh, store them in an airtight container. Place a piece of parchment paper between layers to prevent sticking. Keep the container at room temperature for up to three days. If you want them to last longer, refrigerate them for up to a week. Just make sure to let them come to room temperature before serving for the best taste. If you have extra brownies, freezing is a great option. First, let the brownies cool completely. Cut them into squares, and wrap each piece tightly in plastic wrap. Next, place the wrapped brownies in a freezer-safe bag or container. They can stay in the freezer for up to three months. When you're ready to enjoy them, let them thaw in the fridge overnight or at room temperature for a few hours. To reheat your brownies, preheat the oven to 350°F (175°C). Place the brownies in an oven-safe dish and cover them with foil. Heat for about 10-15 minutes, or until warm. This helps revive their fudgy texture. You can also use the microwave. Just heat them for 10-15 seconds at a time. Be careful not to overheat, as this can dry them out. Enjoy your delicious treats! Yes, you can make these brownies ahead. I often bake them a day in advance. Once they cool, wrap them tightly with plastic wrap. This keeps them fresh. Store them at room temperature or in the fridge. If you refrigerate, let them sit out for a bit before serving. This brings back their soft texture. To cut brownies neatly, use a sharp knife. Dip the knife in hot water, then dry it off. This helps prevent sticking. Start by cutting the edges first, then cut into squares. Wipe the knife clean between cuts for the best results. This method keeps your brownies looking pretty and prevents a messy slice. You can find pre-made caramel pecan turtle brownies at local bakeries or specialty dessert shops. Many grocery stores also stock them in the bakery section. If you prefer online options, check websites like Amazon or food delivery services. Some brands sell them frozen, allowing you to enjoy them whenever you want. For the best taste, I recommend trying local options first. Caramel pecan turtle brownies are a sweet treat worth making. This article covered the key ingredients, step-by-step baking instructions, and useful tips to ensure success. You learned how to avoid common mistakes and enhance the taste with just a pinch of sea salt. Plus, we explored variations, like gluten-free options and no-bake brownies, alongside storage tips to keep them fresh. Remember, these brownies are not just dessert; they’re a joyful experience. Enjoy your baking and share these treats with loved ones!](https://recipesinsight.com/wp-content/uploads/2025/07/997a9695-1736-43fc-8b38-91269a4556ce.webp)
Indulging in a rich and gooey dessert is a joy, and Caramel Pecan Turtle Brownies are the perfect treat! Combining
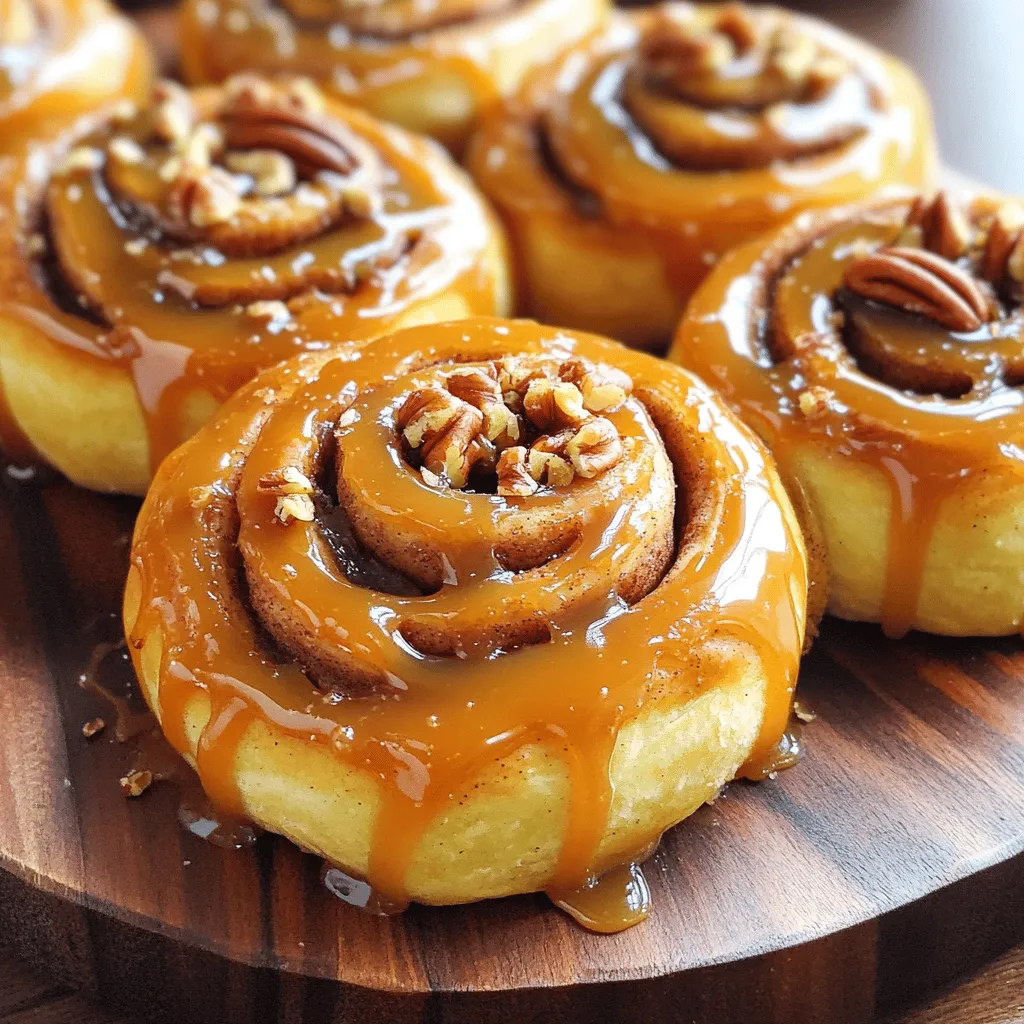
Ready to treat yourself to an indulgent treat? My Caramel Pecan Cinnamon Rolls are both sweet and easy to make.
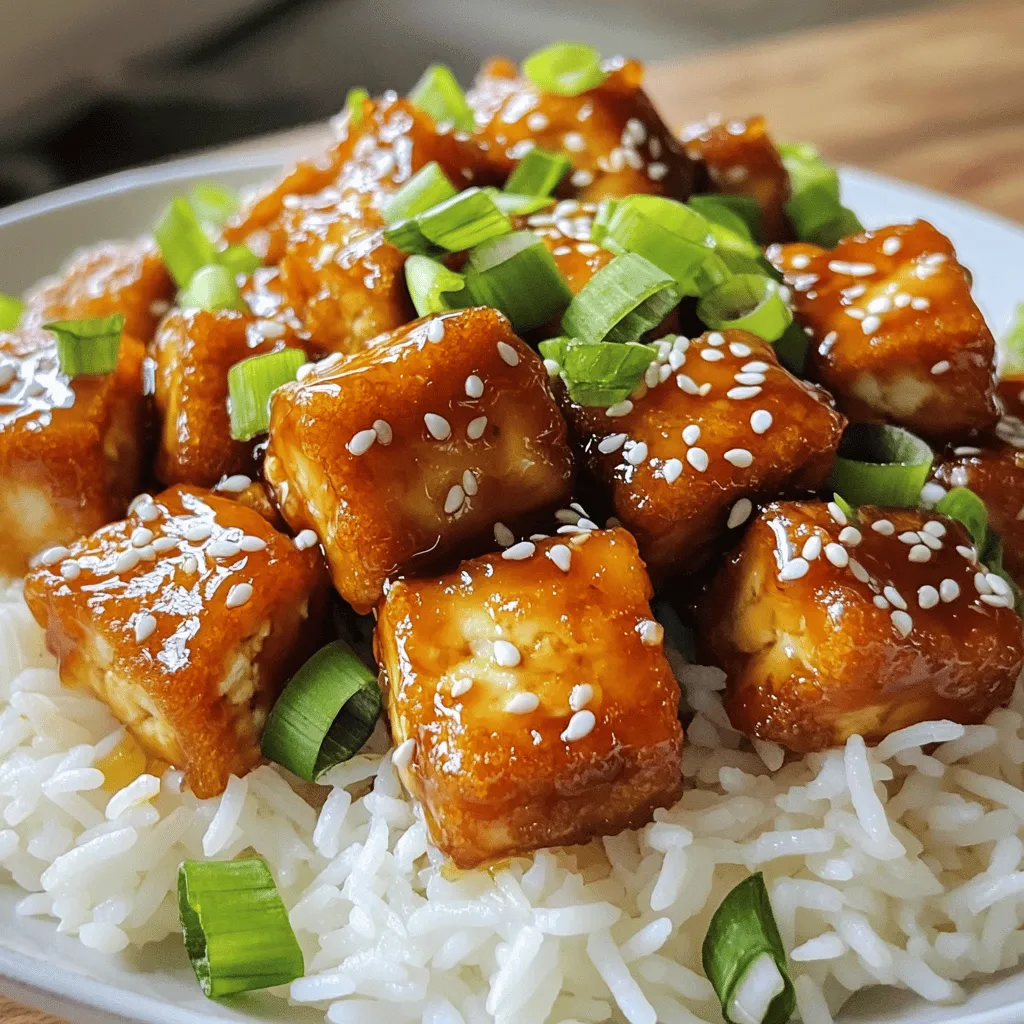
Are you ready to make a meal that’s both crispy and sweet? This Crispy Honey Garlic Tofu is not just
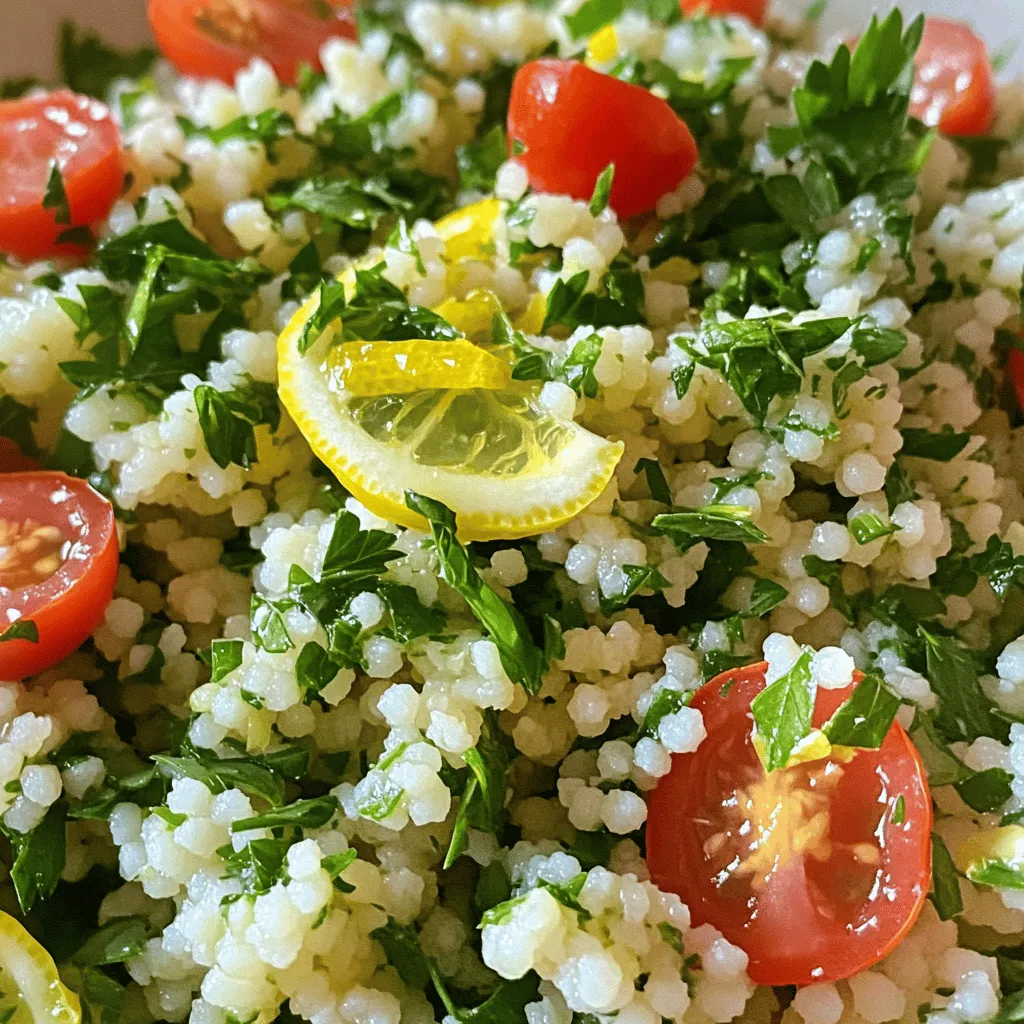
Are you ready to brighten up your meals? My Lemon Herb Couscous is a fresh and flavorful delight that’s simple
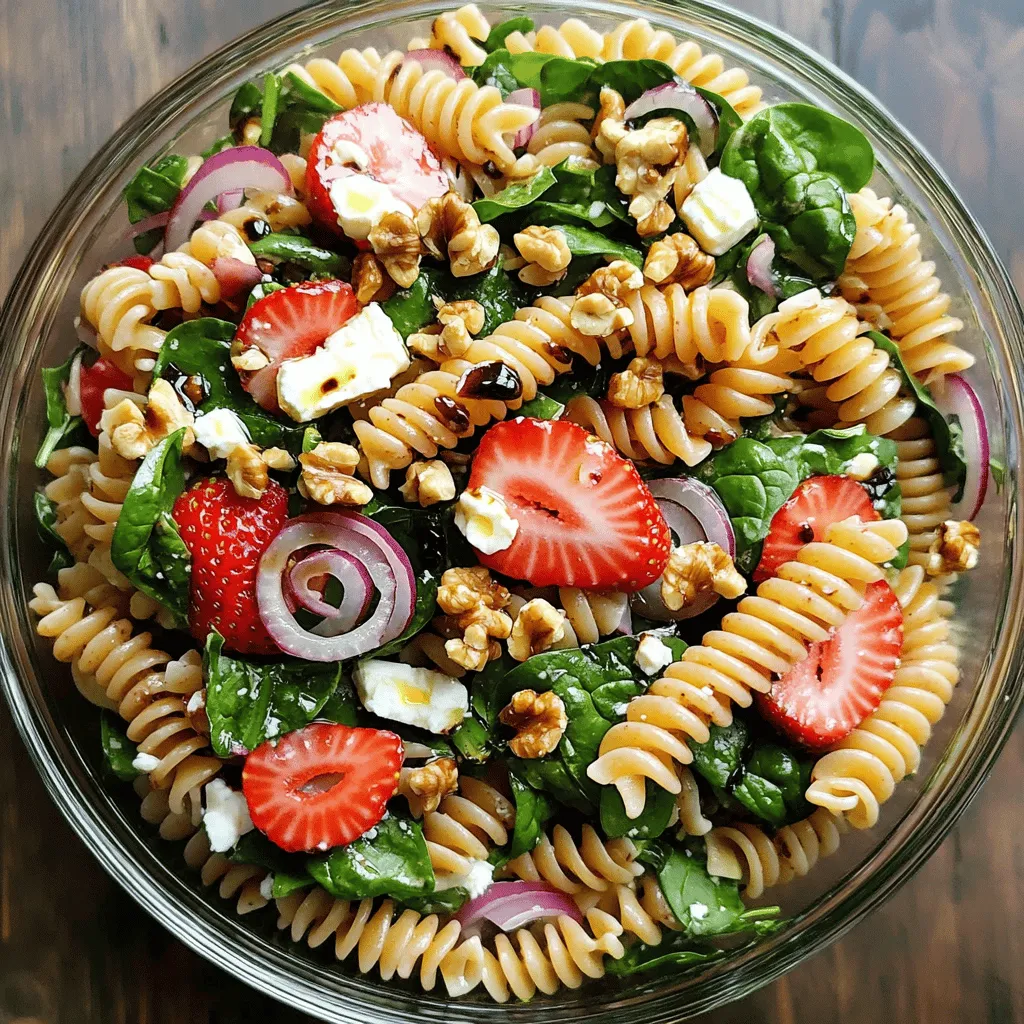
If you’re looking for a fresh and tasty dish, you’re in the right spot! This Strawberry Spinach Pasta Salad combines
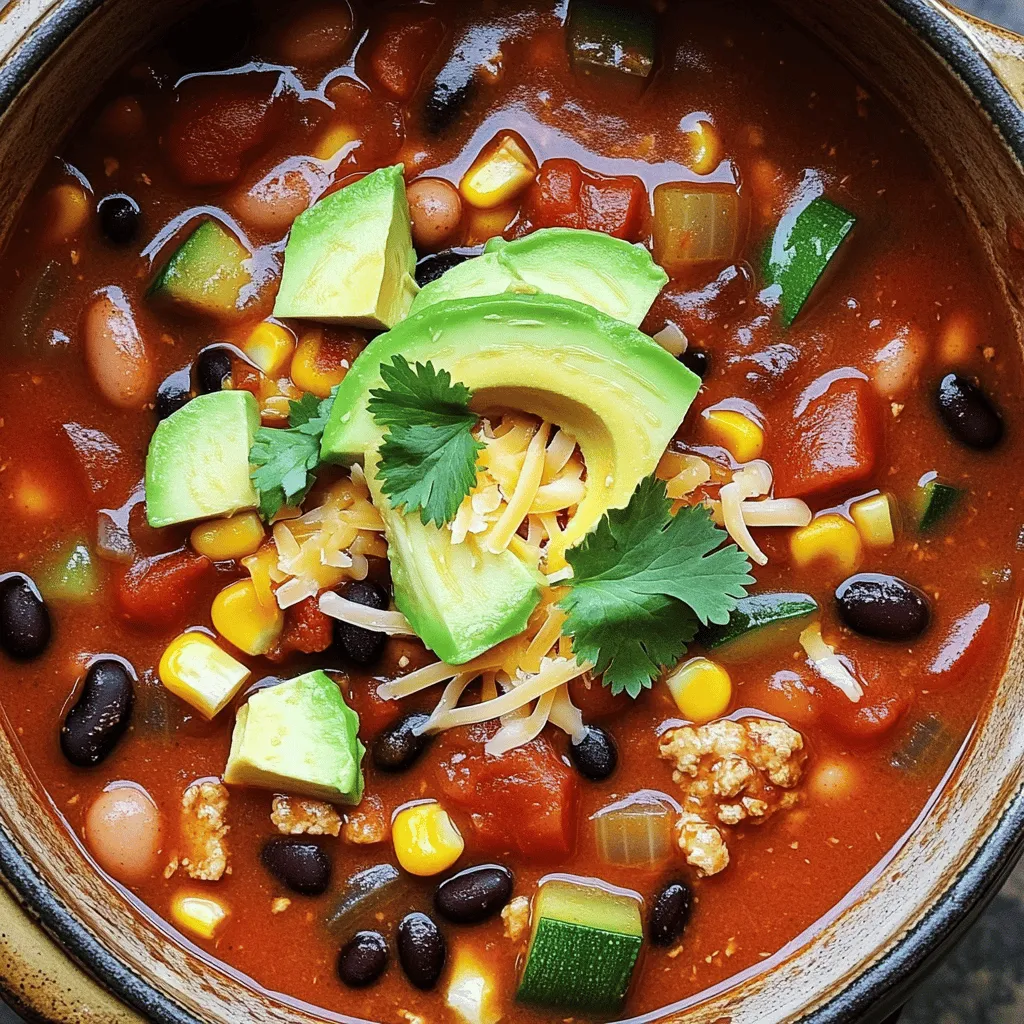
Are you ready to spice up your dinner routine? This Veggie Loaded Turkey Chili is a game changer—packed with flavor
![- Fresh spinach leaves - Ripe banana, frozen - Pineapple chunks (fresh or frozen) - Coconut water - Avocado - Chia seeds - Greek yogurt (optional) - Juice of lime - Mint leaves for garnish - Use 1 cup of fresh spinach leaves for a nutrient boost. - Add 1 ripe banana, frozen to make it creamy and cold. - Use 1/2 cup of pineapple chunks, either fresh or frozen, for sweetness. - Pour in 1/2 cup of coconut water for hydration and flavor. - Include 1/2 avocado for healthy fats and creaminess. - Add 1 tablespoon of chia seeds for extra fiber and omega-3s. - Use 1/2 cup of Greek yogurt if you want a thicker smoothie. - Squeeze in the juice of 1 lime for a zesty kick. - Garnish with fresh mint leaves for a lovely finish. If you want to switch things up, you can swap spinach for kale or use almond milk instead of coconut water. Each change brings a new twist to your smoothie! For the full recipe, check out the Tropical Green Smoothie section. 1. Start by preparing your banana. If it is fresh, peel and slice it. Place the slices in the freezer for about 30 minutes. Freezing gives your smoothie a nice, cold texture. 2. Next, grab your blender. Add the fresh spinach leaves and coconut water. Blend on a low setting. This creates a smooth base for your drink. 1. Now it's time to add more flavor. Into the blender, add your frozen banana, pineapple chunks, avocado, chia seeds, and lime juice. If you want a creamier smoothie, you can add Greek yogurt too. 2. Blend everything together until it is well combined and smooth. For the perfect texture, pulse the blender a few times. If you find the mixture too thick, add a splash more coconut water or regular water. 1. Taste your smoothie to see if it is sweet enough. If you want it sweeter, you can add a little honey or agave nectar. However, the fruit usually provides enough sweetness. 2. Once you are happy with the flavor, pour the smoothie into your favorite glass or bowl. To make it look pretty, garnish it with fresh mint leaves and a slice of lime. Enjoy your refreshing Tropical Green Smoothie! How do you select ripe tropical fruits? Look for vibrant colors and a sweet smell. For bananas, choose ones with a few brown spots. Pineapples should feel heavy for their size and have a sweet scent. Avocados should yield slightly when pressed. Make sure to buy fresh, seasonal fruits for the best taste and nutrition. When are these fruits available? Bananas and avocados are available year-round. Pineapples peak in spring and summer. Knowing seasonal availability helps you enjoy the freshest flavors. What are the nutritional benefits of spinach and avocado? Spinach is low in calories and high in vitamins A, C, and K. It also has iron and calcium, great for strong bones. Avocado is rich in healthy fats, which help your heart. It also adds creaminess to your smoothie. What are the advantages of using coconut water? Coconut water is low in calories and full of electrolytes. It hydrates you better than regular water. It also adds a subtle sweetness to your smoothie. How can you garnish your smoothie for visual appeal? Try adding fresh mint leaves on top. You can also add a slice of lime on the rim of your glass. A sprinkle of chia seeds or shredded coconut makes it pop! What are some serving suggestions? Serve your smoothie in clear glasses to show off the color. Bowls work well too, especially if you add toppings. Enjoy your drink with a straw or a spoon for a fun touch! For the full recipe, check out the Tropical Green Smoothie section. {{image_2}} You can switch up the greens in your smoothie. Try kale or arugula for a different taste. Both add great nutrients. If you need a dairy-free option, use almond or coconut yogurt instead of Greek yogurt. This keeps the smoothie creamy without dairy. Want to spice things up? Try adding ginger or turmeric for warmth and health benefits. Both spices boost flavor and nutrition. You can also mix in tropical fruits like mangosteen or kiwi. These fruits add unique flavors and nutrients. The texture of your smoothie can change easily. For a thicker smoothie, add more frozen fruits or avocado. If you prefer a thinner consistency, splash in extra coconut water or regular water. You can also boost protein by adding protein powder or acai. These options make your smoothie more filling and nutritious. Check out the [Full Recipe] for more details on making your Tropical Green Smoothie! To keep your Tropical Green Smoothie fresh, store it in a sealed container. A glass jar works best. Smoothies taste best when fresh, but you can keep them in the fridge for up to 24 hours. After that, they may lose their taste and texture. If you notice separation, just shake or stir before drinking. Freezing smoothies is a great way to save time. Pour your smoothie into ice cube trays or small containers. This way, you can grab just what you need. To thaw, leave them in the fridge overnight. If it’s too thick after thawing, add a splash of coconut water and blend again. Make your mornings easier by prepping smoothie packs. Gather ingredients like spinach, banana, and pineapple. Measure out your fruits and greens, then place them in freezer bags. You can add chia seeds and yogurt to the bags too. When you’re ready to blend, just dump the pack into your blender with coconut water. This method makes for a quick and easy smoothie. For the complete recipe, check out the Tropical Green Smoothie section above. Can I use other liquids instead of coconut water? Yes, you can use other liquids! Some good options are almond milk, regular water, or even orange juice. Each liquid will change the flavor a bit. Coconut water adds a nice tropical taste, but you can choose what you like. Is the Greek yogurt necessary for the recipe? Not at all! Greek yogurt adds creaminess and protein, but it is optional. If you want a vegan smoothie, you can skip it. You can also use dairy-free yogurt if you prefer. How many calories does this smoothie contain? This smoothie has about 250 calories per serving. The exact number can change based on your ingredients. Using frozen fruit may also change the calorie count slightly. Can I make this smoothie vegan-friendly? Yes, you can! Just skip the Greek yogurt or use a plant-based yogurt. This change makes the smoothie vegan while keeping it tasty and nutritious. What foods pair well with this smoothie? This smoothie goes great with toast, muffins, or a fruit salad. You can also enjoy it with a light breakfast, like oatmeal or granola. Pair it with a nut butter for added protein. Can I use this recipe as a meal replacement? Yes, you can use this smoothie as a meal replacement! It has good nutrients and keeps you full. Just make sure to add enough healthy fats, like avocado or nut butter, to feel satisfied. For the full recipe, check out the Tropical Green Smoothie section above. This blog explores vibrant ingredients for a healthy tropical green smoothie. I shared steps to prepare and serve, along with tips for choosing fruits and enhancing flavor. Remember, you can customize this recipe to suit your tastes. Whether you want a thicker blend or a dairy-free option, the sky is the limit. Enjoy experimenting, and feel free to make this smoothie your own. With a little creativity, you can create a delicious drink perfect for anytime!](https://recipesinsight.com/wp-content/uploads/2025/07/74118870-4a0b-44fb-973b-eedd4e098f6b.webp)
Are you ready to blend up a delicious and healthy treat? The Tropical Green Smoothie is both refreshing and packed
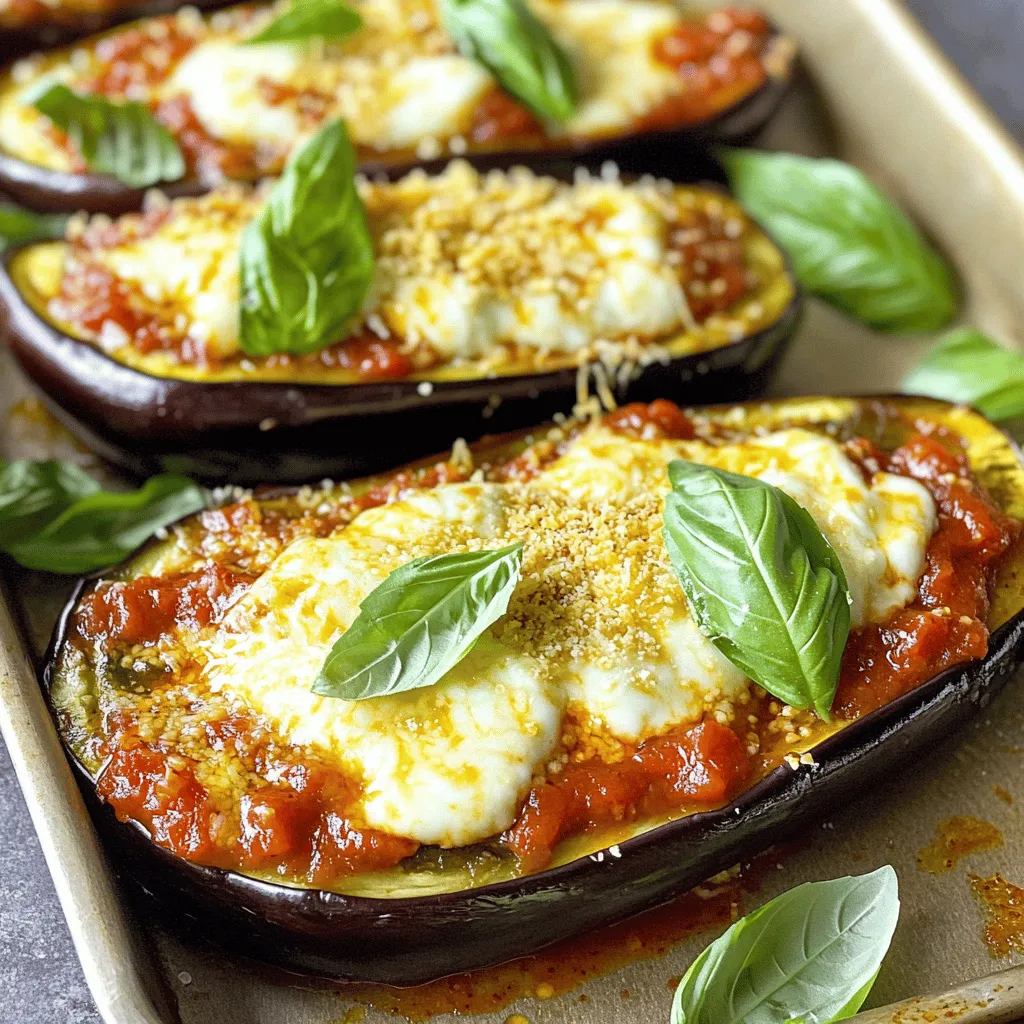
Looking for a fun and tasty dinner idea? Eggplant Parmesan Boats are here to save the day! This dish combines
![- 6 slices of thick bread (brioche or challah) - 2 large eggs - 1/2 cup milk (or non-dairy alternative) - 1 teaspoon vanilla extract - 1 teaspoon ground cinnamon - 2 tablespoons sugar (optional, adjust to taste) - Pinch of salt - Cooking spray or melted butter - Maple syrup or powdered sugar for serving When I make Air Fryer French Toast Sticks, I focus on using quality ingredients. Thick bread like brioche or challah gives the best texture. The bread soaks up the egg mixture well, creating a soft inside and crispy outside. For the egg mixture, I combine eggs and milk. You can use non-dairy milk if you prefer. The vanilla and cinnamon add warmth and flavor. A pinch of salt enhances the sweetness. If you have a sweet tooth, adjust the sugar to your taste. Cooking spray or melted butter helps the sticks crisp up in the air fryer. To serve, I love drizzling maple syrup or dusting with powdered sugar. These toppings make the dish extra special. Check out the Full Recipe for all the details on how to put this together. Trust me, you will enjoy this treat! Preheat your air fryer to 375°F (190°C). This step is key for crispiness. Let it warm up for about 5 minutes. Cut each slice of thick bread into three equal sticks. I suggest using brioche or challah for a rich flavor. Place the cut sticks aside on a plate. In a bowl, whisk together the eggs, milk, vanilla, cinnamon, sugar, and salt. Mix until smooth. This mixture gives the French toast its sweet, warm taste. Dip each bread stick into the egg mixture. Make sure to coat all sides. Let any extra egg mixture drip off before placing them aside. Spray the air fryer basket lightly with cooking spray. Arrange the bread sticks in a single layer. Avoid overcrowding to ensure they cook evenly. Air fry for 8-10 minutes. Flip them halfway through. They should turn golden brown and crispy. After cooking, let them cool for a minute before serving. Enjoy these sticks warm with maple syrup or powdered sugar. For more details, check the Full Recipe. To make the best French toast sticks, focus on the egg mixture. Dip each stick fully to ensure even coating. This helps them cook evenly and taste great. You want every bite to be rich and flavorful. Avoid overcrowding the air fryer basket. If you place too many sticks at once, they won’t cook well. Air needs to flow around each stick to make them crispy. Cook in batches if you need to. It’s worth the extra time for a perfect snack. Adjust the cook time based on the thickness of your bread. Thicker slices may need a few extra minutes. Keep an eye on them to avoid burning. The goal is a golden brown color with a nice crunch. You can also switch up the milk you use. Regular, almond, or oat milk can change the flavor. Each type brings a different taste, so feel free to experiment and find your favorite. If you want a lighter option, try reducing the sugar. You can also use whole grain or gluten-free bread. These choices add fiber and nutrients. This way, you enjoy a tasty snack while being mindful of health. For the full recipe, click here: [Full Recipe]. {{image_2}} You can boost the taste of your French toast sticks easily. Try adding chocolate chips or chopped nuts to the egg mixture. This adds a sweet crunch that kids love. You can also use flavored extracts like almond or maple. Just a splash adds a new twist to the classic taste. Toppings can make your snack even better! Fresh fruit like strawberries or blueberries adds color and nutrition. You can also get creative with dipping sauces. Yogurt is a healthy option, and chocolate sauce is always a hit. These fun toppings let everyone customize their snack. Make your French toast sticks fit any season! For fall, add pumpkin spice to the egg mixture for a cozy flavor. In winter, a drop of peppermint extract gives a festive touch. These seasonal twists keep things fresh and exciting, making your snack perfect all year round. For more ideas, check the Full Recipe. To store leftover French toast sticks, place them in an airtight container. Let them cool first to avoid steam buildup. Keep the container in the fridge for up to three days. When you're ready to eat, just reheat them in the air fryer for a few minutes. This keeps them crispy and warm. You can freeze French toast sticks for longer storage. To freeze, place the cooled sticks in a single layer on a baking sheet. Freeze for about an hour until firm, then transfer them to a zip-top bag. They can last up to two months in the freezer. To reheat, simply air fry them at 375°F (190°C) for 5-7 minutes until heated through. Use airtight containers to keep your French toast sticks fresh. Glass containers with tight lids work great. You can also use heavy-duty plastic bags. Make sure to remove as much air as possible before sealing. This helps prevent freezer burn and keeps them tasty! Yes, you can prepare these French toast sticks in advance. To do this, follow the steps in the Full Recipe, but stop before cooking. Once you dip the bread sticks, place them in a single layer on a baking sheet. Cover them tightly with plastic wrap and store them in the fridge. When you're ready to eat, just air fry them straight from the fridge. This keeps them fresh and tasty. If you want, you can also freeze them. Just make sure they cool first, then place them in an airtight container. To reheat, air fry them at 375°F for about 5-7 minutes. For the best texture, use thick bread like brioche or challah. These types soak up the egg mixture well, making them soft inside. Their nice crust also helps them get crispy in the air fryer. If you want something healthier, whole grain bread works too. Just make sure it’s thick enough to hold up during cooking. Yes, you can easily modify these ingredients. For a dairy-free option, use almond milk or oat milk instead of regular milk. If you need gluten-free bread, choose a gluten-free variety that you like best. You can also reduce the sugar or leave it out if you want a low-sugar snack. The recipe is flexible, so feel free to adjust it to fit your diet. To keep your French toast sticks crispy, avoid stacking them too closely. Store them in a single layer on a rack if you can. You can also place them in an oven set to low heat. This helps keep them warm and crispy. If you want to reheat them, use the air fryer again. This way, they will regain their crunch without getting soggy. You can easily make tasty air fryer French toast sticks. This recipe uses simple ingredients like bread, eggs, and milk. Flavor enhancers like vanilla and cinnamon add a nice touch. Follow the steps for preparation and cooking to achieve perfect sticks. Experiment with toppings and variations to suit your taste. Store any leftovers properly to keep them fresh. Enjoy this fun, quick snack or breakfast option anytime!](https://recipesinsight.com/wp-content/uploads/2025/07/6a62cf10-9f5c-46a2-ac04-ceb18f10fd50.webp)
If you’re craving a fun, easy snack, Air Fryer French Toast Sticks are your answer! With just a few simple