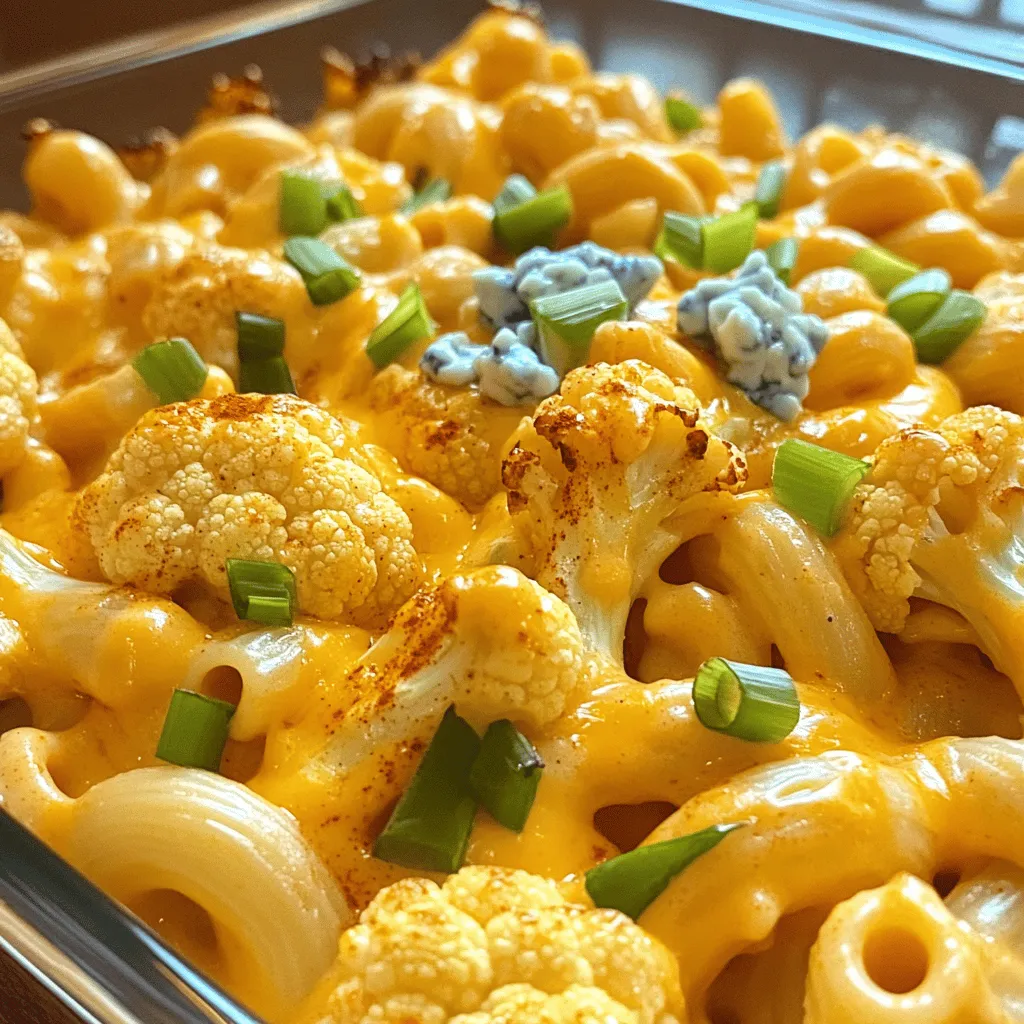
Get ready to dive into a delicious bowl of Buffalo Cauliflower Mac & Cheese! This recipe brings comfort food to a new level, mixing spicy buffalo flavor with creamy cheese and tender cauliflower. You’ll love how easy it is to make, whether you’re enjoying a cozy night in or impressing friends at a gathering. Let’s explore the tasty ingredients and simple steps to create this flavorful dish that will keep you coming back for more!
Why I Love This Recipe
- Delicious Flavor Fusion: This dish combines the classic comfort of mac and cheese with the bold flavors of buffalo sauce, creating a unique and satisfying meal.
- Healthy Twist: By using cauliflower, this recipe adds a nutritious element, making it a guilt-free indulgence that doesn’t compromise on taste.
- Customizable Heat Level: You can easily adjust the amount of hot sauce to suit your taste, allowing you to create the perfect balance of spice.
- Easy to Make: This recipe is straightforward and requires minimal prep time, making it perfect for weeknight dinners or gatherings.
Ingredients
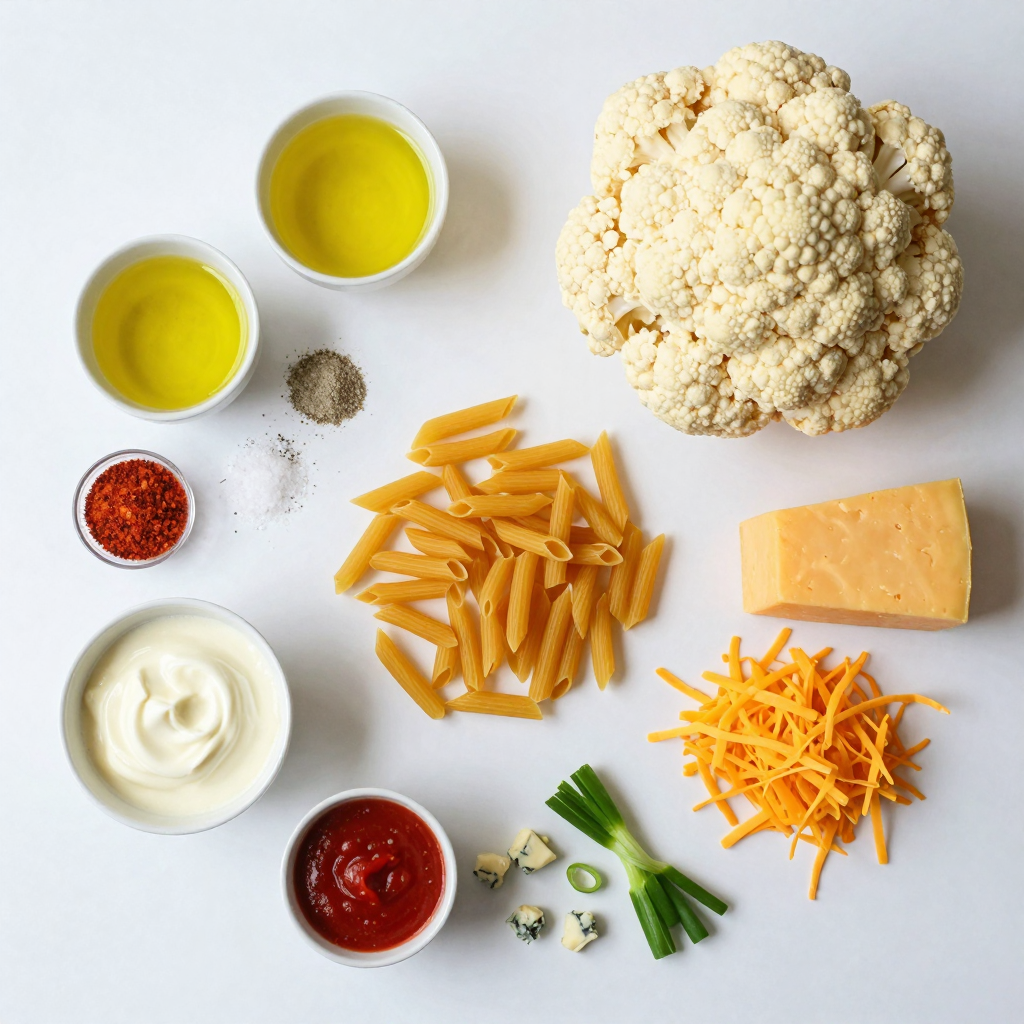
Main Ingredients
– 1 head of cauliflower, cut into florets
– 8 ounces elbow macaroni (or gluten-free pasta)
Cheese Sauce Components
– 2 cups sharp cheddar cheese, shredded
– 1 cup cream cheese, softened
Seasoning and Garnish
– 2 tablespoons olive oil
– 1 teaspoon garlic powder
– 1 teaspoon onion powder
– 1/2 teaspoon smoked paprika
– Salt and pepper to taste
– 1/2 cup hot sauce (adjust to taste)
– 1/4 cup green onions, sliced (for garnish)
– Crumbled blue cheese (optional, for garnish)
Gathering these ingredients makes it easy to whip up this tasty dish. Cauliflower adds a great texture. The elbow macaroni gives a classic feel. For the cheese sauce, the sharp cheddar and cream cheese create a rich flavor. Olive oil and spices help the cauliflower roast perfectly. The hot sauce brings the buffalo kick, while green onions and blue cheese add a nice finish. Each ingredient plays a role in making this dish comforting and fun.
Step-by-Step Instructions
Roasting the Cauliflower
To start, preheat your oven to 425°F (220°C). Take a large baking sheet and set it aside. In a big bowl, toss the cauliflower florets with 2 tablespoons of olive oil. Add 1 teaspoon of garlic powder, 1 teaspoon of onion powder, and 1/2 teaspoon of smoked paprika. Sprinkle in salt and pepper to taste. Spread the seasoned cauliflower on the baking sheet in a single layer. Roast it for 20-25 minutes. Flip the florets halfway through. You want them to be golden and tender.
Cooking the Pasta
While the cauliflower roasts, bring a pot of water to a boil. Add 8 ounces of elbow macaroni, or gluten-free pasta if you prefer. Cook it according to the package instructions until it is al dente. This means it should be firm when you bite it. Once cooked, drain the pasta and set it aside for later.
Making the Cheese Sauce
Next, grab a large saucepan. Set it over medium heat and add 1 cup of softened cream cheese and 1 cup of milk. Stir until the cream cheese melts into the milk. This will make a smooth mixture. Now, slowly add 2 cups of shredded sharp cheddar cheese. Keep stirring until it all melts and becomes creamy. This cheese sauce is the heart of your dish.
Mixing Ingredients
Once your cheese sauce is smooth, add 1/2 cup of hot sauce to it. Stir well to mix. Then gently fold in the roasted cauliflower and cooked macaroni. Make sure everything is well combined. You want every bite to have that delicious flavor.
Baking the Mac & Cheese
Now, preheat your oven to 350°F (175°C). Take a greased baking dish and transfer the mac and cheese mixture into it. If you want, sprinkle some extra cheddar cheese on top. Bake it for 20-25 minutes. You want it to be bubbly and slightly golden on top. This step gives it a nice texture.
Garnishing for Serving
When it’s done baking, remove it from the oven. Let it cool for a few minutes. For garnish, slice some green onions and sprinkle them on top. If you like, add crumbled blue cheese for extra flavor. Serve this dish hot and enjoy every bite!
Pro Tips
- Roasting Perfection: Make sure to spread the cauliflower florets in a single layer on the baking sheet to ensure even roasting and browning.
- Cheese Sauce Consistency: For a smoother cheese sauce, ensure that the cream cheese is at room temperature before mixing it with the milk.
- Hot Sauce Adjustments: Start with less hot sauce and gradually add more to achieve your desired level of spiciness without overpowering the dish.
- Extra Creaminess: Adding a splash of pasta water to the cheese sauce can enhance the creaminess and help the sauce adhere better to the pasta.
Tips & Tricks
Perfecting the Roasting Technique
To roast cauliflower just right, ensure it’s coated evenly. Toss the florets in olive oil, garlic powder, onion powder, smoked paprika, salt, and pepper. Spread them out on a baking sheet without crowding. This helps them roast evenly. Flip the florets halfway through cooking to avoid burning. Taste the roasted cauliflower and adjust the seasoning if needed. A pinch of salt can make a big difference in flavor.
Cheese Sauce Consistency
A smooth cheese sauce is key to great mac and cheese. If your sauce is too thick, add a splash more milk. Stir it in slowly until you reach a creamy texture. If the sauce separates, it might be too hot. Remove it from heat and whisk until it comes back together. You can also use different cheeses. Try gouda or Monterey Jack for a twist on flavors. Each cheese brings its own taste and texture.
Customizing Spice Level
Want a spicier kick? Adjust the hot sauce to your liking. You can start with half the amount. Taste and then add more if needed. For a fun twist, add some cayenne pepper or crushed red pepper flakes. These can enhance the heat without changing the dish too much. You can also add fresh herbs like cilantro or parsley for more flavor. They give the dish a fresh taste that pairs well with the heat.
Variations
Dietary Substitutions
For a gluten-free version, swap elbow macaroni for gluten-free pasta. Many brands offer tasty options that work well. If you want a dairy-free sauce, use non-dairy cream cheese and milk. Cashew cream can also add a rich texture.
Additional Ingredients
You can boost nutrition by adding spinach or mushrooms. Spinach wilts nicely and adds color. Mushrooms bring a nice umami taste. For extra heartiness, consider adding cooked chicken, bacon, or chickpeas. These proteins make the dish filling and delicious.
Flavor Twists
Experimenting with different cheeses can change the flavor. Try gouda, mozzarella, or pepper jack for a twist. For topping, consider panko crumbs for crunch or even crushed tortilla chips for a fun texture. You can also sprinkle fresh herbs, like parsley or cilantro, for a fresh finish.
Storage Info
Storing Leftovers
Store your Buffalo Cauliflower Mac & Cheese in an airtight container. This keeps it fresh. Make sure it cools down first. You can keep it in the fridge for up to four days. If you want to save it longer, consider freezing it. Portion it into smaller containers for easy use later.
Reheating Guidelines
To reheat, use the oven for the best texture. Preheat it to 350°F (175°C). Place the mac and cheese in a baking dish. Cover it with foil to keep it moist. Heat for about 20 minutes, then check if it’s warm. You can also use the microwave. Heat in 30-second intervals, stirring in between. This helps it heat evenly.
Shelf Life
In the fridge, your mac and cheese lasts about four days. If you freeze it, it lasts for about three months. For best results, use a freezer-safe container. Label it with the date so you know when you made it. This way, you can enjoy it at its best!
FAQs
Can I use frozen cauliflower?
Yes, you can use frozen cauliflower. Just remember to thaw and dry it well. This helps avoid extra moisture. You can roast it like fresh cauliflower but reduce the roasting time to about 15 minutes. Frozen veggies are quick and easy, making them a great choice.
How can I make this recipe spicier?
To add more heat, try using more hot sauce. Start with an extra tablespoon. You can also add red pepper flakes for extra kick. If you want a smoky flavor, consider using chipotle powder. Adjust these to your taste for the perfect spice level.
What can I substitute for cream cheese?
If you need a dairy-free option, try using cashew cream. Blend soaked cashews with a bit of lemon juice and water. You can also use dairy-free cream cheese, which works well. Greek yogurt is another option for a tangy flavor but may change the texture slightly.
How do I prevent the cheese sauce from separating?
To keep your cheese sauce creamy, use low heat while cooking. Melt the cream cheese completely before adding the cheddar. Stir continuously to blend well. If it does separate, add a splash of milk and whisk it back together. This helps restore the creamy texture.
Can I prepare this dish in advance?
Yes, you can make this dish ahead of time. Prepare the mac and cheese up to the baking step. Store it in the fridge for up to two days. When ready to bake, just add some extra cheese on top. Bake at 350°F until warm and bubbly.
This blog post offers a tasty way to make mac and cheese with cauliflower. We covered ingredients like broccoli, cheese, and seasoning to enhance the flavor. The step-by-step guide ensures you roast, cook, and bake your dish to perfection. Don’t forget the tips for customizing and storing leftovers. This dish lets you get creative, whether you want it spicy or need alternatives. Enjoy experimenting with flavors and sharing this dish with friends and family!