
Introduction
There’s something truly irresistible about cheesy garlic dishes that transcends cuisine and culture. The aroma of roasted garlic mingling with melted cheese evokes a sense of warmth and comfort, making it a beloved choice for many. Enter Cheesy Garlic Bliss Bombs—a delightful appetizer that brings together the rich flavors of garlic and cheese in a bite-sized treat that’s sure to impress at any gathering or simply satisfy your snack cravings.
Cheesy Garlic Bliss Bombs are not just a culinary indulgence; they are an experience. These delectable morsels are incredibly simple to prepare, requiring only a handful of everyday ingredients. Whether you’re hosting a party, looking for a game-day snack, or just wanting to elevate your weekday meals, these bombs are a perfect choice. Their popularity spans across various audiences, from busy parents to gourmet enthusiasts, proving that great taste doesn’t have to be complicated.
Understanding Cheesy Garlic Bliss Bombs
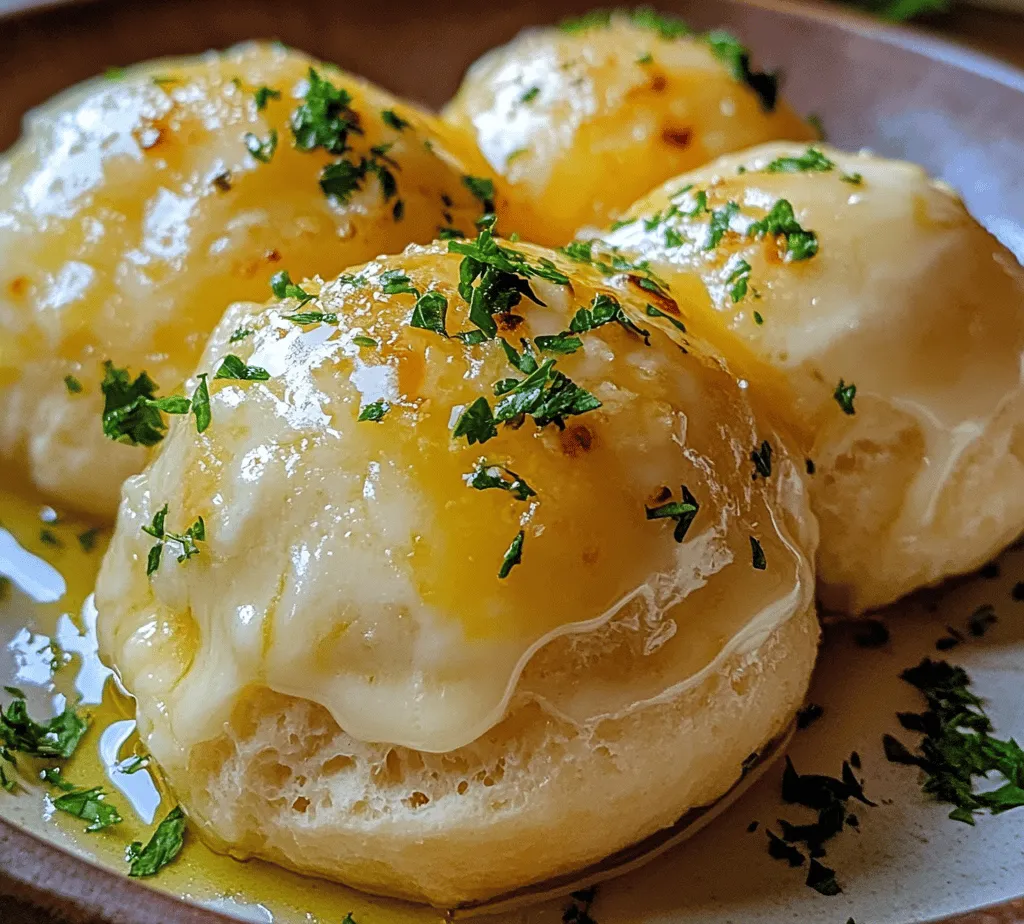
So, what exactly are Cheesy Garlic Bliss Bombs? At their core, they are a fusion of buttery, flaky biscuit dough filled with delightful combinations of cheeses and aromatic garlic. This dish is not only a feast for the taste buds but also a visual treat, as the golden-brown exterior gives way to a gooey, cheesy interior that promises a burst of flavor with every bite.
Garlic holds a significant place in culinary traditions around the world, often revered for its robust flavor and numerous health benefits. From Mediterranean dishes to Asian stir-fries, garlic enhances flavors and adds depth to meals. When paired with cheese—a staple in countless cuisines—the two ingredients create an unforgettable taste experience. The creaminess of the cheese complements the pungent, earthy notes of garlic, resulting in a harmonious blend that elevates these bliss bombs to a new level of deliciousness.
Ingredients Breakdown
Before diving into the preparation steps, it’s essential to understand the key ingredients that make these Cheesy Garlic Bliss Bombs so special.
1. Refrigerated Biscuits: The use of refrigerated biscuits not only simplifies the process but also contributes to the delightful texture of the bombs. They provide a flaky, tender outer layer that encases the cheesy filling, ensuring that every bite is satisfying.
2. Cheeses: The choice of cheese is crucial in this recipe. Mozzarella is favored for its melty, stretchy qualities, while cream cheese adds a rich, smooth texture that balances the overall flavor. Together, these cheeses create a creamy filling that oozes out when bitten into, making them an irresistible treat.
3. Butter and Garlic: These two ingredients form the flavor foundation of the dish. Butter not only adds richness but also helps to create a golden, crispy exterior during baking. Fresh minced garlic infuses the filling with its signature flavor, ensuring that each bliss bomb is packed with that beloved garlic taste.
4. Seasonings: To enhance the flavors further, Italian seasoning, salt, and pepper are incorporated into the mixture. Italian seasoning brings an aromatic blend of herbs that complements the garlic and cheese beautifully, while salt and pepper elevate the overall taste without overpowering it.
5. Garnish: Finally, a sprinkle of fresh parsley serves as both a garnish and a flavor enhancer. It adds a pop of color and a hint of freshness that brightens up the dish, making your Cheesy Garlic Bliss Bombs not only delicious but visually appealing.
Preparation Steps
Now that we’ve explored the key components of Cheesy Garlic Bliss Bombs, it’s time to delve into the preparation steps for making this mouthwatering appetizer.
Step 1: Preheating the Oven
The first step in creating the perfect Cheesy Garlic Bliss Bombs is to preheat your oven. Proper temperature is crucial for baking, as it ensures that your bombs cook evenly and achieve a beautifully golden-brown crust. Set your oven to 375°F (190°C) and allow it to preheat while you prepare the filling and assemble the bombs.
Step 2: Preparing the Filling
While the oven is warming up, gather your cheese, garlic, and seasonings. In a mixing bowl, combine the mozzarella and cream cheese until well blended. Add the minced garlic, Italian seasoning, salt, and pepper, and mix until everything is evenly incorporated. The result should be a creamy, flavorful filling that embodies the essence of garlic and cheese.
Step 3: Assembling the Bliss Bombs
Next, it’s time to assemble the bliss bombs. Open the package of refrigerated biscuits and separate them into individual pieces. Flatten each biscuit slightly in your hands to create a small disc. Spoon a generous amount of the cheese and garlic mixture into the center of each disc, then carefully fold the edges over the filling, pinching them together to seal. This step is essential to ensure that the cheesy goodness stays inside while baking.
Step 4: Coating with Butter
Once all the bombs are assembled, melt some butter in a microwave-safe bowl. Dip each bliss bomb into the melted butter, ensuring that they are fully coated. This not only adds flavor but also promotes a crispy texture during baking. Place the coated bombs on a baking sheet lined with parchment paper, ensuring they are spaced apart to allow for even cooking.
Step 5: Baking to Perfection
With the oven preheated and the bliss bombs ready, it’s time to bake! Place the baking sheet in the oven and bake for approximately 15-20 minutes, or until the bombs are golden brown and the cheese is bubbly. Keep an eye on them towards the end of the baking time to ensure they don’t over-bake.
By following these preparation steps, you’ll be well on your way to creating a batch of Cheesy Garlic Bliss Bombs that will leave everyone reaching for more. The combination of simple ingredients, flavorful filling, and easy assembly makes this dish a winner for any occasion.
Stay tuned for the next part of this article, where we will explore tips for achieving the best results with your Cheesy Garlic Bliss Bombs and answer some common questions about this delightful recipe.
Butter Mixture Preparation
To achieve the best flavor infusion in your Cheesy Garlic Bliss Bombs, start by preparing the garlic butter mixture. This essential step not only enhances the overall taste but also sets the tone for the delightful aroma that fills your kitchen as they bake.
Ingredients for Butter Mixture:
– ½ cup unsalted butter (1 stick), melted
– 4 cloves of garlic, minced (or more for garlic lovers)
– 2 tablespoons fresh parsley, finely chopped (optional for added freshness)
– ½ teaspoon salt
– ¼ teaspoon black pepper
Instructions:
1. Melt the Butter: In a small saucepan, melt the unsalted butter over low heat. Be careful not to let it brown; you want it to be just melted.
2. Add Garlic: Once the butter is melted, remove it from the heat and stir in the minced garlic. Allow the mixture to sit for about 5-10 minutes. This resting period enables the garlic to infuse its flavor into the butter thoroughly.
3. Season: After resting, add salt, pepper, and parsley (if using) to the mixture and stir well. This compound butter will be used both in the filling and as a flavorful coating after baking.
Biscuit Preparation Techniques
The base of your Cheesy Garlic Bliss Bombs is the biscuit dough, which should be light, fluffy, and easy to work with. Here are some tips for flattening and shaping the biscuits effectively.
Ingredients for Biscuit Dough:
– 2 cups all-purpose flour
– 1 tablespoon baking powder
– ½ teaspoon salt
– ½ cup unsalted butter, cold and cubed
– ¾ cup milk (or buttermilk for extra richness)
Instructions:
1. Mix Dry Ingredients: In a large mixing bowl, combine flour, baking powder, and salt. Whisk these dry ingredients until thoroughly mixed.
2. Cut in Butter: Add the cold, cubed butter to the dry mixture. Use a pastry cutter or your fingers to work the butter into the flour until the mixture resembles coarse crumbs. Be careful not to overwork the dough, as this can result in dense biscuits.
3. Add Milk: Pour in the milk and stir gently until the dough just comes together. It should be slightly sticky but manageable.
4. Flatten the Dough: Turn the dough out onto a floured surface. Using a rolling pin, roll it out to about ½ inch thickness. If you prefer, you can also pat it down with your hands.
5. Cutting the Dough: Use a round cutter (about 3 inches in diameter) to cut out circles from the dough. Gather scraps, re-roll, and cut additional circles until all the dough is used.
Filling Techniques
When it comes to filling your Cheesy Garlic Bliss Bombs, getting the right amount of cheese is crucial for achieving optimal melting and gooeyness.
Ingredients for Filling:
– 1 cup shredded mozzarella cheese (or cheese of your choice)
– ¼ cup cream cheese, softened (for extra creaminess)
Instructions:
1. Prepare the Filling: In a medium bowl, mix the shredded mozzarella cheese and softened cream cheese until well combined. This combination ensures a melty, gooey filling that will delight every bite.
2. Portion the Filling: For each biscuit round, take about a tablespoon of the cheese mixture and place it in the center of the dough circle. Avoid overfilling, as this can cause the bombs to burst when baking.
Sealing the Bombs
To ensure a perfect seal for a gooey center, follow these sealing techniques:
1. Fold Carefully: Once the cheese is placed in the center of the dough, carefully fold the edges of the dough over the filling. Pinch the edges together, ensuring there are no gaps where the cheese can escape.
2. Roll into Balls: After sealing, gently roll the filled dough between your palms to form a smooth ball. This step helps to further secure the filling inside and gives a nice, uniform shape.
3. Repeat: Continue this process until all the biscuit rounds are filled and sealed.
Coating and Baking
The garlic butter coat is essential not just for flavor but also for that desirable golden-brown appearance.
Baking Instructions:
1. Preheat the Oven: Preheat your oven to 375°F (190°C) and line a baking sheet with parchment paper.
2. Coat with Garlic Butter: Before placing the bliss bombs on the baking sheet, dip each one into the garlic butter mixture, ensuring they are well-coated. This adds a beautiful sheen and enhances the flavor.
3. Arrange on Baking Sheet: Place the coated bliss bombs on the prepared baking sheet, leaving space between each bomb to allow for expansion during baking.
Baking Tips for Perfect Bliss Bombs
Achieving golden brown perfection requires attention to baking times and visual cues.
Ideal Baking Times and Temperatures:
– Bake your Cheesy Garlic Bliss Bombs in the preheated oven for about 15-20 minutes or until they are golden brown and puffed up.
Visual Cues:
– Look for a deep golden color on the outside and a slight rise in the dough. If you notice the tops are browning too quickly, you can loosely cover them with aluminum foil to prevent burning.
Letting Them Cool:
– After baking, allow the bliss bombs to cool on the baking sheet for about 5 minutes before transferring them to a wire rack. This resting period helps the cheese settle and makes them easier to handle.
Serving Suggestions
Cheesy Garlic Bliss Bombs are versatile and can be paired with various dips or sauces to enhance their flavor.
Dip Ideas:
– Consider serving these bliss bombs with marinara sauce, ranch dressing, or a garlic aioli for an extra layer of flavor. The creamy dips complement the cheesy interior and buttery exterior beautifully.
Serving Sizes and Occasions:
– These bliss bombs are perfect for parties, game day gatherings, or family dinners. A serving size of 2-3 bombs per person is usually ideal, but feel free to adjust based on your crowd’s appetite.
Presentation Ideas:
– For a visually appealing presentation, arrange the bliss bombs on a large platter, garnished with fresh parsley or basil. You can even sprinkle some extra shredded cheese on top or drizzle with additional garlic butter right before serving.
Nutritional Information
Understanding the nutritional aspects of the ingredients used in your Cheesy Garlic Bliss Bombs can help you manage your dietary choices.
Overview of Nutritional Aspects:
– Each bliss bomb is rich in carbohydrates and protein from the biscuit and cheese. They also contain fats from the butter and cream cheese, contributing to their decadent flavor.
Portion Sizes and Dietary Adaptations:
– To make gluten-free versions of these bliss bombs, substitute all-purpose flour with a gluten-free flour blend. Be mindful of the cheese used, as some may contain gluten, so check labels if necessary.
Conclusion
Making Cheesy Garlic Bliss Bombs at home is not just about cooking; it’s about crafting a delightful experience that you can share with family and friends. The joy of biting into a warm, gooey center surrounded by a buttery, garlic-infused crust is unparalleled.
These bliss bombs are incredibly versatile, allowing for variations like adding cooked bacon, herbs, or different cheese types for a personal touch. Whether it’s a casual gathering or a festive occasion, these Cheesy Garlic Bliss Bombs will surely be a hit.
Encourage your culinary creativity by experimenting with different fillings or serving options. The possibilities are endless, and each batch can be a unique expression of your taste. So, roll up your sleeves, gather your ingredients, and indulge in the bliss of these cheesy delights.