
If you love warm, flaky treats, you’ll adore my easy Chocolate Chunk Scones recipe. These scones are packed with rich, semi-sweet chocolate chunks, making them a perfect pick-me-up for any time of day. With just a handful of simple ingredients and clear steps, you’ll whip up a batch that your friends and family will rave about. Ready to impress your taste buds? Let’s dive into this delightful recipe!
Why I Love This Recipe
- Irresistible Flavor: The combination of rich chocolate chunks and buttery scone makes each bite a delightful experience.
- Easy to Make: This recipe comes together quickly, perfect for both novice bakers and seasoned pros.
- Versatile Enjoyment: These scones are great for breakfast, brunch, or as an afternoon treat with tea or coffee.
- Customizable: Feel free to add your favorite mix-ins like nuts or dried fruits to make them your own!
Ingredients
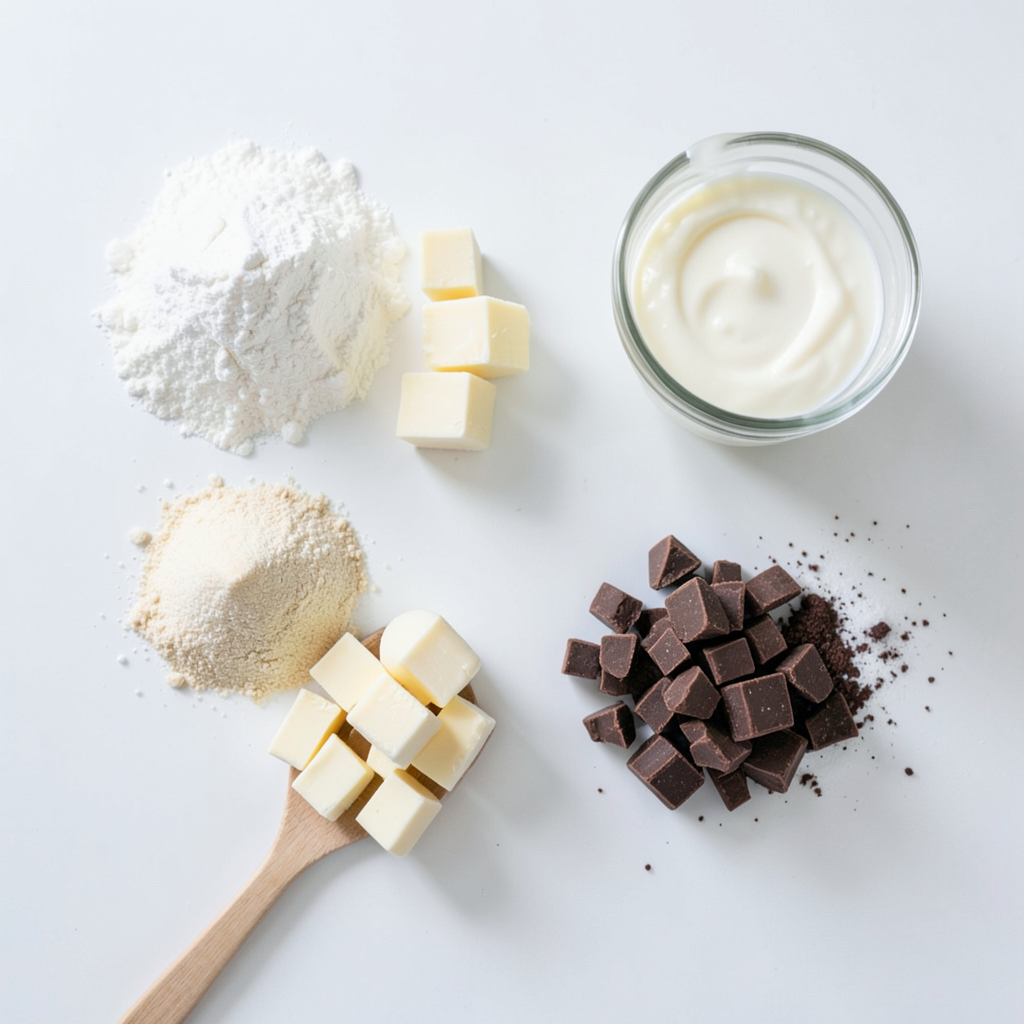
Detailed List of Ingredients
- 2 cups all-purpose flour
- 1/4 cup granulated sugar
- 1 tablespoon baking powder
- 1/2 teaspoon salt
- 1/3 cup cold unsalted butter, cubed
- 3/4 cup heavy cream
- 1 teaspoon vanilla extract
- 1 cup semi-sweet chocolate chunks
- 1 egg (for egg wash, optional)
- Coarse sugar for sprinkling on top (optional)
To make these chocolate chunk scones, gather your ingredients first. Using quality ingredients helps create a better flavor.
Start with all-purpose flour. This forms the base of our scones. Then, add granulated sugar for sweetness. Baking powder provides the lift, while salt balances the flavors.
Next, you'll need cold unsalted butter. Cut it into small pieces. Keeping it cold helps your scones rise well.
After that, pour in heavy cream. It adds richness and moisture. Add a splash of vanilla extract for a lovely aroma.
Now, the star of the show: semi-sweet chocolate chunks. They melt slightly while baking, giving a gooey texture.
If you want a shiny finish, use an egg for an egg wash. Sprinkling coarse sugar on top adds a nice crunch.
These ingredients come together to create a delightful treat. Each bite is rich, sweet, and full of chocolatey goodness. Enjoy mixing and baking!
Step-by-Step Instructions
Prepping the Dough
1. First, preheat your oven to 400°F (200°C). Line a baking sheet with parchment paper.
2. In a large bowl, mix together the flour, sugar, baking powder, and salt. Whisk until combined.
3. Next, add the cold, cubed butter to the flour mix. Use your fingers or a pastry cutter. Work the butter in until it looks like coarse crumbs.
Mixing Ingredients
1. Now, pour in the heavy cream and vanilla extract. Stir until everything is just combined. Be careful, do not overmix.
2. Gently fold in the chocolate chunks. Make sure they are evenly spread throughout the dough.
Shaping and Baking
1. On a lightly floured surface, turn out the dough. Pat it into a circle about 1 inch thick.
2. Cut the dough into 8 equal wedges, like slicing a pizza. Place them on the prepared baking sheet.
3. If you want a shiny top, beat the egg and brush it over the scones. You can also sprinkle coarse sugar on top for extra sweetness.
4. Bake for 15-20 minutes. They should be lightly golden on top when done.
5. Let them cool for a few minutes on the baking sheet. Then, transfer the scones to a wire rack.
Tips & Tricks
Perfecting the Scone Texture
To make the best chocolate chunk scones, avoid overmixing the dough. When you mix too much, the scones can become tough. Just stir until the ingredients blend together.
For flour, I recommend all-purpose flour. It gives a nice balance of structure and softness. You can try cake flour for a lighter scone, but all-purpose works great for this recipe.
Baking Techniques
To achieve a golden-brown top, brush the scones with an egg wash. This gives them a nice shine and color. If you prefer a sweet touch, sprinkle coarse sugar on top before baking.
Using parchment paper on your baking sheet makes cleanup easy. It also helps prevent the scones from sticking, ensuring they come off smoothly.
Serving Suggestions
Enjoy your scones with a warm cup of tea or coffee. They pair well with clotted cream or butter for extra richness.
For more flavor, try drizzling melted chocolate on top or adding a dusting of powdered sugar. Fresh fruit preserves can also elevate your scone experience, making each bite delightful.
Pro Tips
- Use Chilled Ingredients: Ensure your butter and cream are cold to achieve the flakiest scones possible.
- Don’t Overmix: Mix the dough just until combined to prevent tough scones; a little bit of floury bits is okay.
- Experiment with Flavors: Feel free to add nuts, dried fruits, or different types of chocolate to customize your scones.
- Serve Fresh: Enjoy scones warm from the oven for the best texture and flavor; they can be reheated briefly in the oven.
Variations
Flavor Variations
You can make your chocolate chunk scones even more exciting. Adding fruits like blueberries or raspberries can give a fresh twist. The sweet, tart flavors work well with the rich chocolate. Just fold in about a cup of your chosen fruit before shaping the dough.
You can also swap in nuts. Walnuts or pecans add a nice crunch. Use about half a cup, and chop them roughly. This will give your scones added texture and flavor.
Healthier Alternatives
For those wanting a healthier scone, try using whole wheat flour. This gives a nutty taste and more fiber. You can replace half of the all-purpose flour with whole wheat flour. The texture may be a bit denser, but it will still be tasty.
You can also substitute lighter dairy options. Use low-fat milk or almond milk instead of heavy cream. This will cut calories but still keep the scone moist.
Seasonal Twists
Each season brings new flavors. In fall, try adding pumpkin spice to your dough. Just mix in a teaspoon of pumpkin pie spice with the dry ingredients. This gives a warm, cozy flavor that pairs well with chocolate.
In winter, consider using peppermint extract. A few drops can turn your scones into a minty treat. These seasonal twists keep the recipe fun and fresh all year long.
Storage Info
Best Practices for Storing Scones
To keep your chocolate chunk scones fresh, you have some easy options. For short-term storage, place them in an airtight container at room temperature. This keeps them soft and tasty for about two days. If you want them to last longer, put them in the fridge. Just remember that the cold can make them a bit dry, so try to eat them within a week.
To maintain freshness, always let your scones cool completely before storing. This prevents moisture buildup, which can make them soggy. If you plan to serve them later, you can also wrap them in plastic wrap before putting them in the container.
Freezing for Later
Freezing is a great way to save scones for later. You can freeze both raw and baked scones. If you freeze raw scones, shape them first, then place them on a baking sheet. Once they are frozen solid, transfer them to a freezer bag. This way, you can bake fresh scones anytime!
For baked scones, let them cool completely. Wrap each scone in plastic wrap and place them in a freezer bag. They can stay fresh for about three months.
When you're ready to enjoy your frozen scones, reheat them in the oven. Preheat to 350°F (175°C) and bake for about 10 minutes. This makes them warm and soft again. If they are raw, bake them straight from the freezer, adding a few extra minutes to the baking time. Enjoy those warm chocolatey bites!
FAQs
Common Questions About Chocolate Chunk Scones
Can I substitute different types of chocolate? Yes, you can! Feel free to swap semi-sweet chocolate for dark, milk, or even white chocolate. Each type brings its own flavor. Just keep in mind that the sweetness may change.
How can I avoid flat scones? To keep scones tall, make sure your baking powder is fresh. Cold butter is key too. Work it into the flour until it looks like crumbs. Don't overmix once you add the cream and chocolate.
What’s the best way to enjoy scones after baking? Enjoy scones warm, right out of the oven. Drizzle them with melted chocolate or dust with powdered sugar. They pair great with tea or coffee for a cozy treat.
How do I know when the scones are fully baked? Look for a light golden color on top. You can also gently tap the bottom of a scone; it should sound hollow. If they are too soft in the middle, they need more time.
Can I make the dough ahead of time? Yes, you can! Prepare the dough and wrap it tightly in plastic. Store it in the fridge for up to 24 hours. Just remember to let it sit at room temperature for a bit before baking.
You learned how to make tasty chocolate chunk scones. We covered key ingredients, step-by-step instructions, and helpful tips. You can try fun variations to make them unique. Don’t forget storage tips to keep them fresh. Scones are great with tea or coffee. Enjoy your baking and share your scones with friends. These treats will impress anyone who tries them. Happy baking!