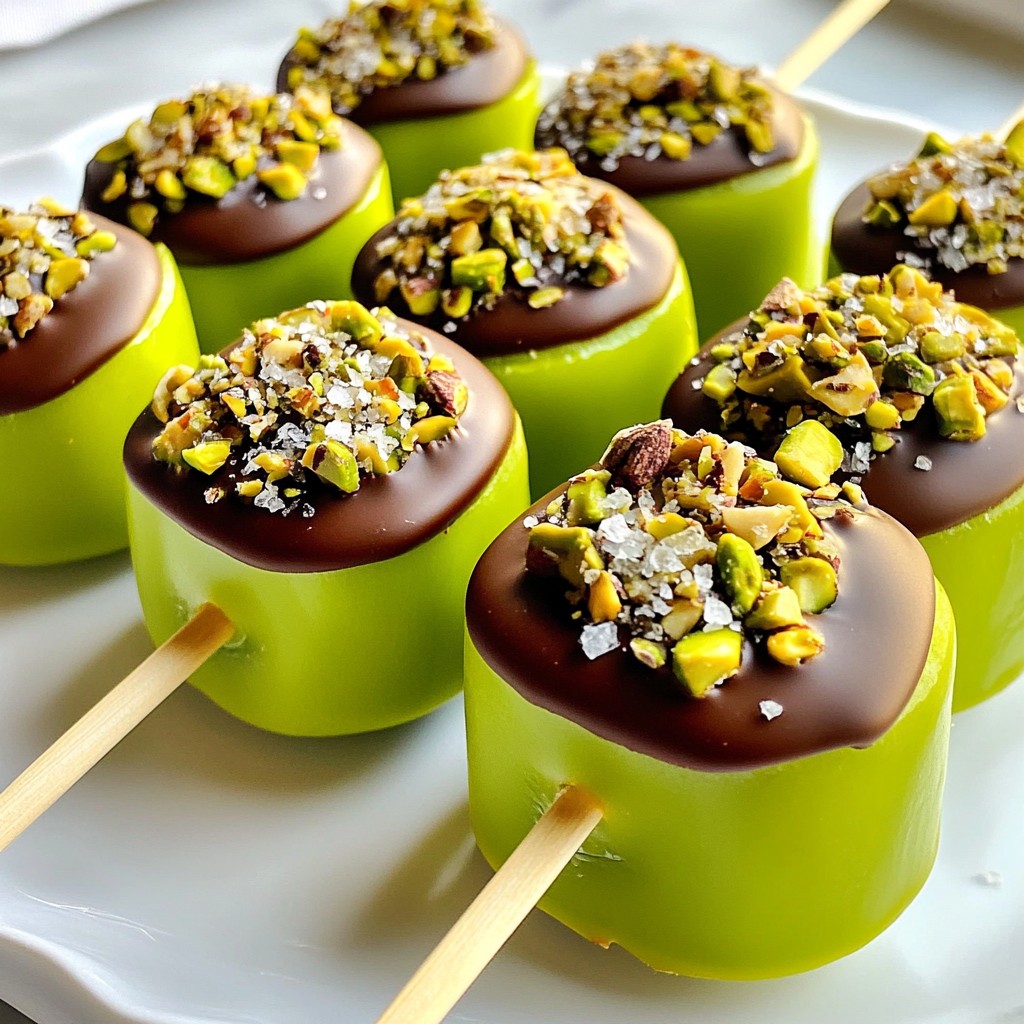
Looking for a fun, tasty treat? Chocolate Covered Kiwi Pops are perfect for you! These frozen delights combine sweet kiwi and rich chocolate, making them a hit for kids and adults alike. With just a few simple ingredients and easy steps, you’ll have a refreshing snack ready in no time. Join me as we dive into this delicious recipe that will brighten your day and cool you off!
Why I Love This Recipe
- Refreshing Treat: These chocolate-covered kiwi pops are a perfect blend of delicious and refreshing, making them an ideal snack for hot days.
- Nutritious Indulgence: With the natural sweetness of kiwi and the goodness of nuts, you can enjoy a guilt-free dessert that’s also packed with nutrients.
- Easy to Make: This recipe requires minimal ingredients and steps, making it a simple yet impressive treat to whip up for family and friends.
- Customizable: You can easily switch up the toppings and chocolate types, allowing for endless variations to suit your taste!
Ingredients
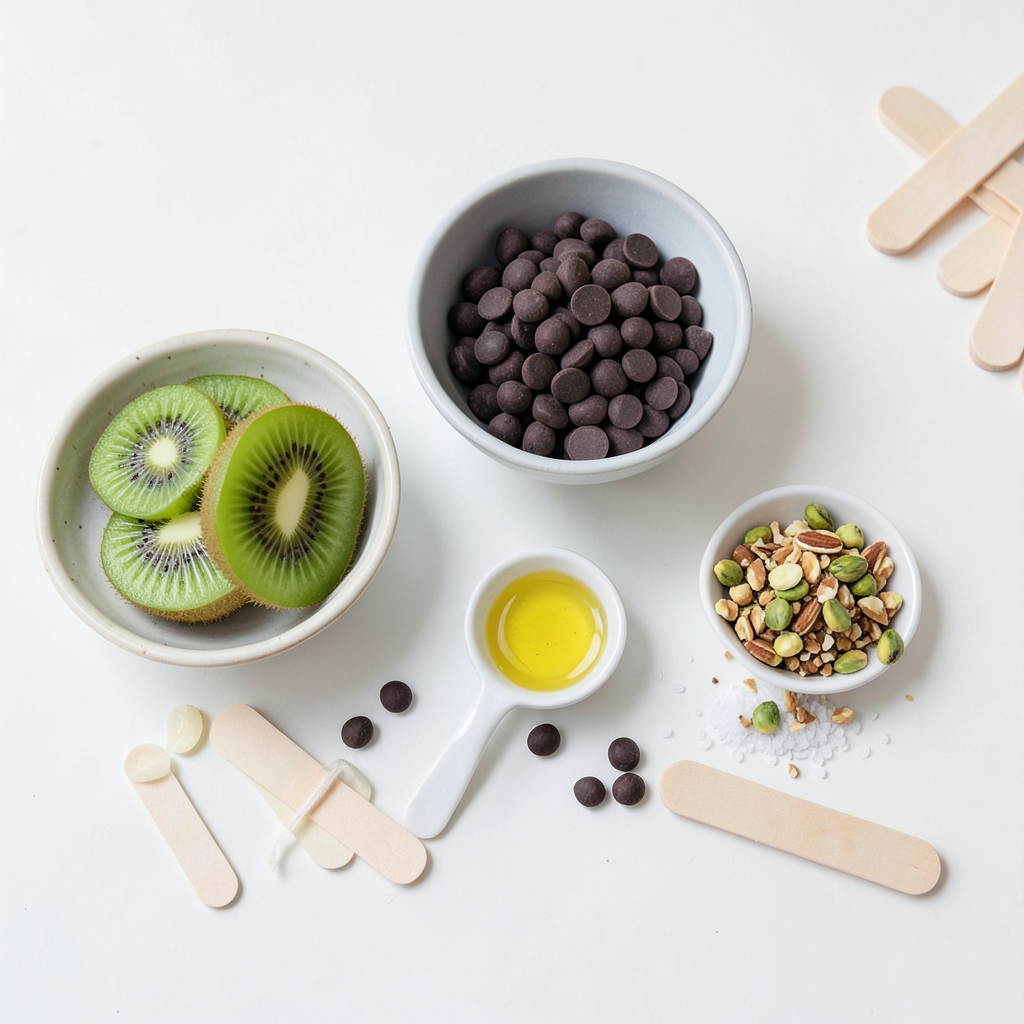
Main Ingredients
- 4 ripe kiwis, peeled and sliced into thick rounds
- 1 cup dark chocolate chips
- 1 tablespoon coconut oil
Additional Ingredients
- 1/2 cup crushed nuts (almonds or pistachios)
- Sea salt flakes (for garnish)
- Sticks (like popsicle or skewer sticks)
The main ingredients here are simple yet flavorful. The kiwis should be ripe, which means they will taste sweet and juicy. The dark chocolate chips bring rich flavor, while coconut oil helps the chocolate melt smooth.
You also need crushed nuts for crunch. Almonds and pistachios work well. They add texture and taste. Sea salt flakes give a nice touch, balancing the sweet and rich flavors.
To make these pops, you need sticks. Popsicle sticks or skewers will work perfectly. They help you hold the treats while you enjoy them. This recipe is fun and easy, perfect for a hot day or a special treat!
Step-by-Step Instructions
Preparing the Kiwi
To prepare the kiwi, start by peeling each one. Then cut them into thick rounds. Aim for about 1 inch thick. Take a stick and gently push it into the center of each slice. This creates a handy popsicle handle. Make sure the stick goes in deep enough to hold well. Set your prepared kiwi pops aside, ready for the next steps.
Melting the Chocolate
Next, let's melt the chocolate. In a microwave-safe bowl, mix the dark chocolate chips with coconut oil. The oil helps the chocolate to melt smoothly. Microwave the bowl in 30-second intervals. After each interval, take the bowl out and stir the chocolate. Keep going until the chocolate is fully melted and smooth. It should be glossy and easy to dip the kiwis into.
Coating and Chilling
Now, it's time to coat your kiwi pops. Dip each kiwi slice into the melted chocolate. Make sure it’s well covered. Let any extra chocolate drip off. After dipping, roll the chocolate-covered kiwi in crushed nuts. This gives a nice crunch. Place the coated pops on a parchment-lined baking sheet. For a burst of flavor, sprinkle a pinch of sea salt on top of each one. Finally, put the baking sheet in the freezer for about 30 minutes. This helps the chocolate to set. Once it's set, your chocolate-covered kiwi pops are ready to enjoy!
Tips & Tricks
Perfecting the Chocolate Dip
To get a perfect chocolate coat, start with melted chocolate. Mix dark chocolate chips with coconut oil. Use a microwave-safe bowl. Heat the mix in 30-second bursts. Stir it well between each burst. This keeps the chocolate smooth.
When you dip the kiwi, make sure to cover it fully. Hold the kiwi slice by the stick. Dip it in the chocolate and let the excess drip off. This helps avoid a gooey mess.
Enhancing Flavor
You can make your pops even tastier with fun toppings. Try rolling the coated kiwi in crushed nuts. Almonds or pistachios add a nice crunch.
For a twist, sprinkle some sea salt on top. The salt makes the chocolate flavor pop. You can also drizzle more melted chocolate on top. This adds a nice look and extra flavor.
Customization Tips
Feel free to switch up the chocolate types. Milk chocolate gives a sweeter taste. White chocolate adds a creamy flavor. Dark chocolate offers a rich taste.
You can also explore different toppings. Try shredded coconut or mini chocolate chips. Using colorful sprinkles can make the pops fun for kids. Just be creative and enjoy the process!
Pro Tips
- Choose Ripe Kiwis: Make sure your kiwis are ripe but firm to ensure they hold their shape during the coating process.
- Use Quality Chocolate: Opt for high-quality dark chocolate for a richer flavor and smoother coating.
- Experiment with Toppings: Try different toppings like shredded coconut or sprinkles for a fun twist on these pops.
- Serve Chilled: For the best experience, serve these pops straight from the freezer for a refreshing treat.
Variations
Alternative Fruits
You can swap kiwis for many other fruits. Try bananas, strawberries, or pineapple. Each fruit brings a new taste. For bananas, slice them into thick rounds. Strawberries can be dipped whole. Pineapple chunks add a tropical twist.
Dietary Variations
You can easily make this treat vegan. Use dairy-free chocolate chips instead of dark chocolate. Coconut oil is already vegan, so that works well. For gluten-free, just ensure your chocolate chips are gluten-free. These simple swaps make the pops fit your diet.
Fun Flavor Combinations
Add a fun twist with flavored chocolate. Look for mint, orange, or raspberry chocolate. These flavors boost the taste of the kiwi. You can also sprinkle cinnamon or chili powder on top. These spices add a kick to each bite. Experimenting with flavors makes each pop special!
Storage Info
How to Store the Pops
To store your chocolate-covered kiwi pops, place them in an airtight container. This keeps them fresh and prevents freezer burn. If you have space, you can also wrap each pop in plastic wrap. Make sure to separate layers with parchment paper to avoid sticking. Store the container flat in the freezer for the best results.
Shelf Life
These pops can last up to two weeks in the freezer. After that, they may lose their flavor and texture. To enjoy them at their best, try to eat them within this two-week time frame. Keeping them in a sealed container helps maintain their taste and quality.
Re-thawing or Consuming
When you're ready to enjoy a kiwi pop, take it out of the freezer. Let it sit at room temperature for a few minutes. This helps soften the chocolate a little, making it easier to bite into. If you’re in a hurry, you can run it under cold water for a few seconds. Serve them cold for a refreshing treat!
FAQs
Can I use different types of chocolate?
Yes, you can use different types of chocolate for kiwi pops. Milk chocolate gives a sweet taste. White chocolate is creamier and sweeter. Dark chocolate has a rich flavor and more cacao. Each type changes the taste and texture. Feel free to mix chocolates for a fun twist!
How do I know when the chocolate is fully melted?
Watch for a few signs to know your chocolate is ready. The chocolate should look smooth and glossy. Stir it to check for lumps. If it stirs easily without resistance, it’s melted. Be careful not to overheat it. Burned chocolate is not good!
Are chocolate-covered kiwi pops healthy?
Chocolate-covered kiwi pops have some healthy perks. Kiwi is high in vitamins C and E. It also has fiber, which is great for digestion. Dark chocolate has antioxidants. However, watch out for sugar in chocolate. Enjoy these treats in moderation for a balanced snack!
This blog post covered how to make delicious chocolate-covered kiwi pops. We discussed key ingredients like fresh kiwis and dark chocolate. I shared step-by-step instructions for preparing, melting, and coating the kiwi. You got tips for perfecting your pops, exploring variations, and proper storage.
These treats are fun and easy to customize. Experiment with different fruits and toppings. Enjoy your tasty creations, and don’t forget to share them with others!