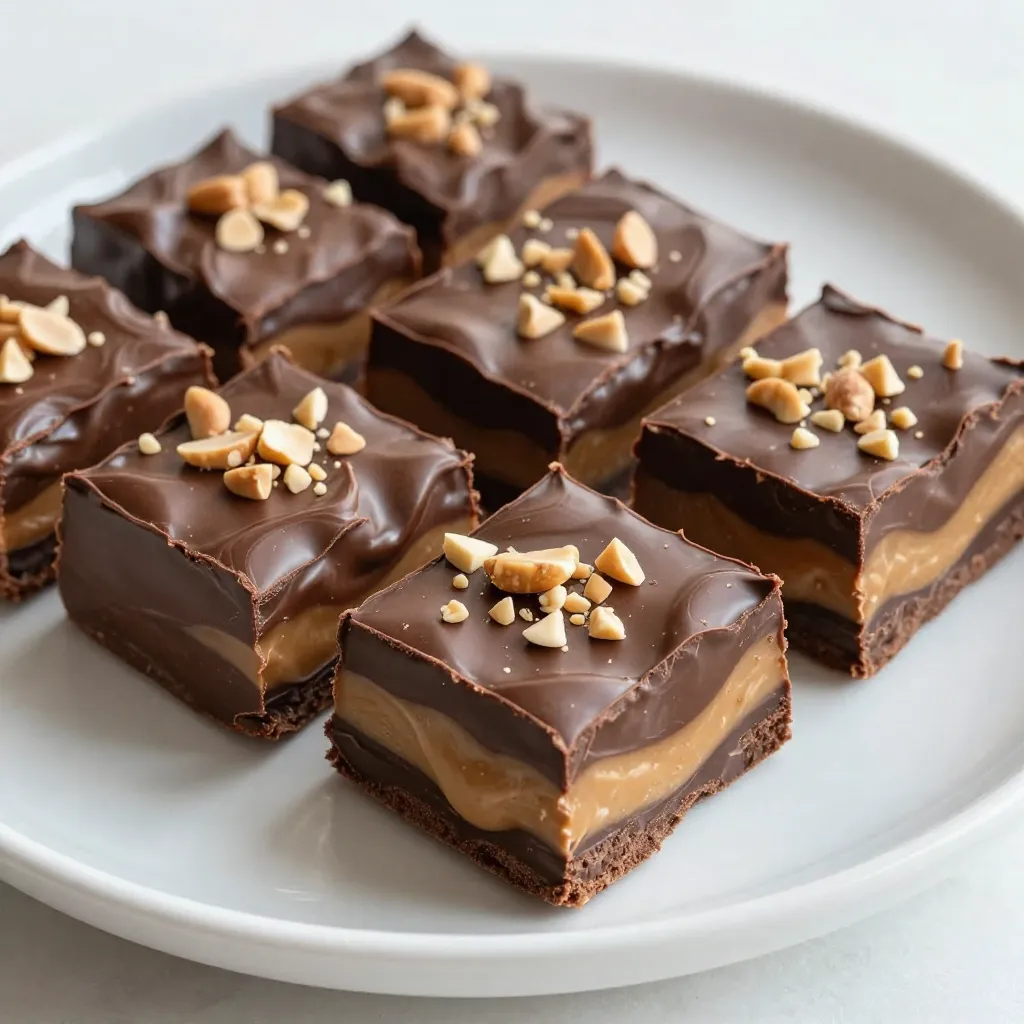
Craving something sweet and rich? You’re in for a treat with my Chocolate Peanut Butter Swirl Fudge! This easy recipe combines creamy peanut butter and rich chocolate for a delightful dessert that melts in your mouth. I’ll guide you through each step, from gathering the ingredients to cutting perfect squares. Whether you’re a novice or a pro, this fudge will impress your taste buds and friends. Let’s dive in and make a batch of this decadent delight!
Why I Love This Recipe
- Decadent Flavor Combination: The rich chocolate and creamy peanut butter create a mouthwatering contrast that is hard to resist.
- Easy to Make: This fudge comes together in just 15 minutes, making it a quick and simple treat for any occasion.
- Perfect for Sharing: With 16 squares, this recipe is ideal for gatherings, parties, or just to share with family and friends.
- Customizable: Add chopped peanuts or drizzle extra chocolate on top for a personal touch that elevates the presentation.
Ingredients
Main Ingredients
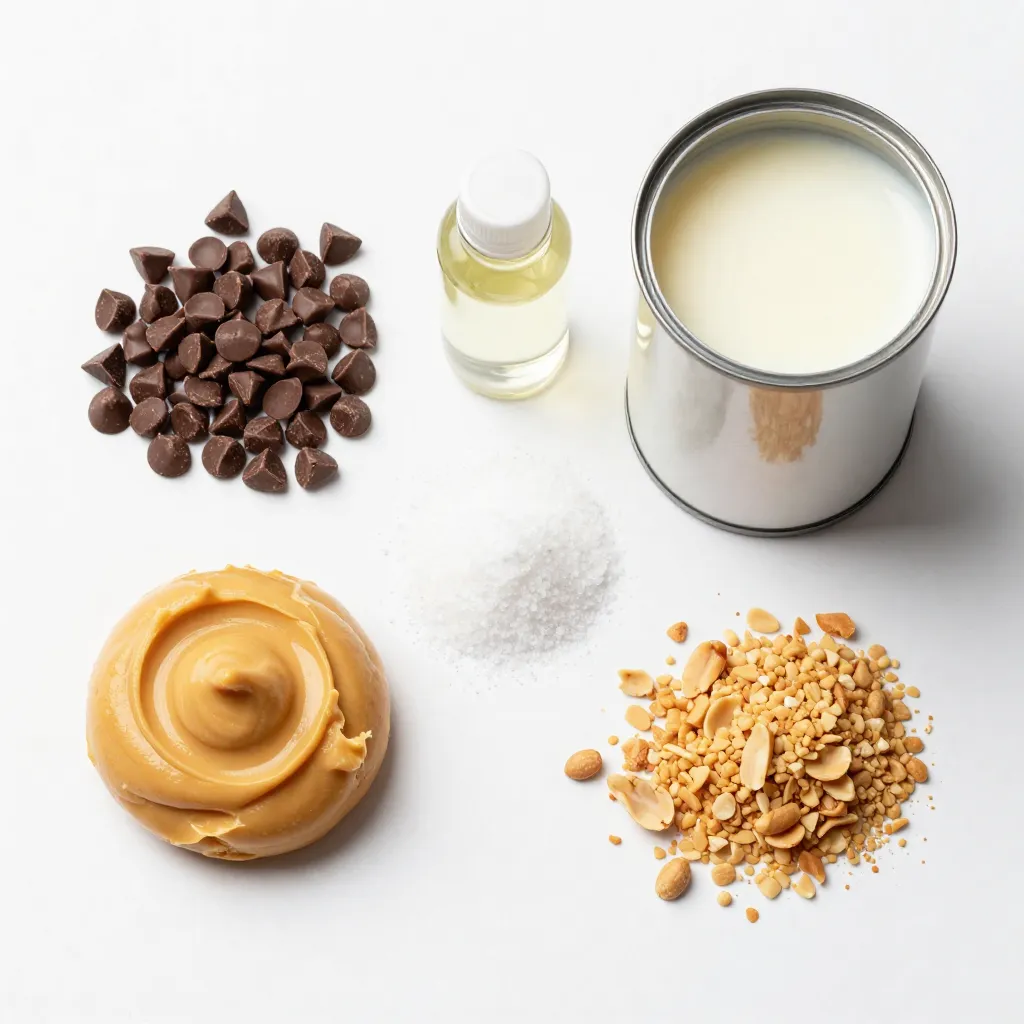
– 1 cup semisweet chocolate chips
– 1 cup creamy peanut butter
– 1 can (14 oz) sweetened condensed milk
Additional Ingredients
– 1 teaspoon vanilla extract
– 1/4 teaspoon salt
– 1/2 cup chopped peanuts (optional, for garnish)
The key to making great Chocolate Peanut Butter Swirl Fudge lies in choosing the right ingredients. First, I use semisweet chocolate chips for that rich chocolate flavor. They melt well and blend perfectly with peanut butter. Next, I always grab creamy peanut butter. It gives the fudge a smooth texture that makes each bite enjoyable.
The sweetened condensed milk is a game changer. It acts as a sweetener and adds creaminess. This ingredient is essential for binding the chocolate and peanut butter together. I also add a touch of vanilla extract for extra flavor. A small pinch of salt helps to balance the sweetness.
For a fun crunch, I sometimes add chopped peanuts on top. They add a nice texture and a burst of nutty flavor. You can skip them if you want a smoother finish. Each ingredient plays a role in creating that dreamy, swirled fudge.
Step-by-Step Instructions
Preparation
– Line an 8×8 inch baking dish with parchment paper.
– Allow some paper to hang over the edges. This helps lift the fudge out later. Set the dish aside.
Melting Chocolate and Peanut Butter
– In a medium saucepan, combine 1 cup of semisweet chocolate chips with half of the sweetened condensed milk (about 7 oz).
– Heat over low while stirring. Keep stirring until the mixture is smooth and shiny.
– Remove the pan from heat. Stir in 1/2 teaspoon of vanilla extract and a pinch of salt.
– In another saucepan, add 1 cup of creamy peanut butter and the remaining sweetened condensed milk.
– Heat this mixture over low heat too. Stir until it becomes creamy and well mixed.
– Remove from heat and stir in the remaining 1/2 teaspoon of vanilla extract and 1/4 teaspoon of salt.
Layering and Swirling
– Pour the melted chocolate fudge into the prepared dish.
– Spread it evenly across the bottom.
– Next, dollop spoonfuls of the peanut butter mixture on top of the chocolate layer.
– Grab a knife or skewer. Gently swirl the peanut butter into the chocolate.
– Be careful not to mix them too much. You want a pretty marbled effect.
Cooling and Serving
– Place the dish in the refrigerator. Chill it for at least 2 hours, or until the fudge is firm.
– Once set, lift the fudge out using the parchment paper.
– Cut it into small squares. If you want, sprinkle chopped peanuts on top for extra crunch.
Tips & Tricks
Perfecting the Fudge
To make the best fudge, keep the heat low while melting. This will help prevent burning. Stir constantly to mix the chocolate and milk well. The goal is a smooth texture. If you stop stirring, the fudge may clump up.
Serving Suggestions
For a lovely presentation, serve fudge squares on a pretty platter. Drizzle some melted chocolate on top for a fancy touch. You can also sprinkle a bit of sea salt for extra flavor. Chopped peanuts add crunch and color.
Common Mistakes to Avoid
One common mistake is over-mixing the swirls. This can make your fudge look muddy instead of marbled. Another mistake is not chilling the fudge long enough. If it’s not cold enough, it won’t set well. Always chill for at least two hours.
Pro Tips
- Use High-Quality Chocolate: Opt for high-quality semisweet chocolate chips for a richer flavor in your fudge.
- Let it Chill Properly: Make sure to refrigerate the fudge for the full two hours to achieve the perfect set and texture.
- Experiment with Swirls: Try different swirling techniques with a toothpick or fork for unique patterns and presentations.
- Customize Your Toppings: Feel free to add other toppings like mini marshmallows, or drizzles of caramel for extra flavor!
Variations
Flavor Variations
You can have fun with different flavors of fudge. Here are two popular options:
– White chocolate peanut butter fudge: Use white chocolate chips instead of semisweet. Melt them in the same way. This fudge will be sweet and creamy, with a nice peanut butter kick.
– Dark chocolate version: Swap semisweet chocolate for dark chocolate chips. This will give your fudge a rich, intense flavor. Dark chocolate pairs well with peanut butter.
Ingredient Substitutions
Sometimes, you might not have all the ingredients. Here are some easy swaps:
– Nut butter alternatives: If you need a nut-free option, try sunbutter or soy nut butter. These work well and keep the taste delightful.
– Dairy-free suggestions: For a dairy-free version, use coconut condensed milk. It adds a nice hint of coconut flavor along with the creaminess.
Add-ins and Toppings
You can make your fudge even more exciting with add-ins and toppings:
– Dried fruits: Add raisins or cranberries for a chewy texture. They contrast well with the creaminess of the fudge.
– Chocolate chunks: Mix in some extra chocolate chunks for a rich, chocolatey bite.
– Sprinkles: Top with colorful sprinkles for fun and flair. They add a playful touch to your fudge.
Storage Info
How to Store
To keep your chocolate peanut butter swirl fudge fresh, use an airtight container. This helps prevent it from drying out or absorbing other smells. Place parchment paper between layers if you stack pieces. Store the fudge in a cool, dry place, away from direct sunlight. A pantry or cupboard works well.
Shelf Life
When stored properly, your fudge lasts about two weeks at room temperature. It can stay fresh in the fridge for up to three weeks. If you want to keep it longer, you can freeze it. Just make sure to wrap it well to avoid freezer burn. Thaw it in the fridge before serving.
Preparing for Events
If you plan to make fudge ahead of time, do so up to a week before your event. This allows the flavors to develop. Cut it into squares and store them in your container. For transport, use a sturdy box lined with parchment paper to keep it safe. This way, you can share your tasty treat with friends and family with ease.
FAQs
How long does chocolate peanut butter swirl fudge last?
Chocolate peanut butter swirl fudge stays fresh for about one week. Store it in an airtight container. Keep it in a cool, dry place. For longer storage, you can freeze it. Wrap the fudge tightly in plastic wrap and place it in a freezer bag. It can last for up to three months in the freezer. Just remember to let it thaw in the fridge before you enjoy it!
Can I use crunchy peanut butter instead of creamy?
Yes, you can use crunchy peanut butter! It changes the texture, making the fudge more interesting. The chunks of peanut will add a nice bite. If you enjoy a bit of crunch, go for it! Just ensure that it blends well with the chocolate and condensed milk.
What can I do if my fudge is too soft?
If your fudge is too soft, don’t worry. You can fix it by chilling it longer in the fridge. If it’s still soft after that, try melting it down again. Add a little more chocolate chips to the mix. Stir until smooth, then re-chill. This should help it firm up nicely.
This blog post covers how to make delicious chocolate peanut butter swirl fudge. You learned about key ingredients like chocolate chips and peanut butter and how to combine them effectively. Following easy steps, you can create fudge that’s both beautiful and tasty. Remember to avoid common mistakes and explore variations to suit your taste. With the right storage tips, your fudge stays fresh for longer. Enjoy making this treat for yourself or as gifts for others. There’s lots of fun in trying new flavors and presenting it creatively. Happy cookin