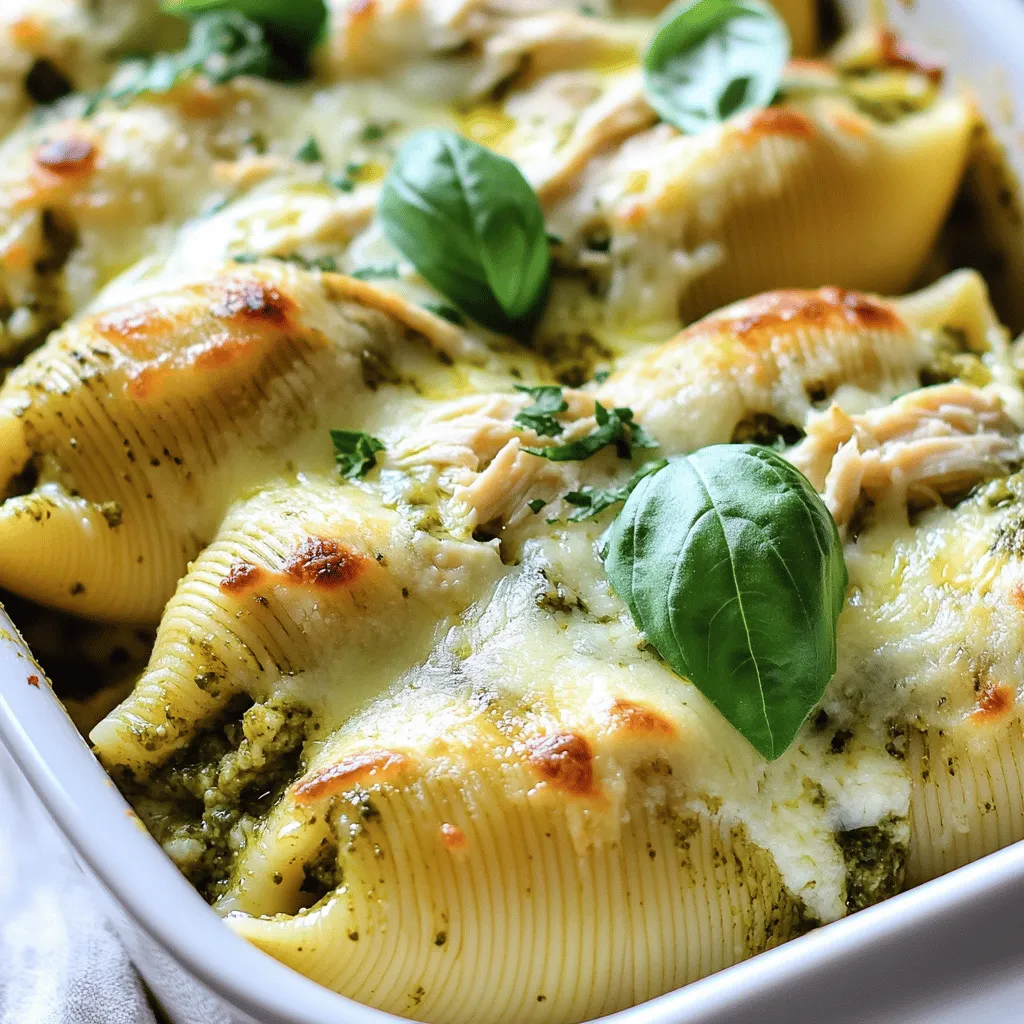
Are you ready for a tasty dish that’s easy to make? Creamy Pesto Chicken Stuffed Shells are a delightful meal you’ll want to share. This recipe combines rich flavors and simple steps, perfect for any night. I’ll guide you through ingredients, tools, and fun tips. Whether you’re a novice cook or a seasoned pro, you’ll find something enjoyable here. Let’s dive into making this creamy, delicious delight!
Why I Love This Recipe
- Comfort Food at Its Best: This dish combines creamy textures and savory flavors, making it the ultimate comfort food that warms your soul.
- Easy to Prepare: With simple ingredients and straightforward steps, this recipe is perfect for a weeknight dinner or a special occasion.
- Customizable Filling: You can easily switch up the filling by adding vegetables or using different proteins, making it versatile for any taste.
- Beautiful Presentation: The vibrant colors of the pesto and fresh basil make this dish not only delicious but also visually appealing on any table.
Ingredients
List of Ingredients for Creamy Pesto Chicken Stuffed Shells
– 12 large jumbo pasta shells
– 1 cup cooked chicken, shredded
– 1 cup ricotta cheese
– 1 cup mozzarella cheese, shredded
– 1/2 cup grated Parmesan cheese
– 1/2 cup basil pesto
– 1 cup heavy cream
– 1 teaspoon garlic powder
– Salt and pepper to taste
– Fresh basil leaves for garnish
Necessary Cooking Tools
To make Creamy Pesto Chicken Stuffed Shells, you need some key tools:
– A large pot for boiling pasta
– A mixing bowl for the filling
– A greased 9×13 inch baking dish
– A small saucepan for the creamy sauce
– A spatula or spoon for mixing and stuffing
Overview of Ingredient Substitutions
You can change some ingredients if needed. Here are a few ideas:
– Use cooked turkey instead of chicken for a different taste.
– Swap ricotta with cottage cheese for a lighter option.
– Try Greek yogurt instead of heavy cream for a healthier sauce.
– Use vegan cheese for a dairy-free version.
– Replace basil pesto with sun-dried tomato pesto for a unique flavor.
These swaps can help you make this dish fit your taste or diet!

Step-by-Step Instructions
Cooking the Pasta Shells
To start, boil water in a large pot. Add salt to the water for flavor. Once it boils, add 12 large jumbo pasta shells. Cook them until they are al dente, about 8 to 10 minutes. Drain the shells and rinse them under cold water. This keeps them from sticking together. Set the shells aside on a clean towel.
Preparing the Filling Mixture
In a mixing bowl, combine the filling ingredients. Add 1 cup of shredded chicken. Next, mix in 1 cup of ricotta cheese. Then, add half of the 1 cup of shredded mozzarella cheese. Sprinkle in 1/2 cup of grated Parmesan cheese. Add 1/2 cup of basil pesto for flavor. Lastly, add 1 teaspoon of garlic powder. Season with salt and pepper to taste. Mix everything well until it’s creamy and smooth.
Stuffing the Shells and Arranging in Dish
Preheat your oven to 375°F (190°C). Now, take each cooked shell and fill it with the chicken and cheese mixture. Be gentle, so the shells don’t break. Place the stuffed shells in a greased 9×13 inch baking dish. Arrange them in a single layer for even cooking.
Sauce Preparation and Assembly
To make your creamy sauce, take a small saucepan and heat it over medium heat. Combine 1 cup of heavy cream and the remaining basil pesto. Stir the mixture gently until it heats up. It should take about 5 minutes. You want the sauce to be warm and slightly thickened. Pour this creamy pesto sauce evenly over the stuffed shells in your baking dish.
Baking Instructions
Cover the baking dish with aluminum foil. Bake in the preheated oven for 25 minutes. After that, remove the foil and bake for another 10 to 15 minutes. You want the cheese on top to be bubbly and golden. Once done, take the dish out and let it cool for a few minutes. Garnish with fresh basil leaves to add color and flavor.
Pro Tips
- Use Fresh Ingredients: For the best flavor, use fresh basil and high-quality chicken. Fresh ingredients enhance the overall taste of the dish.
- Customize the Pesto: Feel free to experiment with different types of pesto, such as sun-dried tomato or spinach, to give your stuffed shells a unique twist.
- Make Ahead: To save time, you can prepare the stuffed shells a day in advance. Just cover them tightly and refrigerate until you’re ready to bake.
- Garnish Wisely: Fresh basil leaves are not just for decoration; they add a burst of flavor. Add them just before serving to keep them vibrant.
Tips & Tricks
Cooking Tips for Perfect Shells
To cook the pasta shells just right, you need to watch the time. Boil them in salted water. Follow the package instructions closely. They should be al dente, firm but not hard. Once done, drain and rinse them under cold water. This step keeps them from sticking together. Lay them out flat to cool.
How to Ensure Flavorful Filling
For a tasty filling, balance is key. Use a mix of chicken, ricotta, and cheeses. I love adding basil pesto for a fresh taste. Don’t forget the garlic powder, too. Season with salt and pepper to boost flavor. Mix everything well, so each bite is full of goodness. Tasting your filling is a must. Adjust the spices if needed.
Best Practices for Baking
When it comes to baking, preheat your oven to 375°F (190°C). This ensures even cooking. Cover the dish with foil for the first part of baking. This keeps the shells moist. After 25 minutes, remove the foil. Let the cheese get bubbly and golden for 10 to 15 minutes more. Keep an eye on it to prevent burning. Let the dish cool for a few minutes before serving. This helps the cheese set and makes serving easier.
Variations
Vegetarian Pesto Stuffed Shells
You can make vegetarian pesto stuffed shells easily. Just skip the chicken. Use more ricotta and add your favorite veggies. Spinach, zucchini, or bell peppers work great. These shells taste fresh and colorful.
Adding Vegetables to the Filling
Adding vegetables to the filling makes it more nutritious. You can mix in cooked broccoli, carrots, or even mushrooms. Chop them small so they fit well in the shells. This adds flavor and a nice crunch to each bite.
Different Sauces and Cheeses to Use
Feel free to change the sauce and cheese. Instead of pesto, use marinara or Alfredo. You can also mix different cheeses. Try goat cheese, feta, or a sharp cheddar. Each change will give a new twist to this dish. Get creative and find your favorite mix!
Storage Info
How to Store Leftover Stuffed Shells
To keep your creamy pesto chicken stuffed shells fresh, let them cool first. Place them in an airtight container. Store the container in the fridge for up to three days. If you want to keep them longer, freezing is a great option.
Freezing and Reheating Instructions
To freeze, wrap the stuffed shells tightly in plastic wrap. Then, place them in a freezer-safe bag or container. They can stay frozen for up to three months. When you’re ready to eat, thaw the shells in the fridge overnight. Reheat them in the oven at 350°F (175°C) for about 25 minutes. Cover with foil to prevent drying out.
Shelf Life of Ingredients Used
Each ingredient has a different shelf life:
– Cooked chicken can last in the fridge for up to 4 days.
– Ricotta cheese stays fresh for about a week once opened.
– Mozzarella cheese lasts around 5 days in the fridge.
– Heavy cream can last up to a week after opening.
– Basil pesto usually stays good for about a week in the fridge, too.
Keeping an eye on these dates helps ensure your stuffed shells taste great every time you enjoy them!
FAQs
Can I use different pasta shapes for this recipe?
Yes, you can use other pasta shapes. Bowtie, rotini, or even lasagna sheets work well. Just make sure the pasta can hold the filling. Each shape gives a unique look and texture.
How do I make this recipe gluten-free?
To make this dish gluten-free, swap regular pasta for gluten-free pasta. Many brands offer gluten-free shells or similar shapes. Check the package for cooking times, as they may vary.
What can I serve with Creamy Pesto Chicken Stuffed Shells?
I love serving these stuffed shells with a fresh salad. A side of garlic bread pairs nicely too. You could try roasted vegetables for a healthy option.
Can I prepare this dish ahead of time?
Yes, you can. Make the dish, then cover it and store it in the fridge. Bake it the next day when you’re ready to eat. You may need to adjust the baking time if it’s cold.
In this blog post, we explored the tasty recipe for Creamy Pesto Chicken Stuffed Shells. We covered the needed ingredients and tools, plus ingredient swaps. I shared step-by-step instructions for cooking and stuffing the shells, along with baking tips. We also discussed fun variations and how to store your leftovers properly.
I hope you feel inspired to try this dish. It’s easy and delicious, perfect for any occasion. Enjoy making and sharing it!