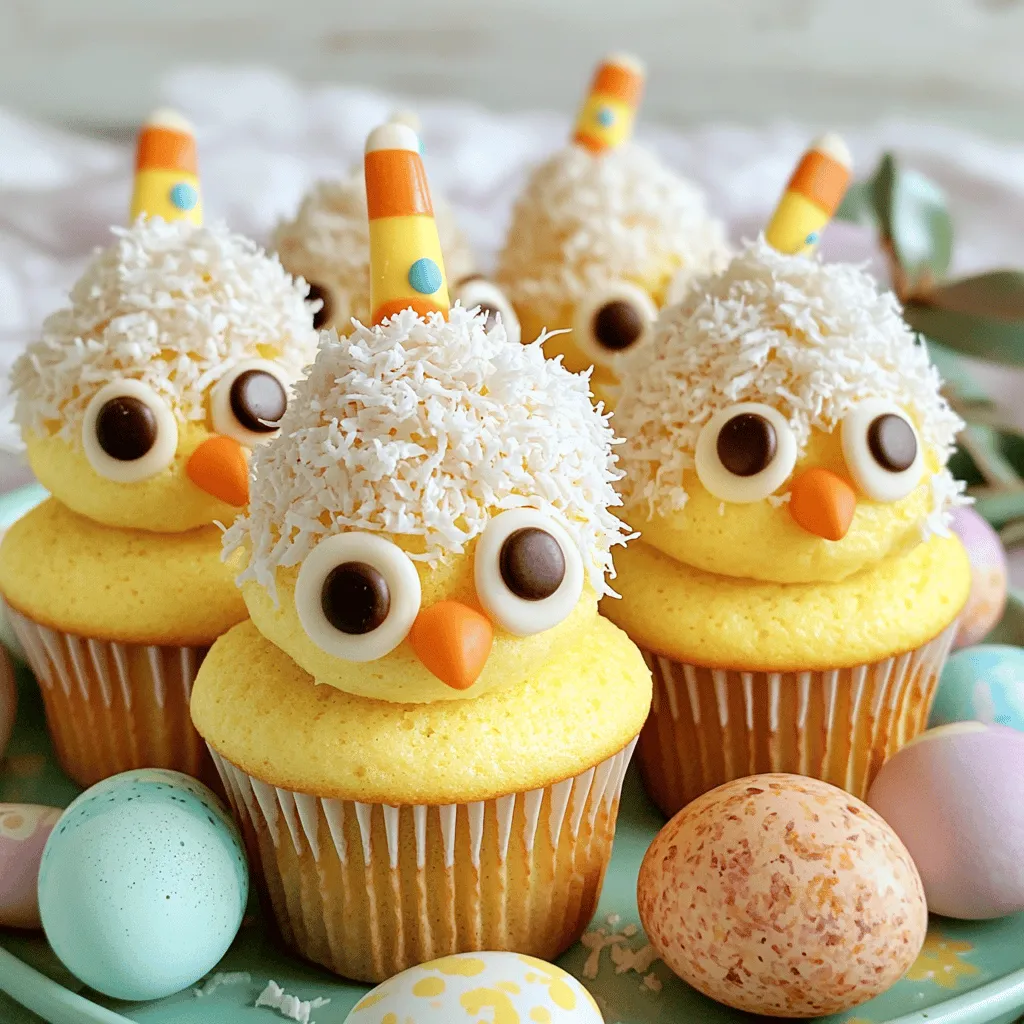
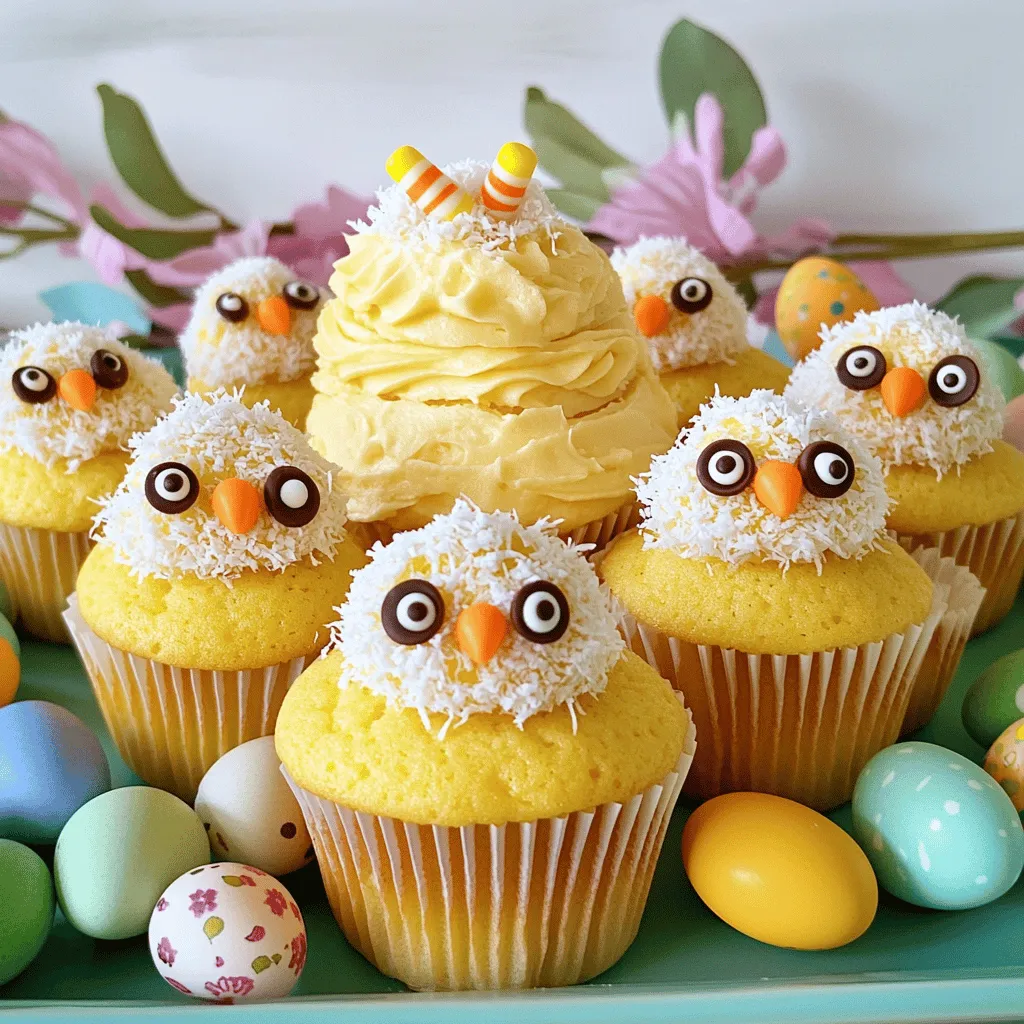
Easter is just around the corner, and there’s no better way to celebrate than with fun and festive Easter Chicks Cupcakes! These delightful treats are not only cute but also easy to make. In this article, I’ll guide you through every step, from choosing the right ingredients to decorating them like a pro. Get ready to impress your friends and family with these adorable cupcakes that are perfect for any spring occasion!
Ingredients
Essential Ingredients for Easter Chicks Cupcakes
– 1 ½ cups all-purpose flour
This gives structure to the cupcakes. It helps them rise and hold shape.
– 1 cup granulated sugar
Sugar sweetens the cupcakes. It also helps them stay moist.
– ½ cup unsalted butter, softened
Softened butter adds richness. It helps create a tender cupcake.
– 2 large eggs
Eggs bind the ingredients together. They help the cupcakes rise.
– 1 teaspoon vanilla extract
Vanilla adds flavor. It gives the cupcakes a warm, sweet aroma.
– ½ cup milk
Milk keeps the batter moist. It helps create a soft texture.
– 1 ½ teaspoons baking powder
Baking powder acts as a leavening agent. It makes the cupcakes fluffy.
– ½ teaspoon baking soda
Baking soda works with the acid in the batter. It helps the cupcakes rise.
– ¼ teaspoon salt
Salt enhances the flavors. It balances the sweetness.
– Yellow food coloring
This gives the cupcakes a cheerful color. It makes them look like little chicks.
– 1 cup coconut flakes
Coconut adds texture. It mimics feathers and gives a tropical taste.
– 1 cup frosting (store-bought or homemade, your choice)
Frosting adds sweetness and decorates the cupcakes. It makes them look festive.
– Mini chocolate chips (for eyes)
These create cute eyes for the chicks. They add a fun touch.
– Candy corn (for beaks)
Candy corn serves as beaks. It adds color and a playful element.
Recommended Tools and Equipment
– Muffin pan and cupcake liners
Use a muffin pan to shape the cupcakes. Cupcake liners keep them neat.
– Mixing bowls and electric mixer
Mixing bowls hold the ingredients. An electric mixer makes mixing easier and faster.
– Measurement tools
Accurate measurements ensure the right taste. Use measuring cups and spoons for best results.
Step-by-Step Instructions
Preparing the Batter
1. Preheat the Oven: Start by setting your oven to 350°F (175°C). This helps the cupcakes bake evenly.
2. Prepare the Liners: Line a 12-cup muffin pan with cupcake liners. This keeps the cupcakes from sticking.
3. Cream the Butter and Sugar: In a bowl, mix together the softened butter and sugar. Beat them until the mixture is light and fluffy. This helps create a soft cupcake.
Baking the Cupcakes
1. Mix the Dry Ingredients: In a separate bowl, whisk together the flour, baking powder, baking soda, and salt. This step adds air and helps the cupcakes rise.
2. Combine Wet Ingredients: Add the eggs and vanilla extract to the butter mixture. Mix until well blended.
3. Combine Everything: Gradually add the dry mix to the wet mix, alternating with milk. Stir until smooth. Add yellow food coloring to make the batter bright.
4. Fill and Bake: Spoon the batter into the cupcake liners, filling each about two-thirds full. Bake for 18-20 minutes. Check doneness with a toothpick; it should come out clean.
Decorating the Cupcakes
1. Frost the Cupcakes: Once cooled, frost each cupcake generously. Aim for a dome shape to mimic the chick’s body.
2. Roll in Coconut: Roll the frosted cupcakes in coconut flakes. This gives them a fluffy, feathered look.
3. Create Chick Faces: Use mini chocolate chips to make eyes by pressing them into the frosting. For the beak, place a piece of candy corn upside down below the eyes.
4. Optional Nest Effect: Add extra coconut on top to create a nest effect. This makes them even cuter!Happy baking!
Tips & Tricks
Baking Tips for Perfect Cupcakes
To get the best cupcakes, start with the right oven temperature. Preheat your oven to 350°F (175°C). This helps the cupcakes rise evenly. To check if they are done, insert a toothpick into the center. If it comes out clean, your cupcakes are ready. If not, give them a few more minutes.
Decorating Tips for a Festive Appearance
You can make your cupcakes look extra fun with different decorating methods. If you want to skip the coconut, you can use fondant to shape cute features. Edible glitter can also add sparkle and joy to your chicks. Just sprinkle it on top for a festive touch.
Common Mistakes to Avoid
One big mistake is overmixing the batter. Mix just until the ingredients blend. This keeps your cupcakes light and fluffy. Another mistake is using stale ingredients. Always check that your baking powder and baking soda are fresh. This ensures your cupcakes rise well and taste great.
Variations
Flavor Variations
You can change up the flavor of your Easter Chicks Cupcakes easily. Try a chocolate or lemon-flavored batter for a twist. To make chocolate cupcakes, use cocoa powder in place of some flour. For lemon, add lemon zest and juice to the batter. This gives a fresh taste perfect for spring. You can also use different frostings. Cream cheese or chocolate frosting adds variety to the sweet treat.
Allergy-Friendly Options
Making these cupcakes for everyone is simple. For gluten-free cupcakes, swap all-purpose flour with a gluten-free blend. You can find many blends at grocery stores. If you need dairy-free options, use a dairy-free butter substitute. Almond milk or soy milk works well instead of regular milk. Always read labels to ensure no nuts are in any ingredient. This keeps everyone safe at the table.
Creative Decorating Ideas
Let your creativity shine when decorating! You can design cupcakes to fit any spring theme. Use pastel colors for a soft look. Edible markers let you draw fun faces or patterns. Sprinkles can add a pop of color and texture. Try star-shaped sprinkles for a fun twist. You can even add tiny edible flowers for a fresh touch. Each cupcake can be a mini work of art!
Storage Info
How to Store Leftover Cupcakes
To keep your Easter Chicks Cupcakes fresh, place them in an airtight container. This helps maintain their moisture and flavor. If you have extra cupcakes, you can refrigerate them for up to five days. For longer storage, freeze them. Just make sure they are wrapped tightly in plastic wrap before putting them in a freezer bag.
Reheating Tips
If you freeze your cupcakes, thaw them in the fridge overnight. This keeps them moist. To warm them, use a microwave. Heat for about 10 seconds, checking often to avoid drying them out. The goal is to enjoy that soft texture and sweet taste.
Shelf Life
These cupcakes taste best within three days of baking. After that, they might start to lose their flavor and texture. Look for signs of spoilage, like a dry or hard texture. If they smell off or have visible mold, it’s time to toss them. Enjoy your Easter treat while it’s fresh and delightful!
FAQs
What are the best food coloring options for these cupcakes?
For vibrant colors, I recommend using gel food coloring. It gives a bright shade without adding too much liquid. Liquid food coloring works too, but it can change the cupcake’s texture. Always check if the food coloring is safe for kids. Most brands are, but it’s good to read the label.
Can I make the cupcakes in advance?
Yes, you can make the cupcakes a day or two ahead of time. Just store them in an airtight container. Wait to frost them until the day of your event. This keeps the frosting fresh and fluffy. You can also freeze the cupcakes for up to three months. Wrap them well to avoid freezer burn.
How can I make these cupcakes vegan?
To make these cupcakes vegan, swap eggs for flaxseed meal. Mix one tablespoon of flaxseed meal with three tablespoons of water. Let it sit for five minutes to thicken. For milk, use almond or soy milk. Replace butter with coconut oil or vegan butter. These swaps keep the cupcakes tasty and moist.
Where can I buy pre-made Easter Chicks Cupcakes?
You can find pre-made Easter Chicks Cupcakes at local bakeries around the holiday. Many online bakeries also offer them for delivery. Websites like Etsy and Goldbelly have unique options. Always check reviews to ensure quality. This way, you can enjoy the fun without any baking!
You now have all you need to bake and decorate delightful Easter Chicks Cupcakes. We covered essential ingredients, tools, and step-by-step instructions. You learned helpful tips to avoid common mistakes and how to store leftovers. With exciting flavor variations and creative decorating ideas, you can make these treats your own. Enjoy the baking process and have fun making cheerful cupcakes that everyone will love. With a little practice, you will impress your friends and family this spring!