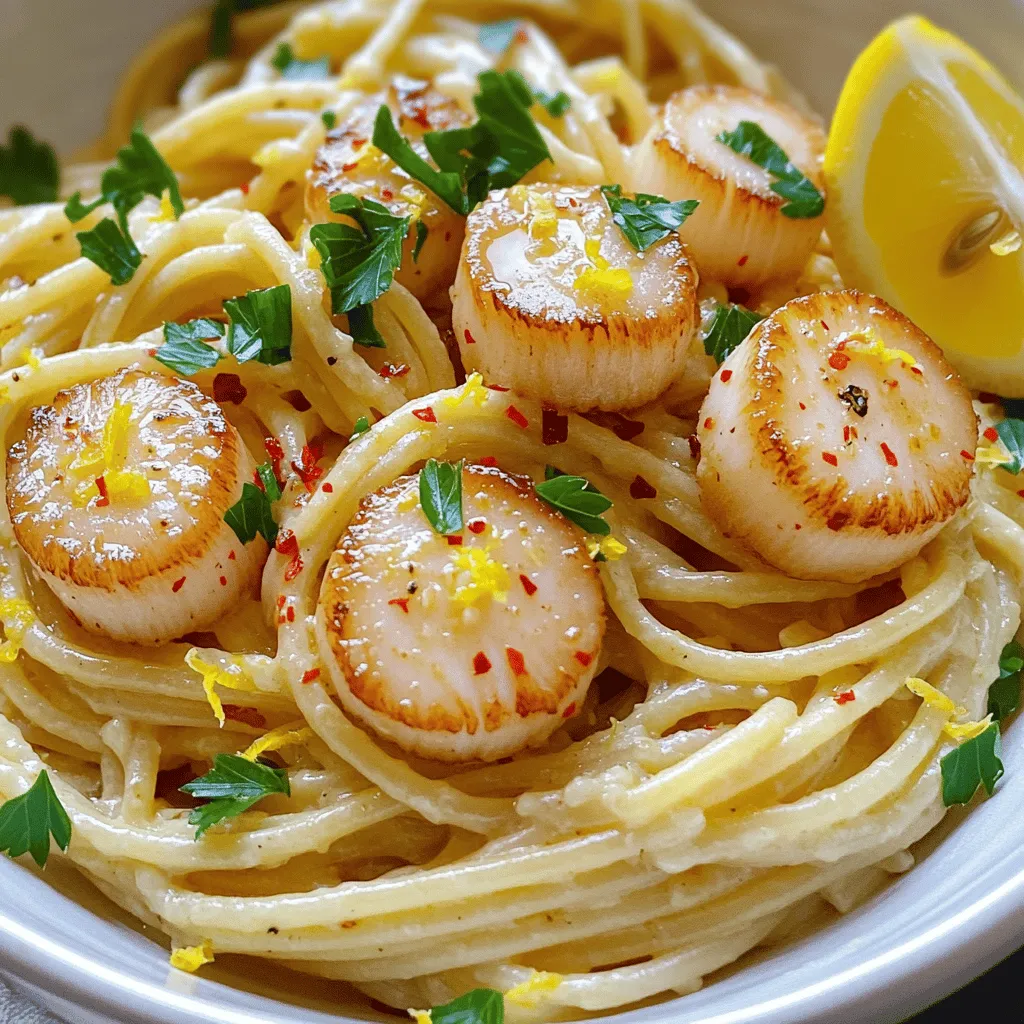
Get ready to impress your taste buds with a quick and flavorful dish! In just 20 minutes, you can whip up Garlic Butter Scallop Pasta that bursts with rich, savory goodness. This easy recipe combines tender pasta, juicy scallops, and a luscious garlic butter sauce. Perfect for a busy weeknight or a special dinner, you’ll love how simple cooking can be. Let’s dive into the details and get cooking!
Why I Love This Recipe
- Quick and Easy: This dish can be prepared in just 20 minutes, making it perfect for a weeknight dinner or a last-minute meal.
- Flavorful Combination: The garlic butter sauce, combined with the freshness of lemon and the richness of scallops, creates a delightful flavor profile that is both comforting and sophisticated.
- Elegant Presentation: Served in deep bowls with a garnish of parsley and lemon wedges, this pasta looks as good as it tastes, making it suitable for special occasions.
- Customizable: This recipe is versatile; you can easily substitute different types of pasta or add vegetables to suit your taste.
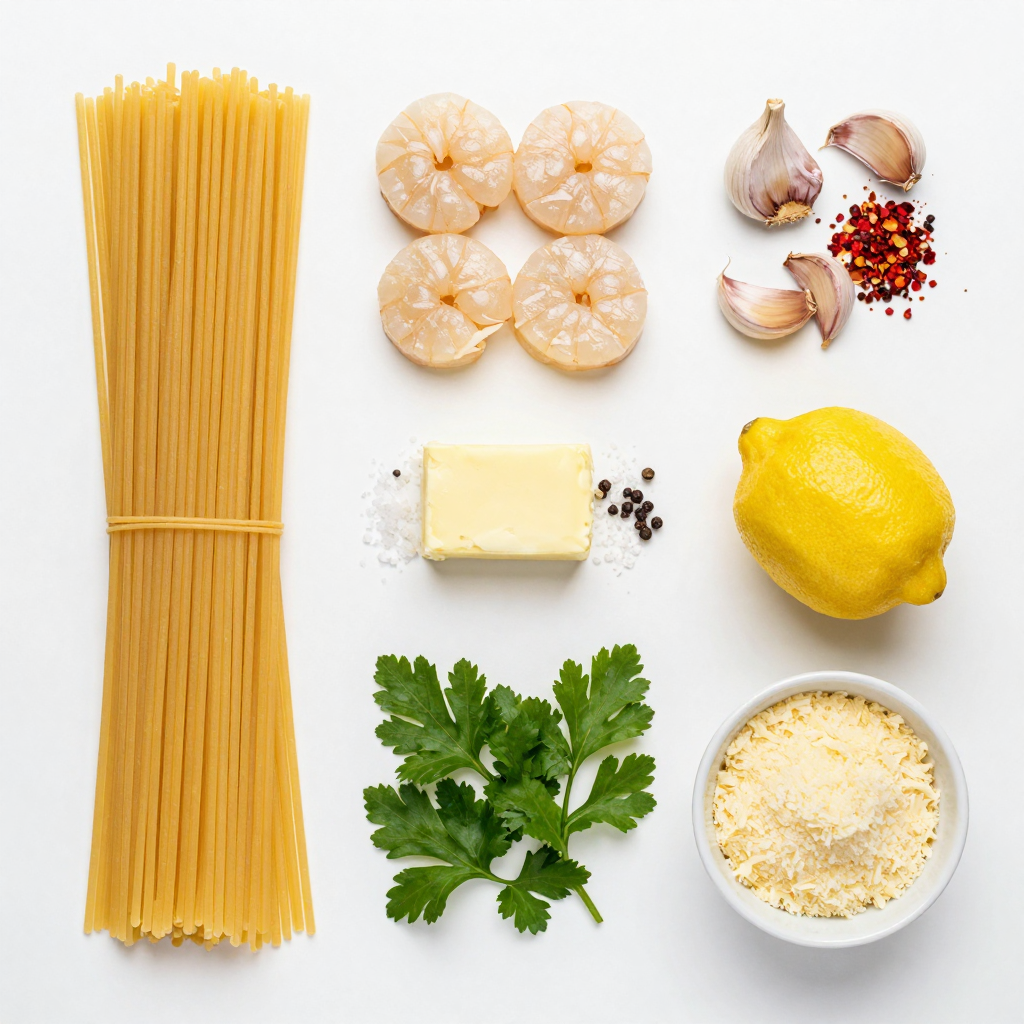
Ingredients
Main Ingredients
– 8 oz spaghetti or fettuccine
– 1 lb scallops, patted dry
– 4 tablespoons unsalted butter
– 4 cloves garlic, minced
Seasoning and Garnishing
– 1 lemon, zested and juiced
– 1/2 teaspoon red pepper flakes
– 1/4 cup fresh parsley, chopped
– Grated Parmesan cheese for serving (optional)
Cooking Essentials
– Salt and pepper
– Pasta water
To make Garlic Butter Scallop Pasta, you need fresh, simple ingredients. Pasta forms the base, so choose spaghetti or fettuccine. Scallops are the star of the dish. They add a sweet, delicate flavor. Use unsalted butter to control the salt in your meal.
Garlic is key for flavor. I always use fresh garlic, minced for the best taste. For seasoning, lemon juice and zest brighten the dish. Red pepper flakes add a nice kick. Fresh parsley not only adds color but fresh flavor too. If you like cheese, Parmesan works well on top.
Don’t forget the cooking essentials: salt and pepper for seasoning your pasta and scallops. Reserve some pasta water. It helps combine everything smoothly. Enjoy gathering these ingredients as you prepare for a quick, tasty meal!
Step-by-Step Instructions
Cooking the Pasta
Start by boiling water in a large pot. Add a good amount of salt; this helps flavor the pasta. Once the water is boiling, add 8 oz of spaghetti or fettuccine. Cook it for about 8-10 minutes until it is al dente. This means it should still have a bit of bite. After cooking, reserve about 1 cup of the pasta water. Then, drain the pasta in a colander and set it aside for later.
Searing the Scallops
Next, prepare a large skillet. Heat 2 tablespoons of unsalted butter over medium-high heat. While the butter melts, pat 1 lb of scallops dry with a paper towel. Season them well with salt and pepper. When the butter is hot, add the scallops in a single layer. Sear them for 2-3 minutes on one side until they turn golden brown. Flip them over and cook for another 2-3 minutes. Once done, remove the scallops from the skillet and set them aside.
Making the Garlic Butter Sauce
In the same skillet, lower the heat to medium. Add the remaining 2 tablespoons of unsalted butter. Let it melt completely. Then, add 4 cloves of minced garlic and 1/2 teaspoon of red pepper flakes. Cook this mixture for about 1-2 minutes. Stir it well, but be careful not to burn the garlic. You want it fragrant and soft.
Combining the Ingredients
Now, add the cooked pasta to the skillet with the garlic butter sauce. Use tongs to toss the pasta and coat it well. If the pasta seems dry, slowly add some of the reserved pasta water. Keep mixing until you reach your desired consistency. The sauce should cling to the pasta nicely.
Finishing Touches
To finish, stir in the juice and zest of 1 lemon. This adds a bright flavor. Gently add the seared scallops back into the skillet. Toss everything together for about one more minute to heat it through. Taste and adjust seasoning with salt and pepper if needed.
Serving the Dish
For serving, place the pasta in deep bowls. Sprinkle with fresh chopped parsley for a pop of color. If you like, add some grated Parmesan cheese on top. Serve it hot, and enjoy it with a light salad on the side for a complete meal.
Pro Tips
- Dry Scallops: Ensure your scallops are patted dry before searing to achieve a perfect golden crust.
- Butter Temperature: Let the butter get hot before adding the scallops; this helps to sear them quickly and keep them tender.
- Pasta Water Magic: Use reserved pasta water to adjust the sauce consistency; it adds flavor and helps the sauce cling to the pasta.
- Fresh Herbs Finish: Always finish your dish with fresh herbs like parsley for a burst of color and flavor that elevates the meal.
Tips & Tricks
Selecting the Best Scallops
When choosing scallops, I recommend fresh over frozen. Fresh scallops have a sweet taste and firm texture. If you must use frozen, thaw them properly before cooking. Look for scallops that are plump and moist. Avoid those that smell overly fishy. Your local fish market is a great place to find high-quality scallops. Ask about their catch of the day for the best flavor.
Perfecting the Garlic Butter Sauce
Cooking garlic takes just a few minutes. Keep an eye on it to avoid burning. Burnt garlic can ruin your sauce’s taste. I like to cook it until it’s fragrant but not brown. For spice lovers, adjust the red pepper flakes to your taste. Start with half a teaspoon and add more if you want heat.
Common Mistakes to Avoid
Overcooking scallops is the most common mistake. They cook quickly, just 2-3 minutes per side. They should be golden brown and opaque when done. Another mistake is not reserving enough pasta water. This water helps bind the sauce to the pasta. Always save at least one cup of it. It can make your dish creamy and flavorful.
Variations
Adding Vegetables
You can make this dish even better by adding vegetables. Seasonal veggies like spinach, asparagus, or cherry tomatoes work great. To add them, sauté the vegetables in the skillet after cooking the garlic. This adds color and nutrition to your meal. Just be sure to cook them until they are tender but still bright.
Alternative Proteins
If you want a change, shrimp or chicken can replace scallops. For shrimp, use the same cooking time as scallops. Just make sure they turn pink and opaque. If you choose chicken, cut it into small pieces. Cook it longer until it’s fully cooked. This way, you keep the dish tasty and satisfying.
Gluten-Free Options
You can easily make this dish gluten-free. Use gluten-free pasta made from rice or quinoa. Check the sauce too; make sure all ingredients are gluten-free. You can still enjoy the rich garlic butter flavor with these swaps, so don’t worry about missing out.
Storage Info
Refrigeration Tips
To store leftovers, let the pasta cool first. Place it in an airtight container. This keeps it fresh for up to three days. Glass or plastic containers work well. Just make sure they seal tight.
Reheating Instructions
For best results, reheat the pasta in a skillet. Heat it on low to medium. Add a splash of water or broth to keep it moist. Stir gently for about 5 minutes. If you prefer the microwave, use a microwave-safe bowl. Heat it on medium power for 2-3 minutes, stirring halfway through.
Freezing Guidelines
You can freeze this dish if you have extra. Divide it into portions. Use freezer-safe containers or bags. Squeeze out air to prevent freezer burn. It can stay frozen for up to three months. To thaw, place it in the fridge overnight. Reheat as mentioned above. This keeps the texture nice and tasty.
FAQs
How long does it take to make Garlic Butter Scallop Pasta?
This dish is quick and easy to prepare. It takes about 5 minutes to prep and 15 minutes to cook. In total, you can enjoy your meal in just 20 minutes.
Can I use different types of pasta for this dish?
Yes, you can switch up the pasta! While spaghetti or fettuccine works best, you can also use:
– Linguine
– Penne
– Gluten-free pasta
Each type of pasta brings a unique texture but pairs well with garlic butter.
How do I know when scallops are fully cooked?
Look for a few signs to know your scallops are done:
– They should be opaque.
– They will have a nice golden crust.
– They should feel firm to the touch.
Overcooking makes them tough, so watch them closely!
Is this recipe suitable for meal prep?
Yes, this dish can work for meal prep! You can cook the pasta and scallops ahead of time. Store them in airtight containers in the fridge. When you are ready to eat, just reheat and add fresh lemon and parsley.
Can I make this recipe dairy-free?
You can easily make this dish dairy-free! Instead of butter, use these options:
– Olive oil
– Coconut oil
– Vegan butter
Each option will give you a nice flavor while keeping it dairy-free!
In this post, we explored the delightful Garlic Butter Scallop Pasta. We covered key ingredients, including scallops, garlic, and seasonings. I provided step-by-step instructions for cooking, mixing, and serving. You learned tips for selecting fresh scallops and avoiding common mistakes. Variations included adding veggies or trying different proteins. Finally, I shared storage tips to keep leftovers fresh. Cooking this dish can be easy and fun. With practice, you’ll impress yourself and others with your skills! Enjoy your kitchen adventure!