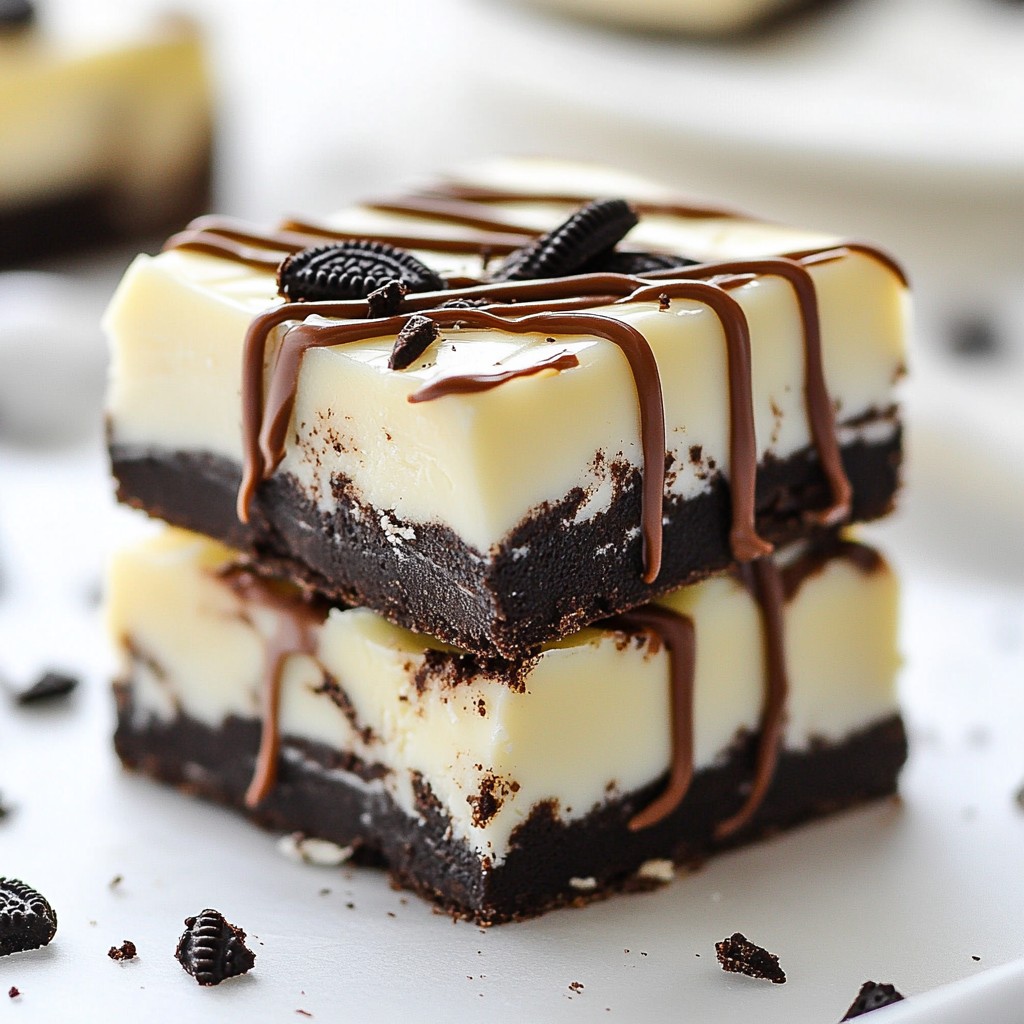
Are you ready to indulge in a sweet treat without turning on the oven? I’m excited to share my easy and delicious No-Bake Oreo Truffle Bars recipe. With just a handful of simple ingredients, like Oreo cookies and cream cheese, you’ll create a dessert that screams indulgence. Let’s dive into the steps and have you impressing friends and family in no time!
Why I Love This Recipe
- Decadent Flavor: These Oreo truffle bars are the perfect blend of rich chocolate and creamy filling, making each bite utterly indulgent.
- No-Bake Convenience: This recipe is incredibly easy to make without any baking, perfect for a quick dessert fix.
- Fun to Make: Crushing Oreos and melting chocolate is a fun activity, especially if you're cooking with kids or friends.
- Stunning Presentation: With the beautiful layers of chocolate and the sprinkle of crushed Oreos on top, these bars look as good as they taste.
Ingredients
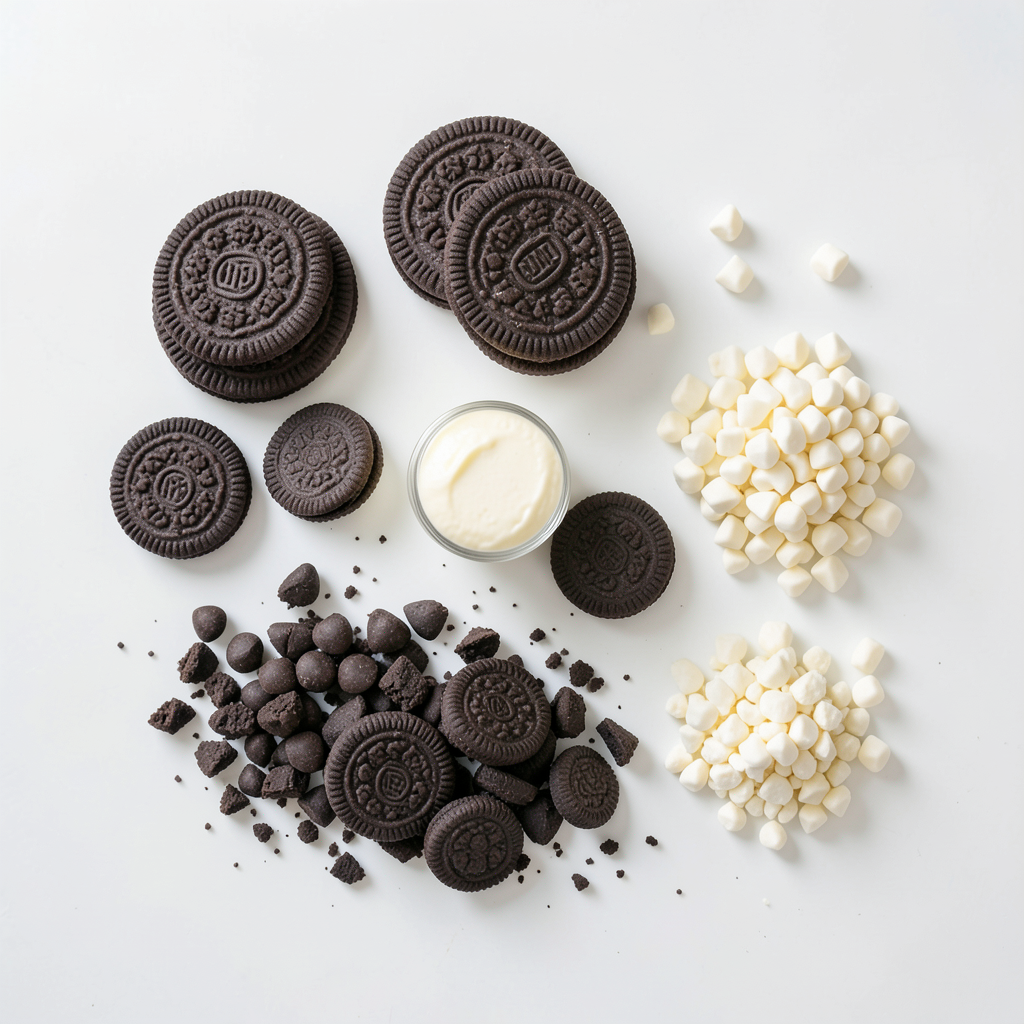
List of Required Ingredients
- 36 Oreo cookies
- 8 oz cream cheese, softened
- 1 cup semi-sweet chocolate chips
- 1/2 cup white chocolate chips
- 1/2 teaspoon vanilla extract
- 1/4 cup crushed Oreos for topping
You need simple ingredients to make No-Bake Oreo Truffle Bars. First, the main star is Oreo cookies. They give a rich chocolate flavor. You also need cream cheese. This adds a creamy texture to the bars. Next, semi-sweet chocolate chips create a smooth chocolate layer. White chocolate chips add a sweet contrast on top. A hint of vanilla extract enhances all the flavors. Lastly, crushed Oreos for topping add a fun crunch.
These ingredients are easy to find. Most are in your kitchen. If not, a quick trip to the store will do. With these items, you can create a tasty treat. Each bite is a mix of chocolate and cream, which is hard to resist. Enjoy gathering your ingredients and get ready to make a crowd-pleaser!
Step-by-Step Instructions
Preparation of Oreo Crumbs
To start, you need to crush the Oreos. You can use a food processor. Just add the cookies and pulse until they turn into fine crumbs. It’s fast and easy! If you don’t have a food processor, no worries. You can place the Oreos in a plastic bag. Seal the bag and crush the cookies with a rolling pin. This method works just as well.
Mixing with Cream Cheese
Next, you will mix the crushed Oreos with cream cheese. In a large bowl, combine the two ingredients. Use softened cream cheese for the best mix. Stir with a spatula or your hands. Keep mixing until the mixture is smooth. This step is key. A smooth mixture helps the bars hold together better.
Assembling the Base Layer
Now, let’s prepare the baking pan. Line an 8x8 inch pan with parchment paper. Leave some paper hanging over the edges. This helps you lift the bars out later. Press the Oreo and cream cheese mix into the pan. Make sure to spread it evenly. You want a flat layer to build on.
Melting Chocolate Layers
For the chocolate layer, grab a microwave-safe bowl. Add the semi-sweet chocolate chips and a tablespoon of vegetable oil. Microwave the bowl in 30-second bursts. Stir after each interval until it’s smooth. Be careful not to overheat the chocolate.
Once melted, pour the chocolate over the pressed Oreo mix. Use a spatula to spread it out evenly. Tap the pan gently to release any bubbles. For a fancy touch, melt the white chocolate in a separate bowl. Drizzle it over the chocolate layer in a fun pattern.
Chilling and Serving Instructions
Now it’s time to chill the bars. Place the pan in the fridge for at least 2 hours. This helps the bars set up nicely. When they are firm, lift the bars out using the parchment paper. Cut them into squares or rectangles.
To serve, enjoy the Oreo truffle bars cold or at room temperature. If you have leftovers, store them in an airtight container in the fridge.
Tips & Tricks
Ensuring the Right Consistency
To get the best texture, the cream cheese must be soft. Take it out of the fridge an hour before use. This ensures easy mixing. If it's too firm, the bars will not hold together well.
When melting chocolate, use the microwave carefully. Heat it in 30-second bursts. Stir after each time. This method helps prevent overheating. If chocolate gets too hot, it can clump and become unusable.
Making Cleanup Easier
Using parchment paper is a great trick. Line your baking pan with it, leaving some paper hanging over the sides. This makes it easy to lift the bars out after chilling. Cleanup becomes simple and quick.
For mixing and melting, use a large bowl and a microwave-safe bowl. A silicone spatula works well for mixing. If you have a microwave-safe measuring cup, that can help for melting chocolate too.
Serving Suggestions
These bars pair well with milk or coffee. Serve them alongside your favorite drink for a tasty treat. You can also add a scoop of ice cream for a fun dessert.
For a fancy touch, try adding toppings. Drizzle more white chocolate on top for a nice look. You can also sprinkle crushed Oreos or nuts for added crunch. Arranging the bars on a nice plate makes them look great for guests.
Pro Tips
- Chill the Mixture: For easier handling, make sure the cream cheese is well softened before mixing, and consider chilling the mixture for a few minutes after pressing it into the pan to firm it up slightly.
- Use Quality Chocolate: Opt for high-quality chocolate chips for melting, as they will provide a smoother texture and richer flavor to your truffle bars.
- Decorate Creatively: Feel free to get creative with the white chocolate drizzle! Use a fork or piping bag for a more artistic design, or even add colored sprinkles for extra flair.
- Storage Tips: Store the bars in an airtight container in the fridge to keep them fresh. They can also be frozen for up to a month—just thaw them in the fridge before serving.
Variations
Flavor Variations
You can change the taste of your No-Bake Oreo Truffle Bars easily. One fun way is to use flavored cream cheese. Try using strawberry or mint cream cheese for a twist. This small change can add a new layer of flavor. You can also add mix-ins like crushed nuts or mini chocolate chips. These will give your bars an extra crunch and richness.
Dietary Adjustments
If you need a gluten-free option, swap Oreo cookies for gluten-free cookies. There are many tasty brands that make gluten-free cookies. You won’t lose any flavor! For dairy-free bars, use vegan cream cheese and dairy-free chocolate. These options let everyone enjoy this sweet treat without worry.
Storage Info
Best Storage Practices
To keep your No-Bake Oreo Truffle Bars fresh, store them in an airtight container. This helps prevent the bars from drying out. Place a layer of parchment paper between layers if stacking. I recommend refrigerating them for up to one week. This keeps the flavors intact and the texture just right.
Freezing Options
If you have leftovers, you can freeze them. Cut the bars into squares first. Wrap each piece in plastic wrap, then place them in a freezer bag. Make sure to remove as much air as you can. For best results, eat the frozen bars within three months.
To thaw, simply place the bars in the fridge overnight. This way, they maintain their texture. If you’re in a hurry, you can let them sit at room temperature for about 30 minutes. Enjoy your tasty treats whenever you want!
FAQs
Can I use other types of cookies?
Yes, you can use other cookies. Try chocolate sandwich cookies, vanilla wafers, or even graham crackers. Each type gives a different taste and texture. For a fun twist, use flavored cookies like mint or peanut butter. Just remember to keep the cookie-to-cream cheese ratio similar for best results.
How long do these bars last?
These bars can last up to one week in the fridge. Keep them in an airtight container to keep them fresh. If you notice any changes in texture or smell, it’s best to toss them. Always check them before serving to make sure they are still good.
Can I make these ahead of time?
Yes, you can make these bars a day or two ahead. Just prepare them, chill, and cut them when ready to serve. They taste great after chilling overnight. This makes them perfect for parties or gatherings. Store them properly to maintain their flavor and texture.
This blog post shared how to make delicious Oreo bars. We listed all the ingredients you need, from Oreo cookies to white chocolate. I guided you through simple steps for mixing, melting, and chilling. I also shared helpful tips for great results and easy cleanup. You can even try fun variations and learn best storage practices. Overall, these treats are simple to make and perfect for sharing. Enjoy your sweet creations, and feel free to get creative with flavors!