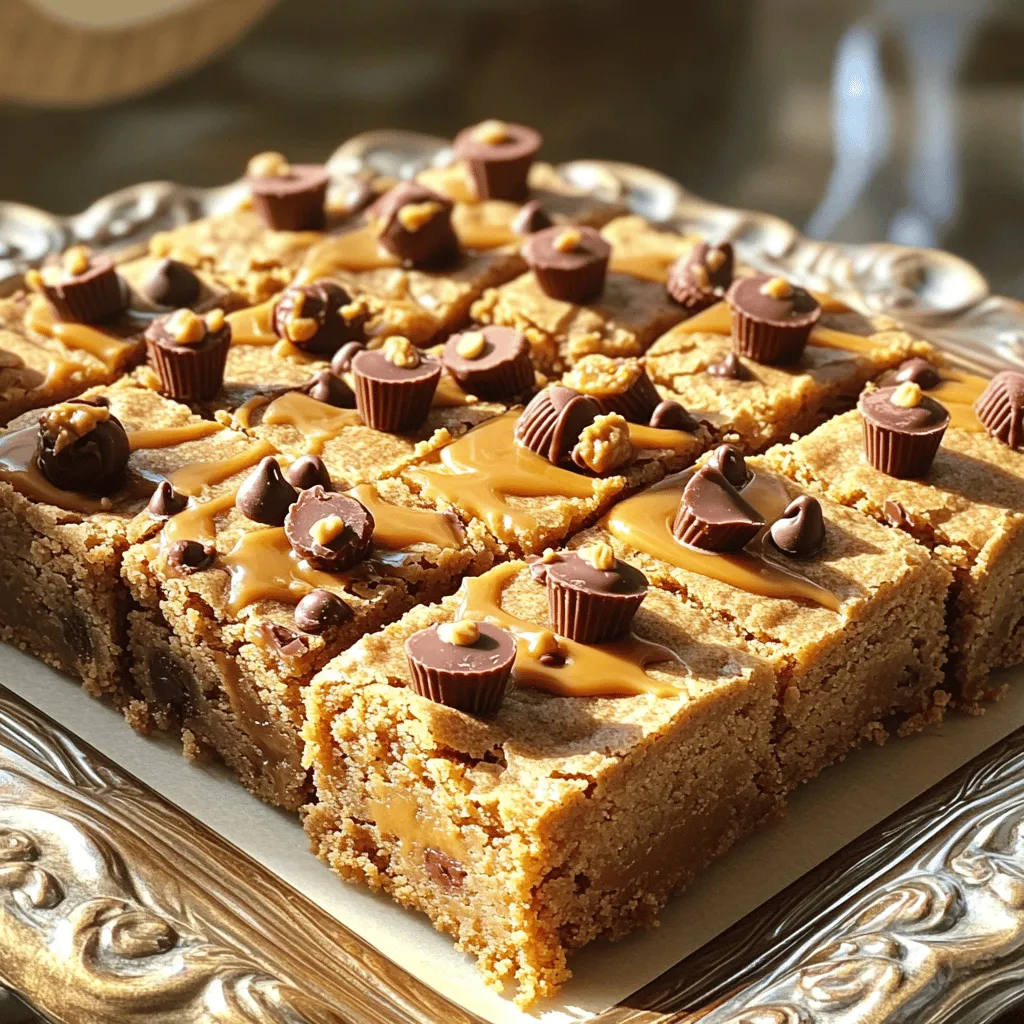
If you love sweet treats, you’ll adore Peanut Butter Cup Blondies! These soft, chewy bars pack a punch of peanut butter goodness and rich chocolate flavor. In this post, I’ll share my favorite recipe, packed with tips and tricks to ensure perfect blondies every time. Whether you want to impress guests or indulge yourself, these blondies will hit the spot! Let’s get baking and bring some joy to your kitchen!
Why I Love This Recipe
- Delicious Flavor Combination: The rich and creamy peanut butter pairs perfectly with the sweetness of the brown sugar, creating a dessert that’s both indulgent and satisfying.
- Easy to Make: With just a few simple steps and no special equipment required, these blondies come together quickly, making them perfect for any baking novice.
- Versatile Treat: You can easily customize these blondies by adding your favorite mix-ins, such as nuts or different types of chocolate, to suit your taste.
- Perfect for Sharing: These blondies cut into neat squares, making them ideal for parties, potlucks, or just sharing with friends and family.
Ingredients
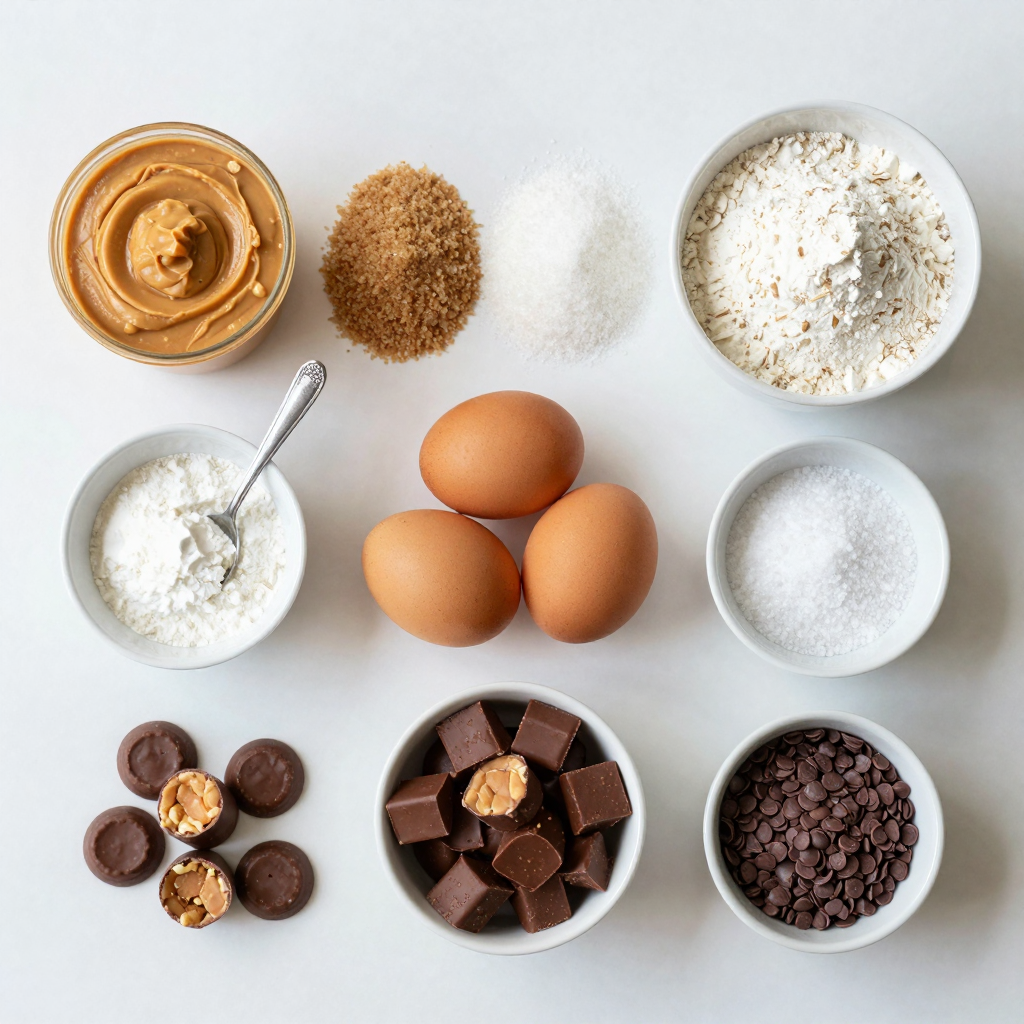
When making peanut butter cup blondies, you need the right ingredients. Here’s a detailed list to help you gather what you need:
– 1 cup creamy peanut butter
– 1 cup brown sugar, packed
– 1/2 cup granulated sugar
– 2 large eggs
– 1 teaspoon vanilla extract
– 1 cup all-purpose flour
– 1/2 teaspoon baking powder
– 1/4 teaspoon baking soda
– 1/2 teaspoon salt
– 1 cup mini chocolate peanut butter cups, chopped
– 1/2 cup chocolate chips (optional for extra richness)
These ingredients blend together to create a moist, sweet treat. The creamy peanut butter gives the blondies their rich flavor. Brown sugar adds depth, while granulated sugar gives sweetness.
The eggs bind everything together, creating a luscious texture. Vanilla extract enhances the overall flavor, making each bite delightful.
The flour, baking powder, and baking soda help the blondies rise. Salt balances the sweetness and brings out the flavors. Mini chocolate peanut butter cups add fun bursts of chocolate. If you want even more chocolate, add chocolate chips!
I recommend using fresh ingredients for the best taste. Each item plays a role in making these blondies irresistibly sweet.
Step-by-Step Instructions
Prepping the Oven and Baking Dish
First, set your oven to preheat at 350°F (175°C). This step is key for even baking. You can grease an 8×8 inch baking dish or use parchment paper. Greasing helps the blondies release easily. Parchment paper makes removal even simpler, so choose what you like best.
Mixing the Ingredients
In a large bowl, mix 1 cup of creamy peanut butter with 1 cup of brown sugar and 1/2 cup of granulated sugar. Stir until it’s smooth and well-blended. Next, add 2 large eggs, one at a time. Make sure to mix well after each egg. Now, stir in 1 teaspoon of vanilla extract for extra flavor.
In a separate bowl, whisk together 1 cup of all-purpose flour, 1/2 teaspoon of baking powder, 1/4 teaspoon of baking soda, and 1/2 teaspoon of salt. This mix gives the blondies the right texture. Slowly add the dry ingredients to the wet mixture. Stir just until they combine; don’t overmix. Finally, gently fold in 1 cup of chopped mini chocolate peanut butter cups. You can add 1/2 cup of chocolate chips for more richness if you want.
Baking the Blondies
Pour the batter into your prepared baking dish, spreading it evenly with a spatula. Place it in the preheated oven and bake for 22-25 minutes. The edges should turn lightly golden. To check doneness, insert a toothpick into the center. It should come out mostly clean, with a few crumbs sticking to it. Once baked, remove the dish from the oven. Let it cool for about 10 minutes before lifting it out, if you used parchment. If not, just cut straight from the pan. Allow the blondies to cool completely before slicing them into squares.
Pro Tips
- Store Properly: Keep your blondies in an airtight container at room temperature for up to a week, or refrigerate for longer freshness.
- Experiment with Mix-Ins: Feel free to swap out the mini chocolate peanut butter cups for other favorites like chopped nuts or caramel bits for a different flavor.
- Check for Doneness: Since ovens vary, check your blondies a couple of minutes before the recommended time to prevent overbaking.
- Enhance the Flavor: Adding a pinch of cinnamon or a splash of espresso powder can elevate the flavor profile of your blondies.
Tips & Tricks
Common Baking Mistakes
– Overmixing the batter: This can make your blondies tough. Mix just until you see no dry flour.
– Not baking long enough: If you take them out too soon, they will be gooey. Always check with a toothpick. It should come out mostly clean.
Enhancing Flavor and Texture
– Adding a pinch of cinnamon: This small addition can boost the flavor. It gives a warm touch to your blondies.
– Using different types of chocolate: Swap in dark chocolate or white chocolate for variety. Each type adds a new taste twist.
Presentation Tips
– Serving suggestions with melted peanut butter or chocolate: Drizzle melted peanut butter or chocolate on top. This makes the blondies look fancy.
– Garnishing options like crushed peanuts: Sprinkle crushed peanuts on top for crunch. It adds texture and makes your treat pop.
Variations
Nut-Free Option
You can make these blondies nut-free by using sun butter instead of peanut butter. Sun butter is made from sunflower seeds. It has a creamy texture and a rich taste. It works well in sweet recipes. Be sure to choose a variety that is safe from allergens in your area. This swap keeps the blondies just as delicious!
Gluten-Free Version
If you need a gluten-free option, try using almond flour or coconut flour. Almond flour adds a nice nutty flavor, while coconut flour gives a slight sweetness. Both options work well in this recipe. Just remember to adjust the amount you use. For almond flour, you can use the same amount as all-purpose flour. For coconut flour, use half the amount since it absorbs more moisture.
Flavor Variations
Want to mix things up? You can add caramel or toffee bits for extra sweetness. These will melt into the batter as it bakes, creating gooey pockets of flavor. You can also use different flavored chips, such as butterscotch or white chocolate. This allows you to create your own unique twist on these blondies. Enjoy experimenting with flavor!
Storage Info
How to Store
Store your Peanut Butter Cup Blondies at room temperature for up to three days. Keep them in an airtight container to keep them fresh. If you want to extend their life, refrigerate them. In the fridge, they can last up to a week. Always use a sealed container to prevent them from drying out.
Freezing Instructions
To freeze your blondies, cut them into squares first. Wrap each piece in plastic wrap, then place them in a freezer-safe bag. This method helps keep them fresh. They can last in the freezer for up to three months. When ready to eat, thaw them overnight in the fridge for the best texture. For a quick thaw, you can leave them at room temperature for a few hours.
Shelf Life
At room temperature, your blondies will last about three days. If you store them in the fridge, they can stay fresh for up to a week. If frozen properly, they can last for about three months. Always check for any signs of spoilage before enjoying your sweet treat.
FAQs
How do I know when my blondies are done?
To check if your blondies are ready, look for a few signs. The edges should be lightly golden. Insert a toothpick into the center; it should come out mostly clean. A few crumbs are okay but no wet batter. This method helps you avoid overbaking.
Can I make these blondies ahead of time?
Yes, you can make these blondies ahead of time. Once baked, let them cool completely. Store them in an airtight container at room temperature for up to four days. If you need to reheat, warm them in the oven for a few minutes. This keeps their texture soft and chewy.
What can I substitute if I don’t have peanut butter?
If you don’t have peanut butter, try using almond butter or cashew butter. These spreads work well and add a nutty flavor. Sunflower seed butter is a great nut-free option. Each alternative will change the taste slightly, but they still create delicious blondies.
Can I add nuts to the blondies?
Absolutely! Adding nuts can enhance the texture and flavor. Chopped walnuts or pecans pair nicely with the peanut butter. Just fold them into the batter after mixing in the chocolate cups. Nuts add crunch and a different taste that balances the sweetness.
You now have a simple guide to make delicious peanut butter blondies. We covered all the key ingredients, steps to bake, and tips for best results. Remember to watch out for common mistakes like overmixing. Feel free to get creative with flavors too! These blondies are versatile and fun. Store them properly to keep them fresh, and they can last for days. Enjoy baking and sharing these treats with friends and family!