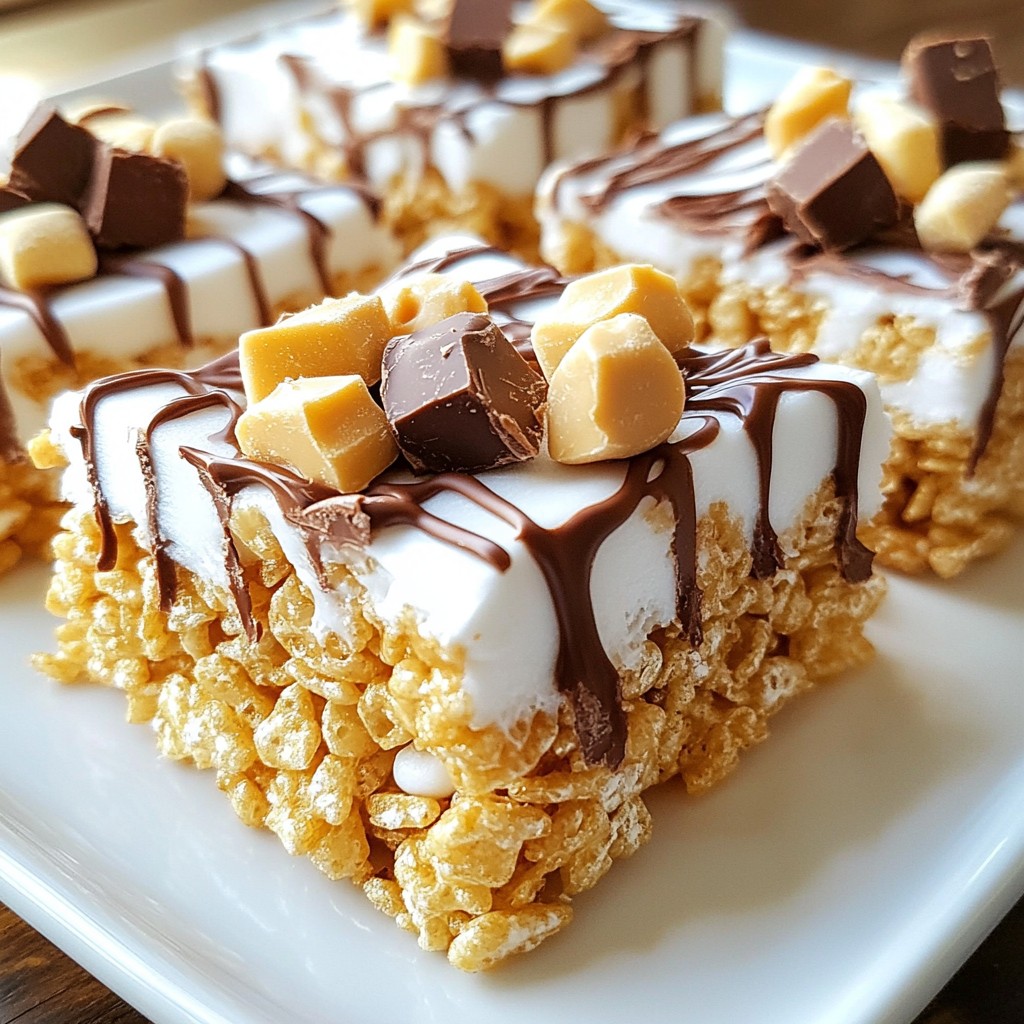
Get ready for a treat that combines crispy, sweet, and nutty flavors! I’m excited to share my simple recipe for Peanut Butter Cup Rice Krispies Treats. These delicious snacks are perfect for parties or a cozy night in. With just a few easy steps, you’ll create a dessert that delights everyone. Let’s dive into the ingredients you need and how to whip up this tasty delight!
Why I Love This Recipe
- Easy to Make: This recipe comes together quickly and requires no baking, making it perfect for a last-minute treat.
- Deliciously Decadent: The combination of peanut butter, chocolate, and marshmallows creates an irresistible flavor profile.
- Customizable: You can easily add your favorite mix-ins or toppings to make it your own.
- Perfect for Sharing: These treats are great for parties, potlucks, or simply sharing with friends and family.
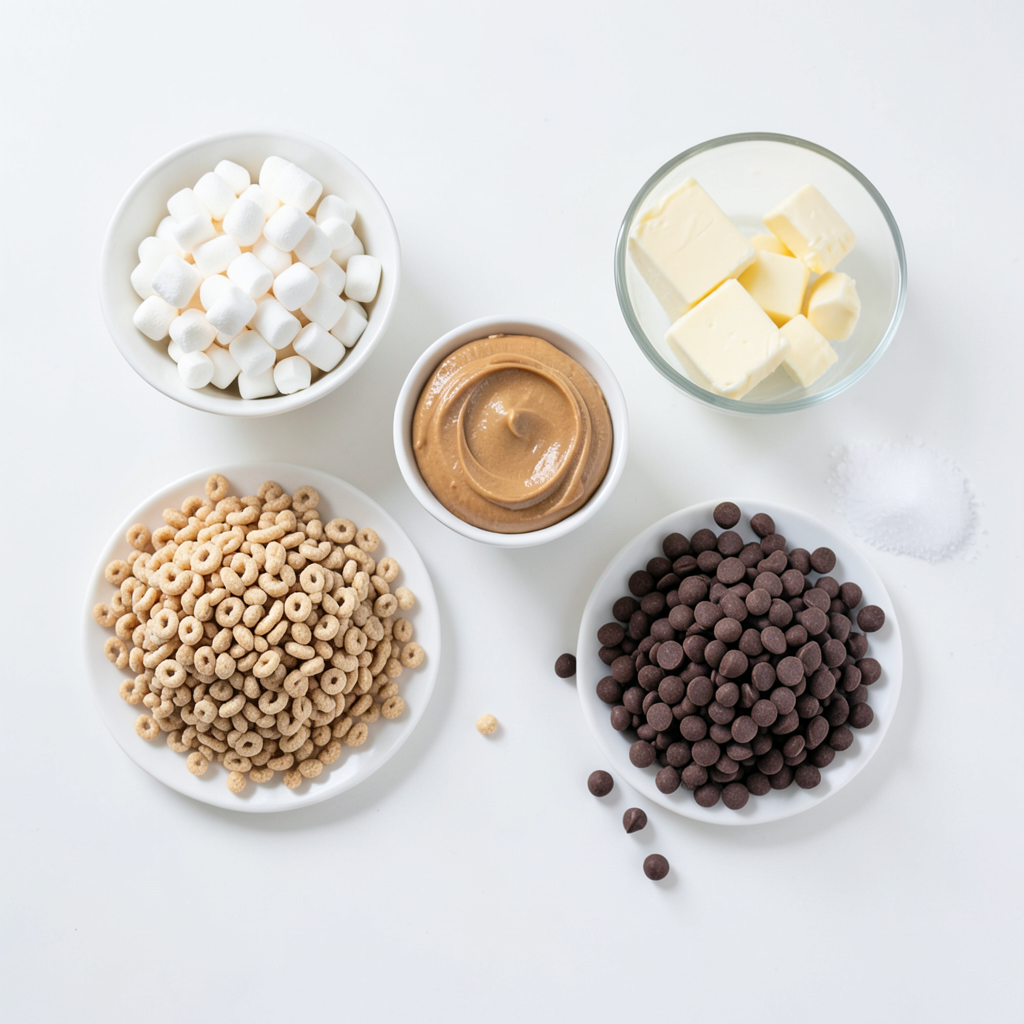
Ingredients
List of Required Ingredients
- 4 cups Rice Krispies cereal
- 1 cup mini marshmallows
- ½ cup creamy peanut butter
- ½ cup unsalted butter
- 1 cup semi-sweet chocolate chips
- ½ cup mini peanut butter cups, chopped (plus extra for topping)
- 1 teaspoon vanilla extract
- Pinch of salt
Recommended Brands or Quality Tips
For the best taste, I like to use Jif for peanut butter. It has a smooth texture that blends well. Kraft mini marshmallows melt nicely, ensuring a gooey base. For chocolate, Ghirardelli semi-sweet chips add rich flavor. Using unsalted butter helps control the saltiness. Look for fresh mini peanut butter cups for the best crunch.
Possible Substitutions
If you need a change, use crunchy peanut butter instead of creamy. This gives a nice crunch to the treats. You can swap dark chocolate chips for semi-sweet for a richer taste. If you want a nut-free option, try using sunflower seed butter. Also, feel free to use vegan chocolate if you want a dairy-free treat.
Step-by-Step Instructions
Preparation of the Baking Dish
First, you need to prepare your baking dish. Take a 9x13 inch dish and grease it with butter or non-stick spray. This step is key to keeping the treats from sticking. Make sure to cover the whole bottom and sides.
Melting the Butter and Marshmallows
Next, grab a large saucepan and set it over medium heat. Add the unsalted butter and mini marshmallows. Stir them constantly. You want them to melt together into a smooth mixture. This takes about 5 minutes. Don’t walk away; keep stirring!
Incorporating Peanut Butter and Rice Krispies
Once everything is melted, take the pan off the heat. Now, stir in the creamy peanut butter and the vanilla extract. Mix until fully combined. After that, add the Rice Krispies cereal. Fold it in gently to coat each piece. You want every Rice Krispie to be covered in the yummy mixture.
Adding and Distributing the Peanut Butter Cups
Now it’s time for the fun part! Fold in the chopped mini peanut butter cups along with a pinch of salt. Make sure they are evenly mixed in. This adds great flavor and texture to your treats.
Chocolate Melting and Topping
In a microwave-safe bowl, melt the semi-sweet chocolate chips. Do this in 30-second bursts, stirring in between. When it’s smooth, drizzle the chocolate over the Rice Krispies mixture. Use a spatula to spread it evenly over the top.
Cooling and Cutting the Treats
Let the treats cool at room temperature for about 30 minutes. This helps them set. Once they are firm, cut them into squares or rectangles. You can now enjoy your delicious Peanut Butter Cup Rice Krispies Treats!
Tips & Tricks
Common Mistakes to Avoid
When making Peanut Butter Cup Rice Krispies Treats, a few mistakes can spoil your fun. Here are some to watch for:
- Not greasing the pan: This causes the treats to stick. Always grease your baking dish well.
- Overcooking the marshmallows: If you cook them too long, they get hard. Stir until just melted.
- Mixing too roughly: Gently fold the Rice Krispies to keep them crunchy. Avoid smashing them down.
Expert Tips for Perfect Texture
For the best texture, follow these tips:
- Use fresh marshmallows: Older marshmallows may not melt well. Fresh ones work best for a gooey base.
- Let the mixture cool slightly: Allow it to cool for a few minutes before adding the Rice Krispies. This helps them maintain their crunch.
- Press firmly but not too hard: When spreading the mixture in the pan, press down gently. This keeps them airy and light.
Serving Suggestions and Pairings
These treats make a great snack or dessert. Here are some ideas for serving:
- Serve with milk: A glass of cold milk pairs perfectly with these treats.
- Add ice cream: Top them with a scoop of vanilla ice cream for a fun dessert.
- Package as gifts: Wrap them in clear bags for a sweet gift. Friends will love this treat!
Pro Tips
- Use Fresh Ingredients: Ensure your marshmallows and peanut butter are fresh for the best flavor and texture in your treats.
- Press Firmly: When transferring the mixture to the baking dish, press down firmly to create a compact layer that holds together well.
- Customize Toppings: Feel free to add other toppings like crushed cookies, nuts, or drizzles of caramel for extra flavor and texture.
- Store Properly: Keep the Rice Krispies treats in an airtight container at room temperature to maintain their freshness for up to a week.
Variations
Alternative Nut Butters
You can swap creamy peanut butter for other nut butters. Almond butter adds a nutty twist. Cashew butter brings a rich, sweet flavor. Sunflower seed butter works well for nut-free options, too. Each nut butter changes the taste but keeps the treats yummy.
Adding Flavor Enhancements
To make your treats even better, add flavor hints. A touch of cinnamon or nutmeg gives warmth. You can mix in a splash of maple syrup for extra sweetness. Try using a flavored extract like almond or coconut for a fun change. These small tweaks can surprise your taste buds.
Incorporating Additional Mix-Ins
Get creative with mix-ins for extra fun. Throw in mini chocolate chips, crushed pretzels, or even dried fruit. Each mix-in gives a different texture and taste. You can also add sprinkles for color. Don't hesitate to experiment and make these treats your own!
Storage Info
Best Practices for Storing Leftovers
To keep your Peanut Butter Cup Rice Krispies Treats fresh, store them in an airtight container. Place a piece of wax paper between layers to prevent sticking. This helps maintain their texture. Keep the container at room temperature. Avoid the fridge, as it can make the treats hard.
Freezing Instructions
You can freeze these treats for longer storage. First, cut them into squares. Then wrap each piece in plastic wrap. Place the wrapped treats in a freezer-safe bag. Label the bag with the date. When you want to enjoy them, thaw at room temperature for about 30 minutes.
Shelf Life of the Treats
When stored properly, Rice Krispies Treats can last about 5 to 7 days at room temperature. If frozen, they can last up to 2 months. Check for any changes in texture or smell before eating. This ensures you enjoy them at their best.
FAQs
How do I make Peanut Butter Cup Rice Krispies Treats gluten-free?
To make these treats gluten-free, use gluten-free Rice Krispies. Many brands offer this option. Check the label to ensure it is certified gluten-free. The rest of the ingredients, like peanut butter and chocolate chips, are usually gluten-free. Always double-check each product to avoid hidden gluten.
Can I use crunchy peanut butter instead of creamy?
Yes, you can use crunchy peanut butter! It will add a nice texture to the treats. The little peanut bits will give a fun crunch. Just keep in mind that the treats might be a bit less smooth, but the flavor will still shine through.
How can I make these treats vegan-friendly?
To make these treats vegan, swap the butter for a plant-based butter. Use vegan marshmallows and ensure your chocolate chips are dairy-free. This way, you can enjoy delicious treats without animal products.
What is the best way to cut the Rice Krispies treats?
The best way to cut Rice Krispies treats is to use a sharp knife. Lightly grease the knife with some butter or oil. This will help prevent sticking. Cut them into squares or rectangles for easy serving. You can also use a pizza cutter for quick slices.
Can I use different types of chocolate for topping?
Absolutely! You can use milk chocolate, dark chocolate, or even white chocolate. Each type adds a unique taste. Feel free to mix and match to find your favorite flavor combo. Just melt the chocolate as directed, and drizzle it over the treats.
In this post, we covered how to make Peanut Butter Cup Rice Krispies Treats. We detailed the key ingredients, offered step-by-step instructions, and shared helpful tips. You learned about variations and proper storage techniques.
These treats are fun and easy to make. Experiment with different flavors and enjoy your creations. Happy baking!