Introduction
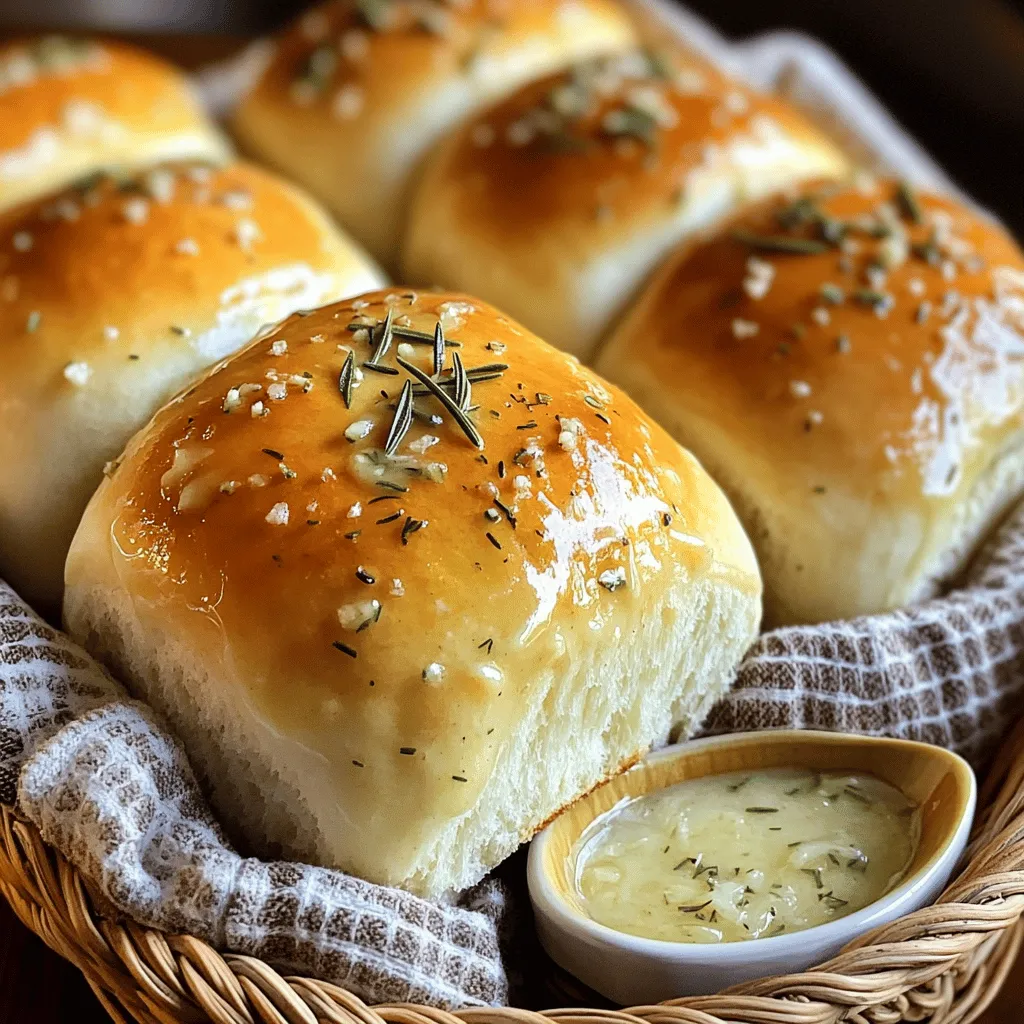
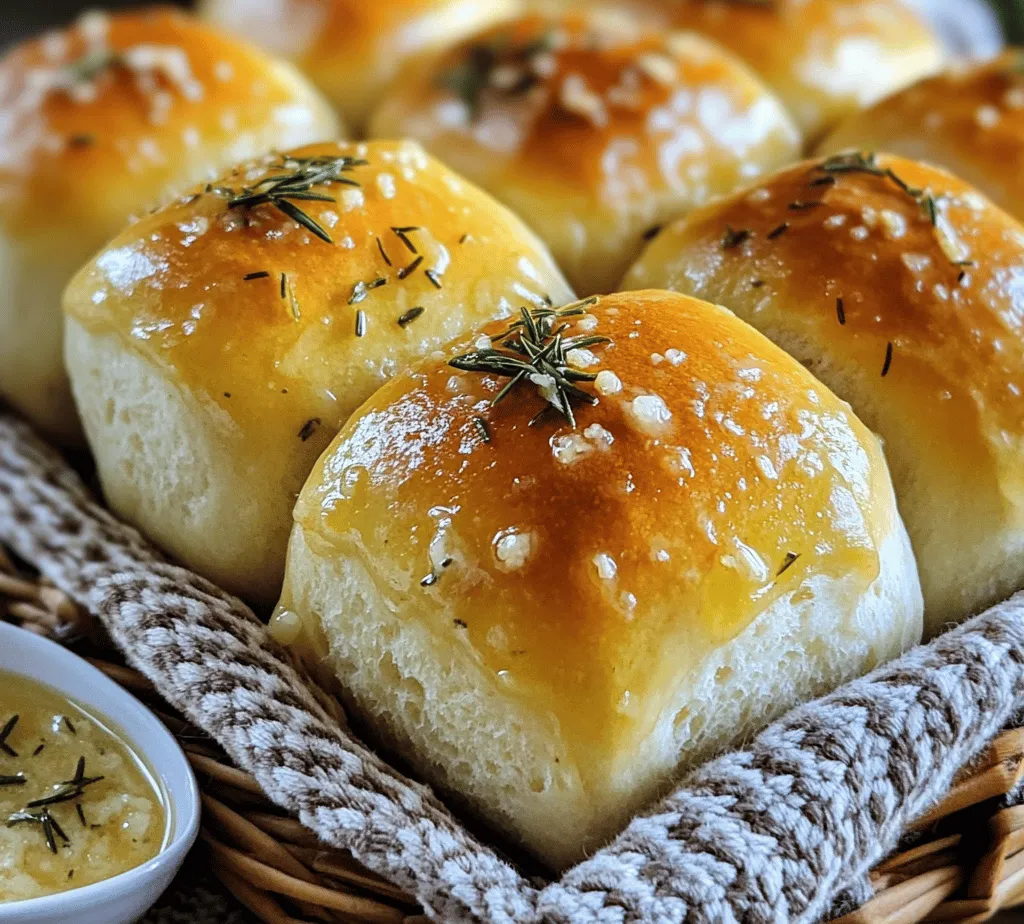
Indulging in freshly baked bread fills the home with warmth and comfort, making it an essential part of family dinners and gatherings. The aroma of bread baking in the oven is enough to evoke feelings of nostalgia and anticipation, as it often accompanies cherished moments shared with loved ones. Among the many bread recipes, Rosemary Dinner Rolls with Garlic Butter stand out as a delightful combination of flavors and textures. These rolls are not only soft and pillowy but also infused with the fragrant essence of rosemary and the rich taste of garlic butter, creating a mouthwatering experience that elevates any meal.
This comprehensive guide will walk you through every step of making these aromatic rolls, ensuring that you create a bread experience that tantalizes the taste buds. Perfect for any occasion, whether it’s a holiday feast or a casual weeknight dinner, these rolls are easy to make and bring a touch of sophistication to your dinner table. With their golden crust and fluffy interior, Rosemary Dinner Rolls with Garlic Butter are sure to impress family and friends alike, turning any gathering into a memorable event.
As we delve into the specifics of this recipe, you will find that the process of making these rolls is not only simple but also rewarding. The combination of fresh ingredients and homemade techniques ensures that each bite is bursting with flavor. Let’s explore the essential components of this recipe, understanding how each ingredient contributes to the overall deliciousness of the rolls.
Understanding the Ingredients
Exploring the key components that make up these delicious rolls provides insight into their unique flavor profile. Each ingredient plays a vital role in the development of texture, taste, and aroma. Here’s a closer look at what you’ll need:
All-Purpose Flour
All-purpose flour is the backbone of any bread recipe, and it plays a critical role in the structure of our Rosemary Dinner Rolls. With a protein content that typically ranges between 10-12%, all-purpose flour provides the necessary gluten formation that gives bread its chewy texture. When combined with moisture and kneaded, the proteins in the flour develop gluten strands, creating a network that traps air bubbles produced during fermentation, resulting in light and airy rolls.
The versatility of all-purpose flour also means that it can be used in a variety of baked goods, from cookies to pizza dough. For this recipe, ensure that your flour is fresh and properly measured to achieve the best results.
Instant Yeast
Using instant yeast in this recipe offers several advantages for home bakers. Unlike active dry yeast, which requires proofing before use, instant yeast can be added directly to the dry ingredients. This not only simplifies the preparation process but also allows for quicker rising times. Instant yeast is formulated to be more potent, ensuring that your dough rises effectively and provides a consistent texture.
The activation process begins as soon as the yeast comes into contact with moisture and warmth. During fermentation, the yeast consumes sugars present in the dough, producing carbon dioxide gas that helps the dough rise. This rapid action means you can enjoy your freshly baked rolls in less time, making this recipe ideal for those who want homemade bread without a long wait.
Fresh Rosemary
Fresh rosemary is the star herb in this recipe, contributing its aromatic qualities that enhance the overall flavor of the rolls. Known for its earthy, pine-like scent, rosemary adds a unique depth to the bread that pairs beautifully with the savory garlic butter. This herb is versatile and commonly used in Mediterranean cuisine, making it a favorite among culinary enthusiasts.
When selecting rosemary, opt for fresh sprigs rather than dried, as the flavor is significantly more vibrant. To prepare the rosemary for the dough, simply strip the leaves from the stems and finely chop them. This will help release the essential oils and infuse the rolls with a delightful herbal fragrance.
Garlic and Butter
The combination of garlic and butter transforms these dinner rolls into a savory delight that is hard to resist. Garlic, when sautéed or melted into butter, releases its rich, pungent flavor, enhancing the rolls and providing a luxurious finish. The infusion of garlic butter not only adds flavor but also moisture, ensuring that each roll is tender and delicious.
Using unsalted butter allows you to control the seasoning of the rolls, making it easier to balance the flavors. When brushing the rolls with garlic butter just before serving, the aroma wafts through the air, inviting everyone to dig in. This finishing touch elevates the dining experience, making these rolls a standout addition to any meal.
Step-by-Step Instructions
Now that we have a clear understanding of the ingredients, let’s move on to the detailed breakdown of the preparation and baking process. Following these steps will ensure clarity and success as you embark on making your Rosemary Dinner Rolls with Garlic Butter.
Preparing the Dough
The first step in creating your delicious dinner rolls is to prepare the dough. Start by gathering your ingredients: all-purpose flour, instant yeast, salt, fresh rosemary, water, and butter.
1. In a large mixing bowl, combine the all-purpose flour, instant yeast, and salt. Make sure to mix these dry ingredients thoroughly to ensure even distribution of the yeast and salt throughout the flour.
2. Create a well in the center of the dry ingredients and add warm water (approximately 110°F or 43°C). The warmth helps activate the yeast, so it’s important to avoid using water that is too hot, which can kill the yeast, or too cold, which will slow down the activation process.
3. Add melted butter and finely chopped fresh rosemary to the well. The melted butter adds richness to the dough, while the rosemary infuses the rolls with flavor.
4. Gradually mix the wet and dry ingredients together with a wooden spoon or spatula until a shaggy dough forms. At this point, the dough will be sticky and rough in texture.
Kneading Techniques
Kneading is a crucial step in bread-making, as it helps develop the gluten structure that gives the rolls their desired texture. Here’s how to knead the dough properly:
1. Transfer the shaggy dough onto a lightly floured surface. Dust your hands and the surface with flour to prevent sticking.
2. Begin kneading the dough by folding it over itself and pushing it away with the palms of your hands. Rotate the dough a quarter turn and repeat the process. This technique helps to evenly distribute the ingredients and strengthen the dough.
3. Knead the dough for about 8-10 minutes, or until it becomes smooth and elastic. You can perform the “windowpane test” to check if the dough is ready. Take a small piece of dough and stretch it between your fingers; if it forms a thin, translucent membrane without tearing, it’s ready for fermentation.
Fermentation Process
Once the dough is kneaded to perfection, it’s time to let it rise. The fermentation process is vital for developing flavor and texture in the rolls.
1. Place the kneaded dough in a lightly greased bowl, turning it to coat all sides with oil to prevent it from drying out. Cover the bowl with a clean kitchen towel or plastic wrap to retain moisture.
2. Allow the dough to rise in a warm, draft-free area until it has doubled in size. This typically takes about 1 to 1.5 hours, but rising times may vary based on the temperature of your environment. If your kitchen is cool, consider placing the dough in a slightly warm oven (turned off) to create an ideal environment for rising.
3. Once the dough has risen, gently punch it down to release any air bubbles. This step is crucial for creating a uniform texture in the final rolls.
Shaping the Rolls
The final step before baking is shaping the dough into rolls. This process not only gives the rolls their individual form but also contributes to their final rise and texture.
1. Turn the dough out onto a lightly floured surface and divide it into equal portions. A kitchen scale can be helpful if you want to ensure uniformity, with each piece weighing around 2-3 ounces.
2. To shape each roll, take a portion of dough and flatten it gently with your palm. Fold the edges toward the center to create a smooth ball. Once you have formed a round shape, place it seam-side down on a baking sheet lined with parchment paper.
3. Repeat this process with the remaining dough portions, placing them about 1-2 inches apart on the baking sheet. This spacing allows for expansion during the second rise.
4. Cover the shaped rolls with a clean kitchen towel and let them rise again for about 30-45 minutes, or until they have puffed up and are touching each other. This final rise is essential for achieving soft, fluffy rolls.
With these steps completed, you are well on your way to baking your Rosemary Dinner Rolls with Garlic Butter. As you prepare to bake, the kitchen will be filled with delightful aromas, setting the stage for a wonderful dining experience. In the next section, we will discuss the baking process and the final touches that will make your rolls irresistible.
The Baking Process
Baking Rosemary Dinner Rolls with Garlic Butter is a delightful journey that culminates in warm, fragrant rolls that are perfect for any meal. To ensure your rolls turn out perfectly, it’s essential to focus on the baking phase, particularly the temperature settings and signs of doneness.
Preheating the Oven
Preheating your oven is a crucial step in the baking process. By setting your oven to the right temperature—typically 375°F (190°C) for these rolls—you allow the yeast to activate properly during the baking phase. A preheated oven ensures that the rolls rise adequately and develop a beautiful crust. If you place the dough in an unheated oven, it can lead to uneven baking and the rolls becoming dense rather than fluffy.
As the oven heats, it’s a good time to prepare your baking sheet. Line it with parchment paper or lightly grease it to prevent the rolls from sticking. This preparation sets the stage for a smooth baking experience.
Perfecting the Golden Brown Finish
As your rolls bake, aim for a golden brown finish that indicates they are cooked through. After about 20-25 minutes, start checking for visual cues: the tops of the rolls should be a rich golden color, and the edges should be firm yet slightly soft to the touch. Gently tap the bottom of a roll; it should sound hollow if fully baked.
For an extra touch, consider using a kitchen thermometer. The internal temperature of the rolls should reach about 190°F (88°C) for optimal doneness. Once they reach this stage, remove them from the oven and allow them to cool slightly on a wire rack. This cooling process helps maintain the rolls’ texture and prevents them from becoming soggy.
Garlic Butter Preparation
The garlic butter is what elevates these rosemary dinner rolls from simple to extraordinary. It adds a rich, savory flavor that complements the herbaceous notes of the rosemary.
Melting and Infusing
To prepare the garlic butter, start with half a cup (1 stick) of unsalted butter. Place it in a small saucepan over low heat. This gentle heat will allow the butter to melt slowly without browning, which is essential for this recipe.
Once the butter is melted, add three to four cloves of minced garlic. Infuse the garlic into the butter by letting it simmer on low heat for about 5-7 minutes. Stir occasionally to prevent the garlic from sticking to the bottom of the pan. You’ll know it’s ready when the garlic becomes fragrant but not browned, as overcooking can lead to bitterness.
After the garlic has infused the butter, remove it from the heat and stir in a pinch of salt and freshly cracked black pepper to taste. For an extra layer of flavor, you might also consider adding a sprinkle of freshly chopped parsley or a squeeze of lemon juice. This garlic butter can be brushed generously over the warm rolls as soon as they come out of the oven, allowing it to seep into the nooks and crannies for a burst of flavor in every bite.
Serving Suggestions
Once your Rosemary Dinner Rolls with Garlic Butter are baked to perfection, presenting them in a way that enhances their appeal can elevate your dining experience.
Presentation Techniques
To serve the rolls aesthetically, consider using a rustic breadbasket lined with a clean cloth. This not only keeps the rolls warm but also adds a touch of charm to your table. You can arrange the rolls in the basket in a spiral or in a neat stack to showcase their golden tops.
For an inviting touch, serve with small ramekins of softened garlic butter on the side, allowing guests to spread more on their rolls as desired. You can also garnish the basket with fresh rosemary sprigs for a touch of color and aroma.
Pairing with Dishes
Rosemary Dinner Rolls pair beautifully with a variety of dishes. They make an excellent accompaniment to hearty soups, stews, and salads. Consider pairing them with a creamy potato soup, a rich beef stew, or a fresh garden salad topped with a lemon vinaigrette.
Additionally, these rolls are fantastic alongside roasted meats like chicken, lamb, or pork, where the garlic butter can complement the savory notes of the meat. They’re also perfect for brunch, served alongside scrambled eggs, fresh fruit, and a light coffee or tea.
Tips for Success
Baking bread can seem daunting, but with a few tips for success, you can avoid common pitfalls and achieve delicious results.
Avoiding Common Mistakes
1. Measuring Ingredients Accurately: Precision in measuring flour and liquids is crucial. Too much flour can lead to dense rolls, while too little can result in overly sticky dough. Use the spoon-and-level method to measure your flour accurately.
2. Kneading Appropriately: Ensure you knead the dough until it is smooth and elastic. Under-kneading can lead to poorly risen rolls, while over-kneading can make them tough. A good guideline is to knead for about 8-10 minutes by hand or 5-7 minutes in a stand mixer.
3. Letting Dough Rise: Don’t rush the rising process. Allow the dough to rise in a warm, draft-free environment until it has doubled in size. This can take anywhere from 1 to 2 hours, depending on the ambient temperature.
4. Testing Yeast Freshness: If your rolls don’t rise as expected, your yeast may be stale. Always check the expiration date and perform a quick test by dissolving a teaspoon of yeast in warm water with a pinch of sugar. If it bubbles and foams after 10 minutes, it’s active and good to use.
5. Avoiding Overcrowding: When placing the rolls on the baking sheet, ensure they have enough space to expand. Crowded rolls can bake unevenly and may not achieve the desired texture.
Conclusion
Creating Rosemary Dinner Rolls with Garlic Butter is a rewarding experience that brings the joy of home baking to your kitchen. With the right ingredients, techniques, and a little patience, you can impress your family and friends with these delightful rolls that are perfect for any meal. The combination of fragrant rosemary and rich garlic butter will create an unforgettable aroma in your home, inviting everyone to the table.
Embrace the art of bread-making, and enjoy the delicious rewards that come from your efforts. Whether served alongside a hearty meal or enjoyed fresh out of the oven, these rolls are sure to become a beloved staple in your culinary repertoire. So roll up your sleeves, gather your ingredients, and start baking these irresistible Rosemary Dinner Rolls today!