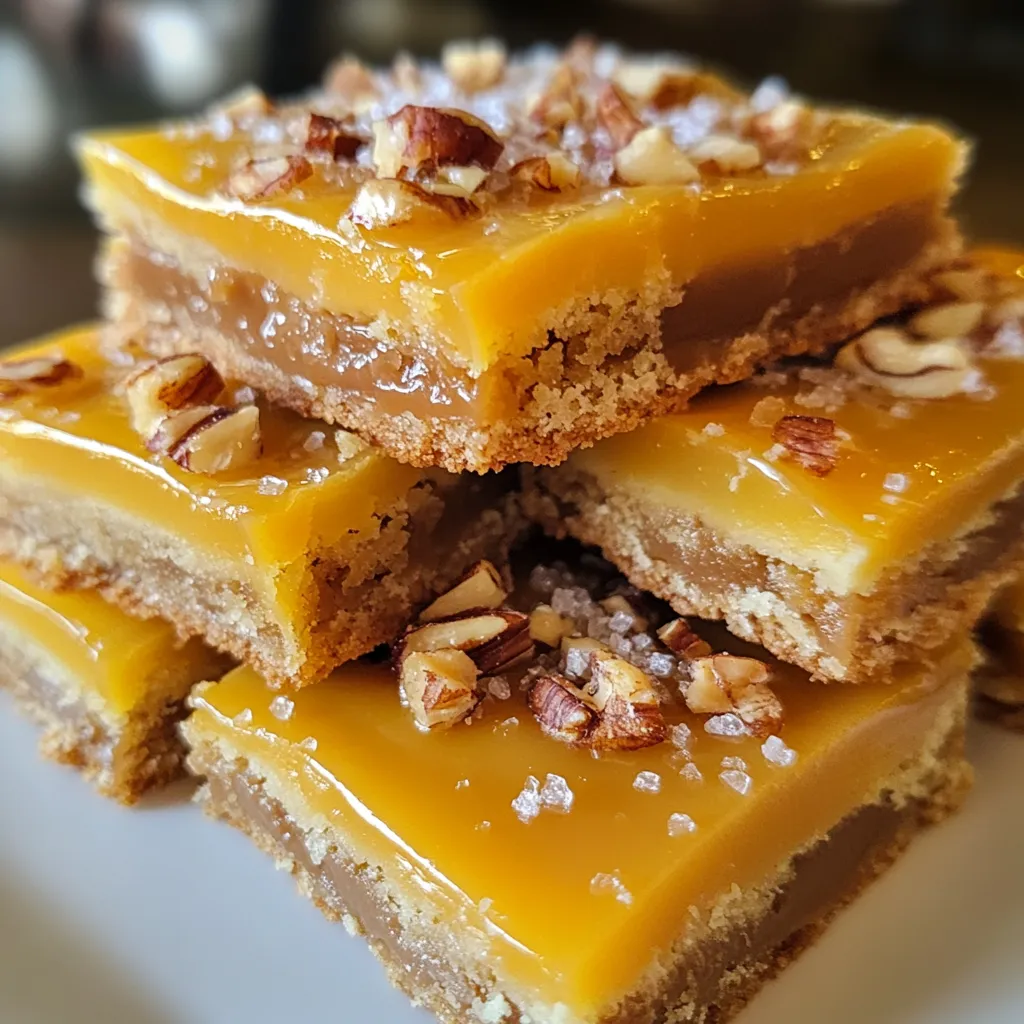
Indulge in the irresistible combination of buttery crust, rich caramel, and a hint of sea salt with our Salted Caramel Bliss Bars. These delectable dessert bars are the epitome of comfort food, offering a sweet and salty experience that tantalizes the taste buds. Whether you’re hosting a gathering, enjoying a cozy night in, or simply treating yourself to something special, these bliss bars are perfect for any occasion. In this article, we will guide you through the process of making these mouth-watering bars, providing tips and insights to ensure your baking experience is a success.
The Allure of Salted Caramel in Desserts
Salted caramel has taken the culinary world by storm, becoming a beloved flavor profile that graces many desserts. Its popularity can be attributed to the perfect balance of sweet and salty, creating a complex taste that appeals to a wide range of palates. The sweetness of caramel, which is achieved by cooking sugar until it melts and turns golden brown, is beautifully complemented by the addition of salt, enhancing the overall flavor.
This delightful interplay of flavors has made salted caramel a staple in many dessert recipes. From cakes and cookies to ice creams and sauces, the versatility of salted caramel means that it can be incorporated into a variety of sweet treats. The unique flavor profile of salted caramel plays an essential role in desserts, making it a perfect choice for those who appreciate a well-rounded dessert experience. The salty notes heighten the sweetness, creating a luxurious taste that leaves you wanting more.
For many, the combination of sweet and salty evokes feelings of nostalgia and comfort. It’s no wonder that salted caramel has become a go-to flavor for creating indulgent desserts that satisfy cravings and bring joy. Making Salted Caramel Bliss Bars at home allows you to experience this flavor combination in a new and exciting way, offering a fresh take on a classic treat.
Ingredients Breakdown
Creating the perfect Salted Caramel Bliss Bars requires a careful selection of ingredients, each playing a vital role in achieving the desired taste and texture. Here’s a comprehensive overview of the key ingredients you’ll need for this recipe:
1. Unsalted Butter: The foundation of both the crust and the caramel, unsalted butter adds richness and flavor. It’s essential to use unsalted butter to control the saltiness in the recipe.
2. Granulated Sugar: This is the main sweetener in the caramel. It’s important for achieving that desirable caramel flavor and the beautiful golden color.
3. Brown Sugar: Using a combination of granulated and brown sugar adds depth and moisture to the bars. Brown sugar contributes a subtle molasses flavor, enhancing the richness of the caramel.
4. All-Purpose Flour: The base of the crust, all-purpose flour provides structure and helps create a flaky, tender base that perfectly complements the rich caramel topping.
5. Heavy Cream: This rich ingredient adds creaminess to the caramel sauce, making it smooth and luscious. It also helps to prevent crystallization during the cooking process.
6. Sea Salt: A key ingredient in achieving the signature salted caramel flavor, sea salt enhances the sweetness of the caramel and provides that satisfying salty kick.
7. Vanilla Extract: This adds aromatic flavor to both the crust and the caramel, rounding out the sweetness and creating a more complex taste.
Possible Substitutes for Dietary Restrictions
If you have dietary restrictions or specific preferences, there are several substitutes that you can consider for these ingredients:
– Dairy-Free Butter: For a dairy-free option, use plant-based butter or coconut oil instead of unsalted butter.
– Coconut Sugar: If you prefer a less processed sweetener, coconut sugar can replace granulated sugar, though it may alter the flavor slightly.
– Gluten-Free Flour: Substitute all-purpose flour with a gluten-free flour blend to make the bars gluten-free. Just ensure that the blend contains xanthan gum for proper texture.
– Non-Dairy Cream: For a dairy-free caramel, use coconut cream or a non-dairy heavy cream alternative.
Understanding the role of each ingredient and knowing about possible substitutes allows you to customize the recipe to meet your specific dietary needs while still enjoying the decadent flavors of Salted Caramel Bliss Bars.
Preparing Your Kitchen for Baking Bliss Bars
Before diving into the baking process, it’s essential to prepare your kitchen. A well-organized workspace will enhance your baking experience and ensure that you have everything you need at your fingertips. Here are some tips to get started:
Essential Baking Tools and Equipment
1. Mixing Bowls: Have a variety of mixing bowls in different sizes for combining ingredients.
2. Measuring Cups and Spoons: Accurate measurements are crucial for successful baking, so ensure you have both dry and liquid measuring tools.
3. Electric Mixer: A stand mixer or hand mixer will make mixing the crust ingredients easier, but you can also mix by hand with a whisk or wooden spoon.
4. 9×9-inch Baking Pan: This size is ideal for baking your bliss bars, allowing for even cooking and easy slicing.
5. Parchment Paper: Lining your baking pan with parchment paper will help prevent sticking and make clean-up a breeze.
6. Candy Thermometer: If you want to ensure that your caramel reaches the perfect temperature, a candy thermometer is a valuable tool to have on hand.
Tips for Organizing Your Workspace
– Clear the Counter: Start with a clean countertop to give you ample space to work.
– Gather Ingredients: Before baking, gather all your ingredients and tools. This “mise en place” approach minimizes chaos and ensures you don’t forget any essential components.
– Preheat the Oven: If your recipe requires it, preheat your oven to the desired temperature before you start mixing your ingredients.
Importance of Ingredient Temperature and Quality
Using quality ingredients can make a significant difference in the final product. For example, using fresh unsalted butter and pure vanilla extract will enhance the overall flavor of your bars. Additionally, ensure that your butter is at room temperature for easy mixing and aeration, which will result in a tender crust. If your heavy cream is cold, it will help prevent the caramel from cooking too quickly, allowing for better control during the melting process.
Step-by-Step Guide to Making Salted Caramel Bliss Bars
Now that your kitchen is prepared, it’s time to dive into the heart of the recipe. Here’s a detailed step-by-step guide to making Salted Caramel Bliss Bars, beginning with the crust.
Preparing the Crust: Techniques for a Flaky Base
1. Preheat the Oven: Start by preheating your oven to 350°F (175°C). This ensures that the crust will bake evenly and develop a beautiful golden brown color.
2. Make the Crust Mixture: In a mixing bowl, combine 1 cup of all-purpose flour, 1/4 cup of granulated sugar, and 1/2 cup of unsalted butter (softened at room temperature). Using a hand mixer or a wooden spoon, mix until the ingredients are well combined and form a crumbly texture.
3. Press into the Pan: Line a 9×9-inch baking pan with parchment paper, leaving some overhang for easy removal later. Transfer the crust mixture into the prepared baking pan and press it down firmly with your fingers or a flat-bottomed glass. Aim for an even layer across the bottom, making sure to create a slightly raised edge to hold the caramel.
4. Bake the Crust: Place the pan in the preheated oven and bake for 15-20 minutes, or until the crust is lightly golden. Keep an eye on it to prevent over-baking, as a perfect crust should be firm but not too dark.
Crafting the Perfect Caramel: Tips for Avoiding Crystallization
1. Combine Ingredients: In a medium saucepan, combine 1 cup of granulated sugar, 1/4 cup of brown sugar, and 1/4 cup of unsalted butter over medium heat. Stir gently with a wooden spoon until the sugars dissolve and the butter melts.
2. Add Cream and Heat: Once the sugars have dissolved, carefully pour in 1/2 cup of heavy cream while continuing to stir. This will create a bubbling mixture, so be cautious to avoid splatters.
3. Monitor Temperature: Attach a candy thermometer to the side of your saucepan, ensuring it doesn’t touch the bottom of the pan. Continue to cook the caramel over medium heat without stirring until it reaches a temperature of 240°F (115°C), known as the soft ball stage. This is crucial for achieving the right consistency.
4. Avoid Crystallization: If sugar crystals begin to form on the sides of the pan, you can use a wet pastry brush to wipe them away. This helps prevent crystallization and ensures a smooth caramel sauce.
5. Finish with Salt and Vanilla: Once the caramel reaches the desired temperature, remove it from the heat and stir in 1 teaspoon of vanilla extract and 1/2 teaspoon of sea salt. This will enhance the flavor and add that signature salted caramel touch.
6. Pour Over the Crust: Carefully pour the warm caramel over the baked crust, using a spatula to spread it evenly. Allow the caramel to set for about 30 minutes at room temperature before moving on to the next steps.
As you embark on the journey of creating Salted Caramel Bliss Bars, the combination of flavors and textures will undoubtedly entice your taste buds. The buttery crust sets the stage for the rich, gooey caramel, making this dessert an irresistible treat for any occasion. Stay tuned for the next part, where we’ll delve deeper into the finishing touches and tips for serving these delightful bars.

Assembling the Layers: Ensuring Even Distribution
Once your crust and caramel layers are ready, it’s time to assemble your Salted Caramel Bliss Bars. Proper assembly is crucial to ensure that each bite is a delightful balance of flavors and textures. Start by spreading the cooled caramel layer evenly over the baked crust. Use a spatula to gently distribute the caramel, ensuring it reaches the edges of the pan. The goal is to create a uniform layer, so every bar has the same delectable taste.
After spreading the caramel, it’s essential to let it cool completely before adding the chocolate layer. This cooling process allows the caramel to set properly, preventing it from mixing with the chocolate and ensuring a clean separation between layers.
Baking to Perfection: How to Know When Your Bars Are Ready
Baking time can vary depending on your oven, but generally, you’ll want to bake your assembled bars until they’re golden brown and firm to the touch. For the crust, this usually takes around 15 to 20 minutes at 350°F (175°C). To check for doneness, look for a lightly golden color and a firm center. The edges should be slightly darker than the center, indicating that the crust is cooked through.
After the initial baking, you’ll want to add the chocolate layer. Return the bars to the oven for an additional 5 to 10 minutes, just until the chocolate is melted and glossy. You can test the bars by gently pressing the center; it should bounce back slightly. If your bars seem too soft, give them a few extra minutes but watch closely to avoid overbaking, which can lead to a dry texture.
Tips for Perfecting Your Salted Caramel Bliss Bars
Common Pitfalls to Avoid During Baking
1. Overmixing the Crust: When preparing the crust, avoid overmixing the dough. This can lead to a tough texture. Mix until ingredients are just combined.
2. Burning the Caramel: Caramel can be finicky. Keep a close watch while it cooks, and stir frequently to prevent burning. If you notice it starting to darken too quickly, reduce the heat.
3. Skipping the Cooling Times: Allow each layer to cool properly before adding the next. This prevents the layers from blending and ensures distinct flavors.
Adjusting Sweetness and Saltiness to Personal Preference
One of the joys of baking is the ability to customize recipes to suit your taste. Feel free to adjust the sweetness of the caramel by adding less sugar or by using dark chocolate for the topping, which can bring a nice bitterness to balance the sweetness. Additionally, sprinkle more or less sea salt on top depending on your preference. A little extra salt can enhance the caramel flavor and create a delightful contrast.
How to Achieve a Beautifully Set Caramel Layer
To ensure your caramel layer sets beautifully, follow these tips:
– Temperature Control: Make sure your caramel reaches the right temperature (around 240°F or 115°C) before pouring it over the crust. A candy thermometer is a handy tool for this.
– Cooling Time: After pouring the caramel, let it cool at room temperature for at least 30 minutes before adding the chocolate layer. This allows it to firm up and creates a perfect base for the chocolate.
Serving Suggestions and Pairings
Creative Ways to Present Your Bliss Bars
Presentation can elevate your Salted Caramel Bliss Bars from simple treats to show-stopping desserts. Here are some creative serving ideas:
– Cut into Unique Shapes: Instead of traditional squares, use cookie cutters to create fun shapes like hearts or stars for special occasions.
– Garnish with Sea Salt: Just before serving, sprinkle a few extra flakes of sea salt on top to enhance the visual appeal and flavor.
– Drizzle with Chocolate: Melt some additional chocolate and drizzle it over the bars for a decorative touch.
Recommended Beverages That Complement Salted Caramel
Pairing your bliss bars with the right beverages can enhance the overall experience:
– Coffee: A rich cup of coffee or espresso complements the sweetness of the caramel beautifully, making it a perfect afternoon treat.
– Tea: Consider pairing your bars with a warm cup of chai or a spiced tea for a cozy experience.
– Milk: A classic choice, a glass of cold milk can help balance the sweetness and richness of the bars.
Ideal Occasions for Serving These Delightful Treats
Salted Caramel Bliss Bars are versatile and suitable for a variety of occasions:
– Birthday Parties: These bars make excellent dessert options for birthdays, pleasing both kids and adults alike.
– Holiday Gatherings: Their rich flavor makes them a perfect indulgence during festive seasons.
– Potluck and Bake Sales: Easy to transport and share, these bars are a hit at potlucks, bake sales, or any gathering where dessert is welcomed.
Storing and Preserving Your Bliss Bars
Best Practices for Keeping Your Bars Fresh
To keep your Salted Caramel Bliss Bars fresh, store them in an airtight container at room temperature. If you live in a particularly warm climate, consider refrigerating them to prevent the caramel from becoming too soft.
– Layering: If stacking bars in a container, place parchment paper between layers to prevent sticking.
How to Freeze and Thaw for Later Enjoyment
If you want to prepare your bliss bars in advance or have leftovers, freezing is a great option:
1. Wrap Individually: Allow the bars to cool completely, then wrap each bar in plastic wrap and place them in a freezer-safe container.
2. Thawing: When you’re ready to enjoy, remove the bars from the freezer and let them thaw in the fridge for a few hours or at room temperature for about 30 minutes.
Understanding Shelf Life and Signs of Spoilage
Generally, Salted Caramel Bliss Bars can be stored for about a week at room temperature or up to two weeks in the refrigerator. If you notice any off smells, changes in texture, or visible mold, it’s best to discard them for safety.
Conclusion: Savor the Sweetness of Salted Caramel Bliss Bars
Baking Salted Caramel Bliss Bars is not just about creating a delicious dessert; it’s about the joy of sharing something special with family and friends. These bars embody the perfect balance of sweet and salty, making them an irresistible treat for any occasion.
As you try this recipe, don’t hesitate to experiment with variations—add nuts, use different types of chocolate, or even infuse the caramel with flavors like vanilla or espresso. Each adaptation can lead to a new favorite version of these blissful bars.
The lasting appeal of homemade desserts lies in the memories they create. Whether shared at a gathering or enjoyed in quiet solitude with a cup of coffee, your Salted Caramel Bliss Bars are sure to bring smiles and satisfaction. So gather your ingredients, embrace the process, and savor every sweet moment. Happy baking!