Introduction
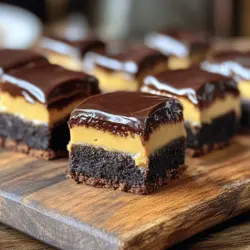
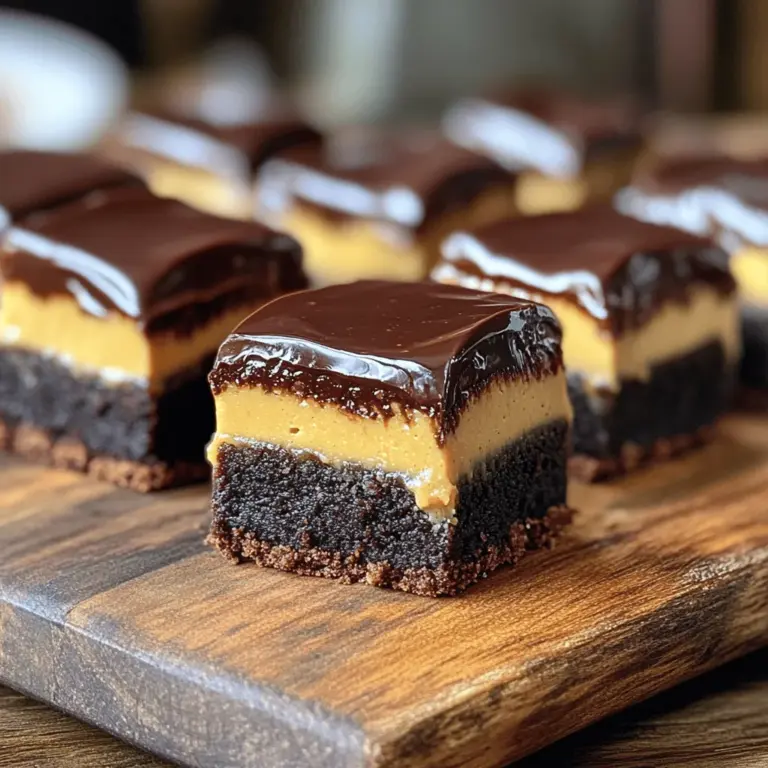
If you’re a fan of chocolate and peanut butter, then you’re in for a treat with these decadent Buckeye Brownie Bites. This delightful fusion brings together the fudgy richness of brownies with the creamy deliciousness of peanut butter, creating a mini dessert that’s perfect for any occasion. Whether you’re hosting a gathering, celebrating a special event, or simply indulging your sweet tooth, these brownie bites are sure to impress.
Mini desserts have become increasingly popular for their convenience and the ability to offer a variety of flavors without overwhelming guests. Buckeye Brownie Bites encapsulate this trend, providing a perfect one-bite portion that’s easy to share. Each bite is a harmonious blend of rich chocolate, velvety peanut butter, and a luscious chocolate ganache topping. The combination of flavors and textures makes these treats a guaranteed hit at parties or as a personal indulgence.
Understanding the Origin of Buckeye Treats
Before we dive into the recipe, it’s interesting to explore the origins of Buckeye treats and their significance in American culture. The Buckeye candy, which consists of a smooth peanut butter center coated in chocolate, is named after the nut of the Ohio Buckeye tree. This treat originates from Ohio, where it is a beloved regional delicacy. The candy has become a symbol of the state, and its popularity has led to various adaptations, including our delightful brownie bites.
The concept of combining chocolate and peanut butter is not new; it has been a staple in American desserts for decades. The rich, nutty flavor of peanut butter complements the deep sweetness of chocolate, creating a balance that many crave. This flavor pairing is celebrated in numerous baked goods, but the Buckeye Brownie Bites take it to another level by incorporating the chewy, dense texture of brownies. By infusing the classic Buckeye candy essence into brownie form, we create a dessert that pays homage to tradition while satisfying modern palates.
Ingredient Breakdown for Buckeye Brownie Bites
Now that we’ve set the stage, let’s take a closer look at the ingredients that will create these irresistible bites. Understanding each component is key to achieving the best flavors and textures in your final product.
Brownie Bites
– Semi-Sweet Chocolate Chips: The heart of the brownie base, quality semi-sweet chocolate chips deliver a rich, deep chocolate flavor. Opt for high-quality chocolate chips; they will enhance the taste of your brownies significantly.
– Unsalted Butter: Using unsalted butter allows you to have full control over the salt content in the recipe. It also contributes to the rich, creamy texture that brownies are known for.
– Granulated Sugar: Sugar plays a crucial role in the texture and sweetness of brownies. It helps create the perfect balance, ensuring that the brownies are sweet but not overwhelmingly so.
– Eggs: Eggs are essential for binding the ingredients together and adding moisture to the brownies. They contribute to the fudgy consistency that makes brownies so desirable.
– Vanilla Extract: A splash of vanilla extract enhances the overall flavor profile, adding depth and complexity to the brownies.
– All-Purpose Flour and Salt: These basic components provide the structure and stability necessary for the brownies. The flour absorbs moisture and helps the brownies rise slightly while the salt balances the sweetness.
Peanut Butter Filling
– Creamy Peanut Butter: The star of the filling, creamy peanut butter provides a smooth texture that complements the brownie base. Look for a high-quality, natural peanut butter for the best results.
– Unsalted Butter: Just like in the brownie base, unsalted butter is essential for the filling. It helps achieve the desired creaminess and richness.
– Powdered Sugar: Powdered sugar is used to sweeten the filling while also contributing to its smooth consistency. It dissolves easily, ensuring a velvety texture.
– Vanilla Extract: Adding vanilla extract to the peanut butter filling enhances the flavor and ties the components together beautifully.
Chocolate Ganache Topping
– Semi-Sweet Chocolate Chips: The ganache topping requires semi-sweet chocolate chips, which will provide a luscious, chocolatey finish to the brownie bites. Again, quality matters, so choose the best chocolate you can find.
– Heavy Cream: Heavy cream is what makes the ganache rich and creamy. It adds a luxurious texture that complements the peanut butter filling and brownie base perfectly.
Step-by-Step Guide to Making Buckeye Brownie Bites
Preparing the Brownie Base
Now that you have a clear understanding of the ingredients, it’s time to dive into the preparation of the Buckeye Brownie Bites. Start by gathering all the ingredients and preheating your oven to 350°F (175°C). Make sure to have a muffin tin ready, greased or lined with paper liners for easy removal later.
1. Melt the Chocolate and Butter: Begin by combining the semi-sweet chocolate chips and unsalted butter in a heatproof bowl. You can melt them together either in the microwave or over a double boiler. If using the microwave, heat in 30-second intervals, stirring in between until fully melted and smooth. If using the double boiler, stir continuously until melted. This process will create a smooth, luscious chocolate mixture that will form the base of your brownie bites.
2. Mix in the Sugar: Once the chocolate and butter are melted and well combined, remove the bowl from heat and let it cool slightly. Then, stir in the granulated sugar until fully incorporated. The sugar will dissolve into the warm chocolate, creating a glossy mixture.
3. Add the Eggs and Vanilla: Next, add the eggs to the warm chocolate mixture, one at a time, stirring vigorously after each addition. This step ensures that the eggs are well blended into the batter. Then, stir in the vanilla extract, which will enhance the overall flavor of the brownies.
4. Incorporate Dry Ingredients: Sift together the all-purpose flour and salt in a separate bowl. Gradually fold the dry ingredients into the wet mixture, being careful not to overmix. The goal is to combine everything just until no streaks of flour remain; this will keep the brownies fudgy and moist.
5. Fill the Muffin Tin: Using a spoon or a small cookie scoop, fill each muffin tin cavity about two-thirds full with the brownie batter. This will give them enough room to rise without overflowing.
6. Bake the Brownies: Place the muffin tin in the preheated oven and bake for about 18-20 minutes, or until a toothpick inserted in the center comes out with a few moist crumbs. Keep a close eye on them to avoid overbaking, as this can lead to dry brownie bites.
7. Cool the Brownies: Once baked, remove the muffin tin from the oven and allow the brownie bites to cool in the pan for about 10 minutes. After that, carefully remove them from the tin and transfer them to a wire rack to cool completely.
As the brownie bites cool, you can prepare the creamy peanut butter filling and the decadent chocolate ganache topping. Each step in the process brings you closer to a delicious treat that is sure to delight your taste buds and impress your guests. Stay tuned for the next part of the recipe, where we will complete these irresistible Buckeye Brownie Bites!
Importance of Mixing Techniques for Perfect Texture
When it comes to creating the perfect Buckeye Brownie Bites, the mixing technique is crucial. This step determines the texture and overall consistency of your brownies. Overmixing can lead to tough brownies as the gluten develops too much, while undermixing may cause uneven distribution of ingredients, resulting in a dry or crumbly texture. For optimal results, mix the ingredients just until they are combined. This will ensure that your brownies remain fudgy and moist, which is essential for the decadent experience you want from a Buckeye Brownie Bite.
Baking the Brownie Bites
Once you have your batter mixed to perfection, it’s time to bake. Preheat your oven to 350°F (175°C). Line a mini muffin tin with paper liners or grease them lightly to prevent sticking. Spoon the brownie batter into each muffin cup, filling them about two-thirds full. This allows room for the brownies to rise without overflowing.
Recommended Baking Time and Tips for Checking Doneness
Bake the brownie bites for approximately 12-15 minutes. The exact time will depend on your oven and the size of your muffin cups. To check for doneness, insert a toothpick into the center of a brownie bite. If it comes out with a few moist crumbs, they are ready. If it comes out wet, give them a few more minutes. Remember, these bites will continue to cook slightly from residual heat even after being removed from the oven, so don’t overbake them.
Cooling Process and Its Significance for Texture
After baking, allow the brownie bites to cool in the tin for about 10 minutes. Then, carefully transfer them to a wire rack to cool completely. This cooling process is vital as it allows the brownies to set, firming up their texture and making them easier to handle when you’re ready to fill and decorate them. Skipping this step or attempting to fill the brownies while they are still warm can lead to a messy filling process.
Creating the Peanut Butter Filling
While the brownie bites are cooling, you can prepare the delicious peanut butter filling. Start by combining creamy peanut butter, powdered sugar, and a pinch of salt in a mixing bowl. Use a hand mixer or a spatula to blend the ingredients until you have a smooth and creamy filling. If the mixture feels too thick, you can add a teaspoon of milk to achieve your desired consistency.
Tips for Making the Indent in Brownie Bites
To create the perfect indent for your filling, you can use a small measuring spoon or the end of a wooden spoon. Once the brownie bites have cooled, gently press the spoon into the center of each bite, creating a small well. Be careful not to push all the way through; you’re aiming for a deep indentation to hold the peanut butter filling securely.
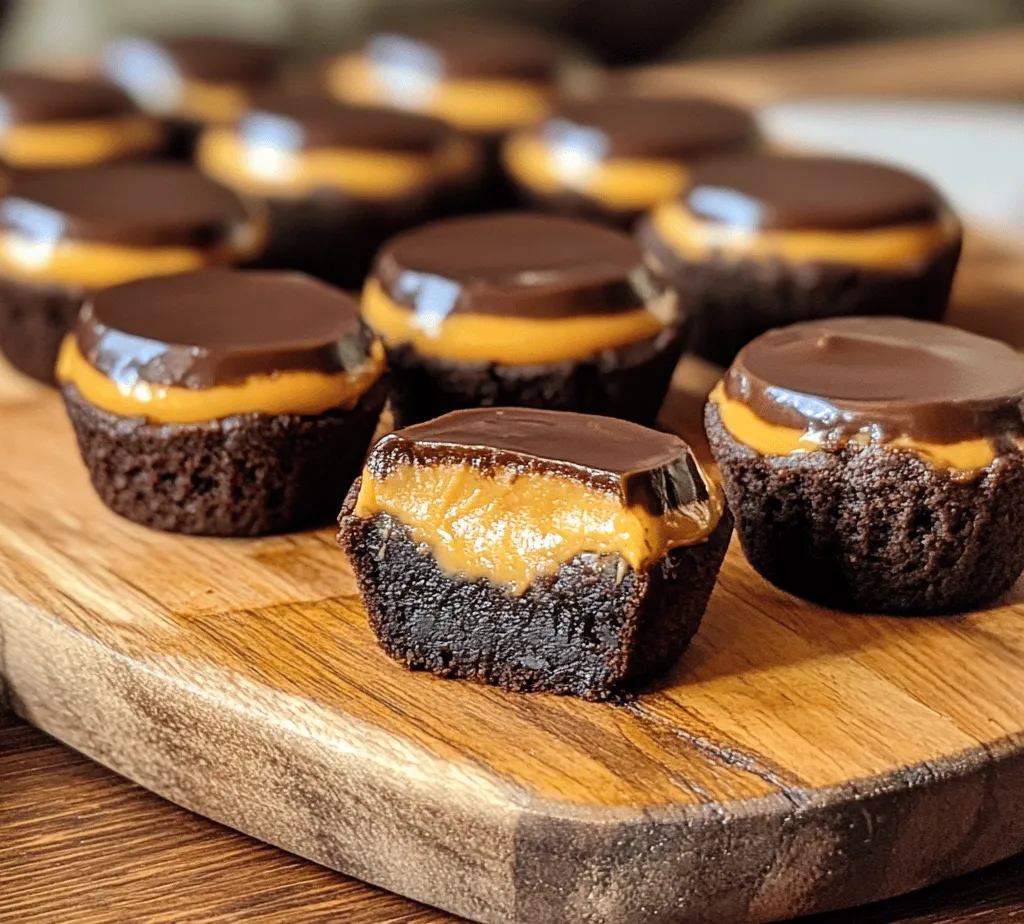
Filling the Brownies
Now it’s time to fill your brownie bites with that luscious peanut butter mixture. Using a small cookie scoop or a piping bag, carefully add the peanut butter filling into each well you made. Ensure that each bite is filled evenly, as this will enhance the overall flavor and make each bite a delightful combination of brownie and peanut butter. If you have any leftover filling, consider spreading it on toast or drizzling it over pancakes for a delicious treat.
Making the Chocolate Ganache
Next, we’ll create the rich chocolate ganache topping that will crown your Buckeye Brownie Bites. Start by finely chopping high-quality chocolate. Place it in a heatproof bowl. In a small saucepan, heat heavy cream over medium heat until it just begins to simmer. Pour the hot cream over the chopped chocolate and let it sit for about 1-2 minutes to soften the chocolate. Then, gently stir the mixture until smooth and glossy.
Proper Melting Techniques for a Smooth Ganache
For a smooth ganache, it’s essential to melt the chocolate gradually and avoid overheating the cream. If you prefer, you can also melt the chocolate in the microwave in short bursts, stirring in between to prevent burning. The key is to maintain a gentle heat to keep the chocolate from seizing.
Cooling Tips Before Topping
After making your ganache, let it cool for a few minutes before topping the brownie bites. This cooling step is crucial as it will thicken the ganache slightly, making it easier to spread without running off the sides. Aim for a pourable consistency that will beautifully coat the peanut butter filling.
Final Assembly and Chilling
Once the ganache is at the right temperature, spoon or drizzle it generously over each filled brownie bite. Ensure that the ganache covers the peanut butter filling completely, providing a beautiful finish. After assembling all the brownie bites, place them in the refrigerator for at least 30 minutes. This chilling time allows the ganache to set properly, creating a delightful contrast between the fudgy brownie, creamy peanut butter, and rich chocolate.
Serving Suggestions for Buckeye Brownie Bites
When it comes to serving your Buckeye Brownie Bites, presentation is key. Arrange them on a beautiful platter for gatherings or special occasions. You can place them in decorative cupcake liners to add a touch of charm. If you want to create individual servings, consider using small treat boxes or clear plastic cups, which can make for an appealing treat at parties or holiday gatherings.
Pairing Ideas with Beverages
These delicious bites pair wonderfully with various beverages. A glass of cold milk enhances the chocolate and peanut butter flavors, making for a classic combination. Alternatively, serve them alongside a robust cup of coffee or espresso for a delightful contrast. For a more festive touch, consider pairing your brownie bites with a sweet dessert wine or a rich hot chocolate.
Creative Serving Options
Get creative with your serving options! You can stack the brownie bites in a tiered dessert stand for an elegant display. Alternatively, place them in mason jars for an adorable rustic touch. This not only makes for an eye-catching presentation but also allows guests to grab their treats easily.
Variations and Customizations
One of the joys of baking is the ability to customize recipes to your taste. Here are some suggestions for variations and customizations for your Buckeye Brownie Bites:
Ingredient Substitutions
If you’re looking to change things up, consider using dark chocolate instead of semi-sweet for a richer flavor. You can also substitute almond butter or sunflower seed butter for the peanut butter if you have allergy concerns or simply prefer a different taste.
Ideas for Adding Flavors or Textures
For added texture, you might sprinkle crushed nuts, such as pecans or walnuts, on top of the ganache before it sets. A sprinkle of sea salt can elevate the flavors and balance the sweetness. For a unique twist, try adding flavored extracts, such as vanilla, almond, or even coffee, to the peanut butter filling for an extra layer of flavor.
Gluten-Free Adaptations
If you or your guests are avoiding gluten, you can easily make these brownie bites gluten-free. Substitute all-purpose flour with almond flour or a gluten-free flour blend. Just be mindful to check that all other ingredients, especially the chocolate and baking powder, are gluten-free.
Storage and Shelf Life
To maintain the freshness of your Buckeye Brownie Bites, store them in an airtight container at room temperature for up to three days. If you want to keep them longer, consider refrigerating them, where they can last up to a week. For even longer storage, you can freeze the brownie bites. Wrap them individually in plastic wrap and place them in a freezer-safe container. They can last in the freezer for up to three months.
When you’re ready to enjoy them, simply thaw them at room temperature or pop them in the microwave for a few seconds to warm them up slightly. This will help to restore their fudginess and make the ganache even more delightful.
Conclusion
Making and enjoying Decadent Buckeye Brownie Bites is a delightful experience that brings together the joy of baking and the pleasure of indulging in sweet treats. From the rich, fudgy brownie base to the creamy peanut butter filling and silky chocolate ganache, every bite offers a perfect balance of flavors and textures.
Baking is not just about following a recipe; it’s about the love and creativity you pour into each dish. These brownie bites are perfect for sharing with family and friends, making them an ideal treat for gatherings, celebrations, or simply as a special indulgence for yourself.
So roll up your sleeves, gather your ingredients, and savor the flavors of these delightful treats. Whether you stick to the classic recipe or experiment with your variations, you’ll find that Buckeye Brownie Bites are sure to become a beloved favorite in your baking repertoire. Enjoy the process, and happy baking!