
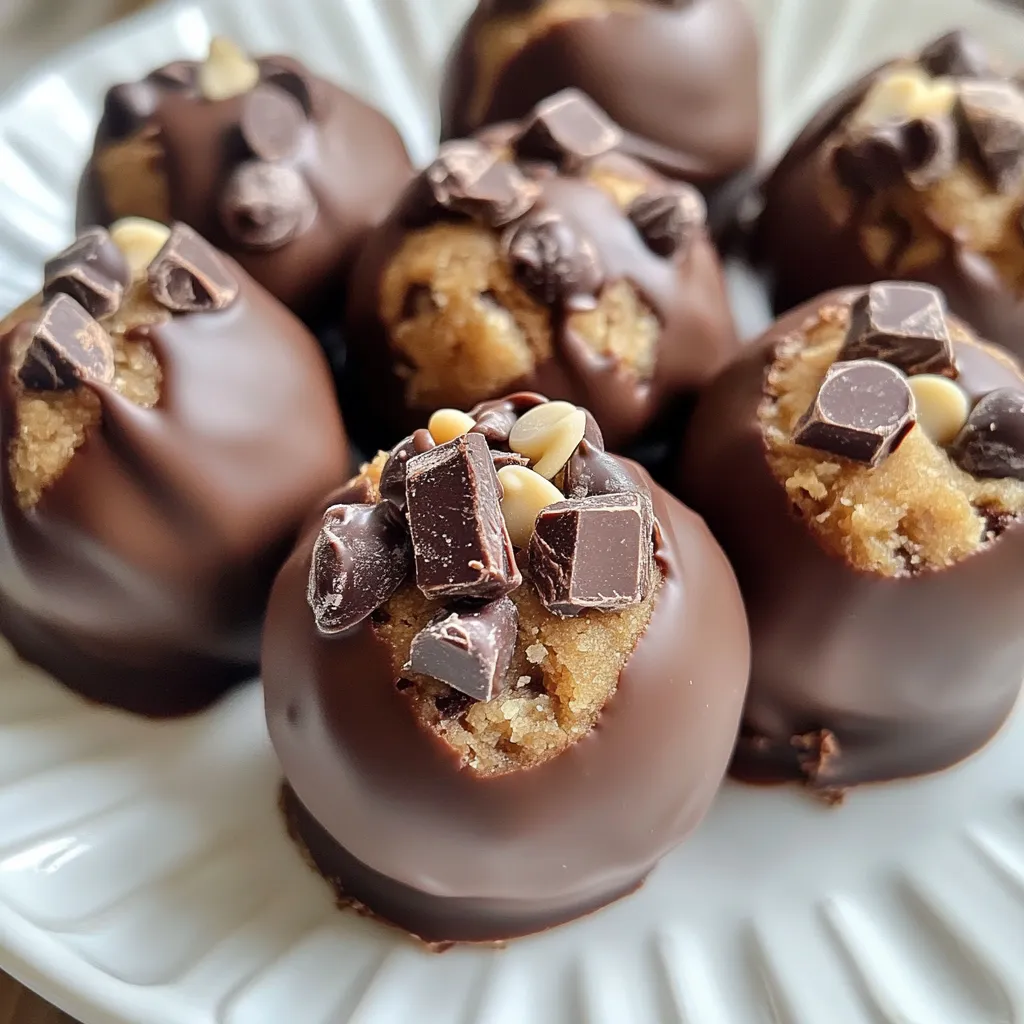
If you have a sweet tooth, you’re in for a treat! Chocolate Chunk Cookie Dough Truffles are a fun twist on classic cookie dough. These little bites combine creamy, dreamy dough with rich chocolate, making them perfect for snacking or sharing. In this post, I’ll share easy steps, tips, and fun variations to make your truffles a hit. Let’s dive into the delicious world of these delightful treats!
Why I Love This Recipe
- Decadent Flavor: The rich combination of semi-sweet and dark chocolate creates an indulgent treat that satisfies any sweet tooth.
- No Baking Required: These truffles are easy to make with no oven needed, making them a perfect last-minute dessert option.
- Customizable: You can easily swap in your favorite mix-ins, like nuts or different types of chocolate, to create your perfect truffle.
- Fun to Make: Rolling the dough into truffles is a fun activity, perfect for family gatherings or a cozy night in.
Ingredients
Detailed Ingredient List
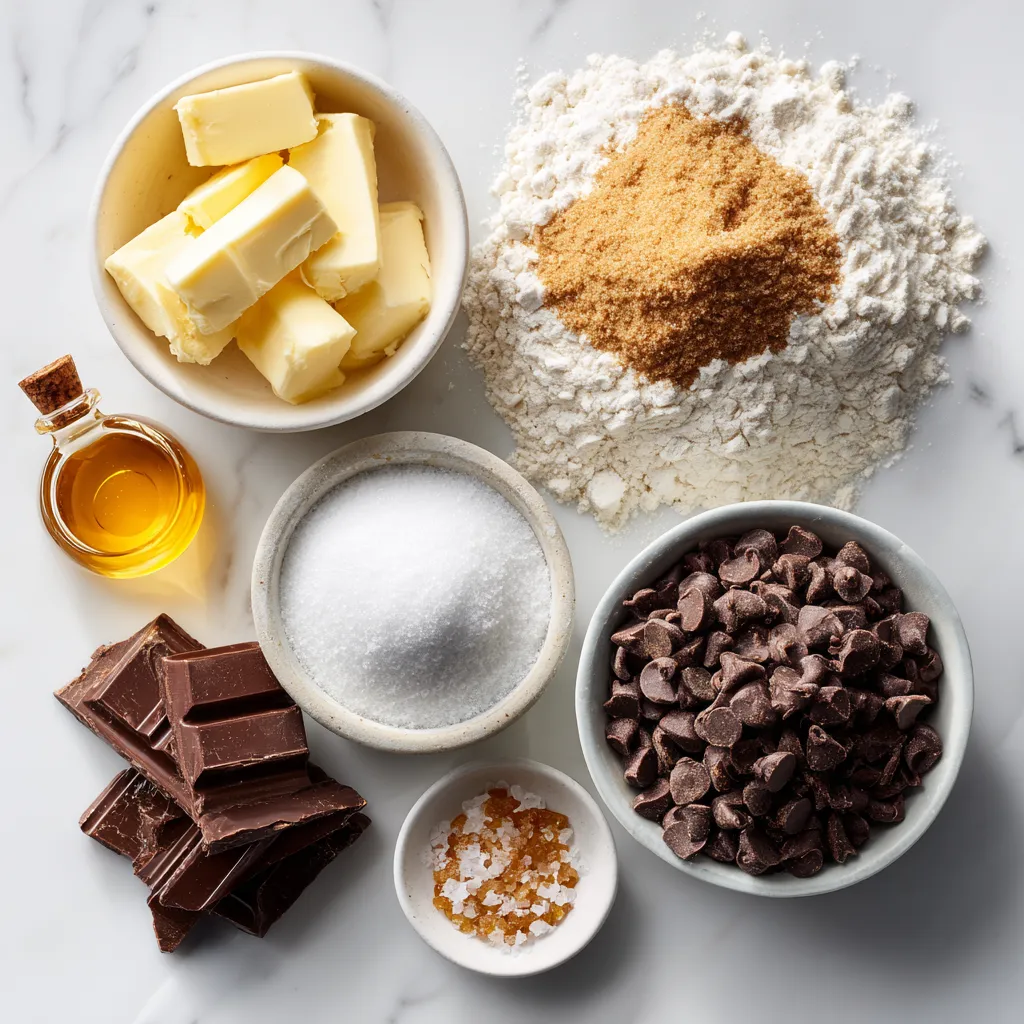
For these delightful Chocolate Chunk Cookie Dough Truffles, gather these key ingredients:
– 1 cup all-purpose flour
– 1/2 cup unsalted butter, softened
– 1/2 cup brown sugar, packed
– 1/4 cup granulated sugar
– 1 teaspoon vanilla extract
– 1/4 teaspoon salt
– 1/2 cup semi-sweet chocolate chunks
– 1/4 cup mini chocolate chips
– 1 cup dark chocolate, chopped (for coating)
Ingredient Substitutions
You can adjust some ingredients based on what you have at home. Here are a few ideas:
– Use coconut oil instead of butter for a dairy-free option.
– Swap brown sugar with coconut sugar for a different flavor.
– Try almond flour instead of all-purpose flour for a gluten-free version.
– Use milk chocolate instead of semi-sweet if you prefer a sweeter taste.
Importance of Each Ingredient
Every ingredient plays a vital role in creating these truffles:
– All-purpose flour: This forms the base of the dough.
– Unsalted butter: It gives richness and creaminess to the truffles.
– Brown sugar: Adds moisture and a deep flavor.
– Granulated sugar: Balances sweetness and helps in browning.
– Vanilla extract: Enhances the overall flavor profile.
– Salt: Brings out the sweetness and balances flavors.
– Semi-sweet chocolate chunks: Offers a rich chocolate taste in each bite.
– Mini chocolate chips: Provide extra texture and chocolatey goodness.
– Dark chocolate: Coats the truffles and adds a contrast to the sweetness.
Understanding these ingredients helps you appreciate the flavors and textures in your cookie dough truffles.
Step-by-Step Instructions
Preparing the Flour
First, we need to heat-treat the flour. This step is key. It kills harmful bacteria in raw flour. Spread the all-purpose flour in a microwave-safe bowl. Heat it in the microwave for about one minute. Stir halfway to ensure even heating. Let the flour cool completely before using it. This will make our truffles safe to eat.
Mixing the Dough
In a large mixing bowl, combine the softened butter, brown sugar, and granulated sugar. Use a hand mixer or stand mixer to cream them together until light and fluffy. This mixing makes the truffles rich and tasty. Next, add in the vanilla extract and mix until just combined. Now, it’s time for the dry ingredients. Gradually add the cooled flour and salt to the butter mixture. Mix on low speed until fully incorporated. Your dough might look crumbly but will hold together when pressed.
Shaping the Truffles
Now we shape our truffles! Use a tablespoon or a small cookie scoop to scoop out portions of the dough. Roll each portion into a ball, about one inch wide. Place these truffles on a parchment-lined baking sheet. This makes them easy to move later. Once all the dough is shaped, refrigerate the truffles for about 30 minutes. This helps them firm up.
Melting and Coating with Chocolate
While the truffles chill, we prepare the chocolate for coating. Chop the dark chocolate and place it in a microwave-safe bowl. Melt it in the microwave, stirring every 20 seconds until smooth. This will help us achieve a nice, shiny coating. Once the truffles are firm, dip each one into the melted dark chocolate using a fork. Allow any excess chocolate to drip off. Return the coated truffles to the parchment-lined sheet. Finally, place them back in the refrigerator for about 15 minutes. This will help the chocolate harden perfectly.
Tips & Tricks
Perfecting the Texture
To get the right texture, start with heat-treated flour. This step is key. Microwave the flour for a minute. Stir halfway through. Let it cool before mixing. This keeps your truffles safe and tasty. When mixing the butter and sugars, beat them until fluffy. This will make your dough light. If your dough feels crumbly, don’t worry. It should hold together when pressed into a ball.
Avoiding Common Mistakes
One mistake is skipping the chilling step. Chilling helps the truffles firm up. If they are too soft, the chocolate coating won’t stick well. Another common error is not melting the chocolate properly. Melt it slowly. Stir every 20 seconds. If you heat it too fast, it can burn. Lastly, don’t crowd the truffles on the baking sheet. Space them out so they can set evenly.
How to Achieve the Best Chocolate Coating
For the best coating, use high-quality dark chocolate. The richness will shine through. Dip each truffle carefully using a fork. Let excess chocolate drip off before placing it back on the sheet. This keeps the coating smooth. After coating, chill the truffles again. This helps the chocolate harden nicely. Remember, patience is key for a perfect finish!
Pro Tips
- Heat-Treat Your Flour: Always heat-treat flour before using it in no-bake recipes to eliminate any potential bacteria.
- Use Room Temperature Butter: Make sure your butter is softened to room temperature for easier creaming with sugars, resulting in a fluffier dough.
- Chill for Better Coating: Chilling the truffles before dipping in chocolate helps maintain their shape and makes coating easier.
- Experiment with Coatings: Try different types of chocolate or even crushed nuts for coating to add variety and texture to your truffles.
Variations
Different Chocolate Types
You can change the flavor of your truffles by using different types of chocolate. Instead of just dark chocolate for coating, try milk or white chocolate. Each will give a unique taste. Milk chocolate adds sweetness, while white chocolate gives a creamy touch. You can even mix chocolates for a fun twist. Just remember to adjust your melting time; different chocolates melt at different rates.
Add-ins and Flavor Enhancements
You can make your cookie dough truffles even better with add-ins. Try adding nuts, like chopped walnuts or pecans, for crunch. You can also mix in dried fruit, like cranberries or raisins, for a tart taste. If you love spices, a pinch of cinnamon or nutmeg can add warmth. For a fun flavor boost, try a splash of almond extract or orange zest. The choices are endless!
Seasonal and Themed Truffles
Get creative with seasonal themes for your truffles. For Halloween, you might add orange food coloring to the melted chocolate and sprinkle with festive candy. During the holidays, use peppermint extract in the dough and coat with white chocolate. You can decorate with crushed candy canes for a festive touch. For birthdays, use colorful sprinkles on top of the chocolate coating. These small changes can make your treats perfect for any occasion!
Storage Info
Best Ways to Store Truffles
To keep your chocolate chunk cookie dough truffles fresh, store them in an airtight container. Line the container with parchment paper for added protection. Place a layer of truffles in the container and add more parchment between layers. This prevents them from sticking together. You can store them at room temperature for a few days.
Shelf Life and Freshness Tips
When stored properly, these truffles stay fresh for about one week. If you want to enjoy them longer, store them in the refrigerator. The cool air helps maintain their texture. Just remember to let them come to room temperature before enjoying. This brings back their delicious flavor and soft texture.
Freezing Chocolate Chunk Cookie Dough Truffles
You can also freeze these truffles for later. After forming and chilling the truffles, place them in a single layer on a baking sheet. Freeze them for about one hour. Once firm, transfer them to a freezer-safe bag or container. They can last up to three months in the freezer. When ready to enjoy, thaw them in the fridge overnight.
FAQs
Can I eat raw cookie dough?
Yes, you can eat cookie dough, but with a twist. Raw cookie dough may contain raw flour and eggs, which can carry harmful bacteria. In this recipe, we heat-treat the flour to make it safe. We microwave it for 1 minute to kill any bacteria. This way, you can enjoy the dough without worry.
What is heat-treated flour and why is it important?
Heat-treated flour is flour that you heat in the microwave. This process kills harmful bacteria that can cause illness. It is important to ensure your cookie dough truffles are safe to eat. You just spread the flour in a bowl and heat it for 1 minute. Stir halfway through and let it cool before using it in your dough.
How do I adjust the recipe for gluten-free options?
To make gluten-free cookie dough truffles, swap all-purpose flour for gluten-free flour. Look for a blend designed for baking. Make sure it does not contain any gluten or wheat. The rest of the recipe stays the same. This way, everyone can enjoy these tasty treats!
This blog post covered key steps for making delicious truffles. We explored essential ingredients, provided substitutions, and highlighted their importance. I outlined a step-by-step guide to prepare them, mix the dough, shape the truffles, and coat them in chocolate. Helpful tips helped you perfect texture and avoid common mistakes. I also shared fun variations and storage tips to keep your truffles fresh.
Remember, making truffles is about enjoying the process. With practice, you’ll become a truffle expert in no tim


