
Are you craving a delicious, easy snack that satisfies your sweet tooth? Look no further! In this post, I’ll show you how to make Chocolate Peanut Butter Oat Bars that are both tasty and simple. Perfect for kids and adults alike, these bars are packed with flavor and nutrition. Plus, I’ll share tips, substitutions, and even vegan options. Let’s dive into this delightful treat that you can whip up in no time!
Why I Love This Recipe
- Delicious Flavor Combination: The rich taste of chocolate paired with creamy peanut butter creates an irresistible treat that satisfies sweet cravings.
- Nutritious Ingredients: Made with rolled oats, nuts, and natural sweeteners like honey or maple syrup, these bars are a healthier dessert option.
- Easy to Prepare: This recipe requires minimal effort and time, making it perfect for busy days when you still want a homemade snack.
- Customizable: You can easily adapt the recipe by adding your favorite nuts, seeds, or even dried fruits for added texture and flavor.
Ingredients
List of Essential Ingredients
To make these tasty chocolate peanut butter oat bars, you need a few simple items:
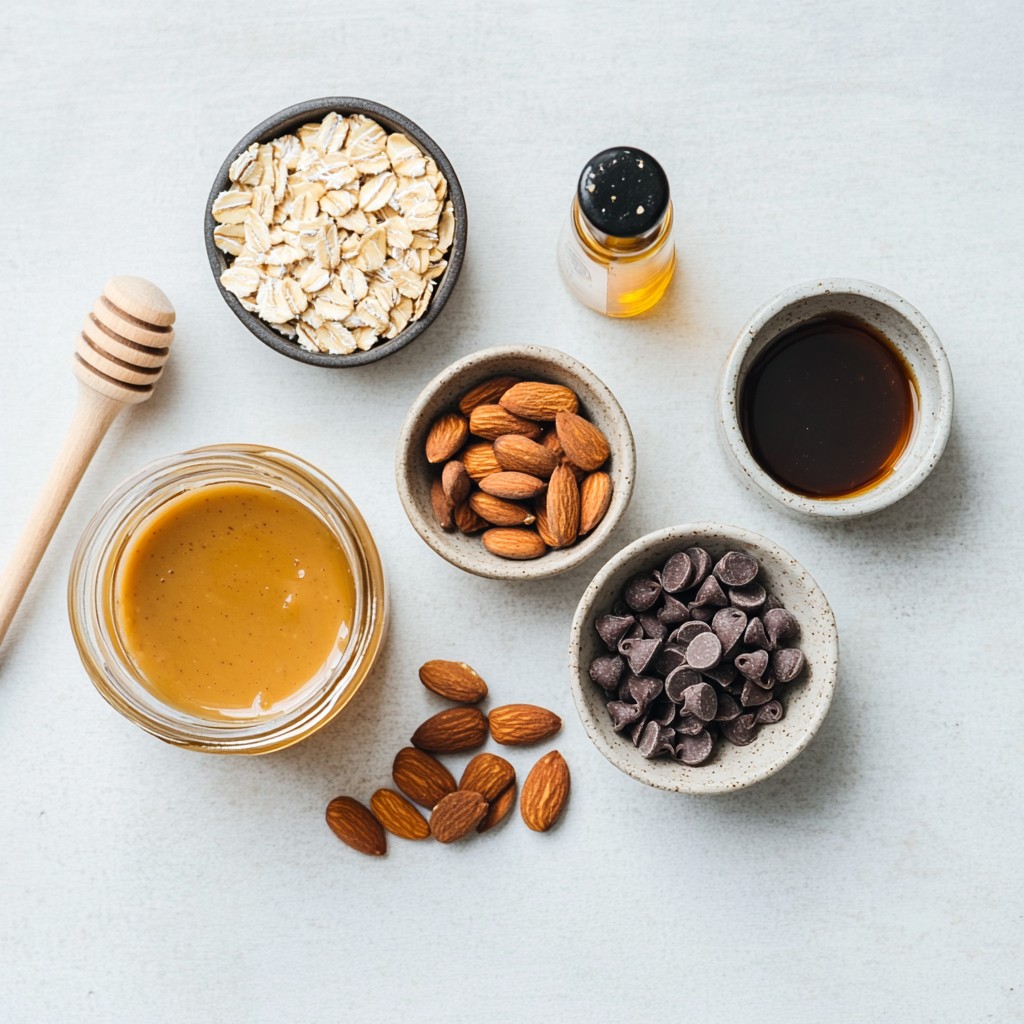
- 1 cup rolled oats
- 1/2 cup creamy peanut butter
- 1/3 cup honey or maple syrup
- 1/2 cup dark chocolate chips
- 1/4 cup chopped nuts (almonds or walnuts)
- 1/4 teaspoon salt
- 1/2 teaspoon vanilla extract
These ingredients combine to create a sweet, chewy treat that you will love.
Substitutions for Allergens
If you have allergies or special diets, don’t worry! You can easily swap out some ingredients:
- Use almond butter or sunflower seed butter instead of peanut butter for nut allergies.
- Replace honey with agave syrup for a vegan option.
- Omit the nuts if you want a nut-free treat.
These swaps keep the bars safe and tasty without losing flavor.
Optional Add-ins
You can get creative with your bars! Here are some fun add-ins:
- Add 1/4 cup dried fruit, like cranberries or raisins, for a fruity twist.
- Mix in 1/4 cup seeds, like pumpkin or sunflower seeds, for extra crunch.
- Sprinkle in 1 teaspoon of cinnamon for a warm, cozy flavor.
These optional add-ins let you customize your bars to match your taste!
Step-by-Step Instructions
Preparation Overview
To make chocolate peanut butter oat bars, start with simple steps. First, preheat your oven to 350°F (175°C). Line an 8x8 inch baking dish with parchment paper. This helps with easy removal later. Now, gather your ingredients: rolled oats, creamy peanut butter, honey or maple syrup, dark chocolate chips, chopped nuts, salt, and vanilla extract.
Next, in a large mixing bowl, combine 1 cup of rolled oats, 1/2 cup of creamy peanut butter, 1/3 cup of your choice of honey or maple syrup, and 1/4 teaspoon of salt. Mix these until they blend well. You want a uniform texture for the base of your bars.
Baking Instructions
Now it's time to fold in flavors. Add half of your 1/2 cup of dark chocolate chips and 1/4 cup of chopped nuts into the bowl. Mix gently to keep some texture. Then, scrape the mixture into your prepared baking dish. Press it down evenly with a spatula.
Place the dish in the oven and bake for 15 to 18 minutes. Watch for golden edges, which show they are ready. As soon as you take them out, sprinkle the rest of the chocolate chips on top. This step makes the bars even more delicious.
Finishing Touches
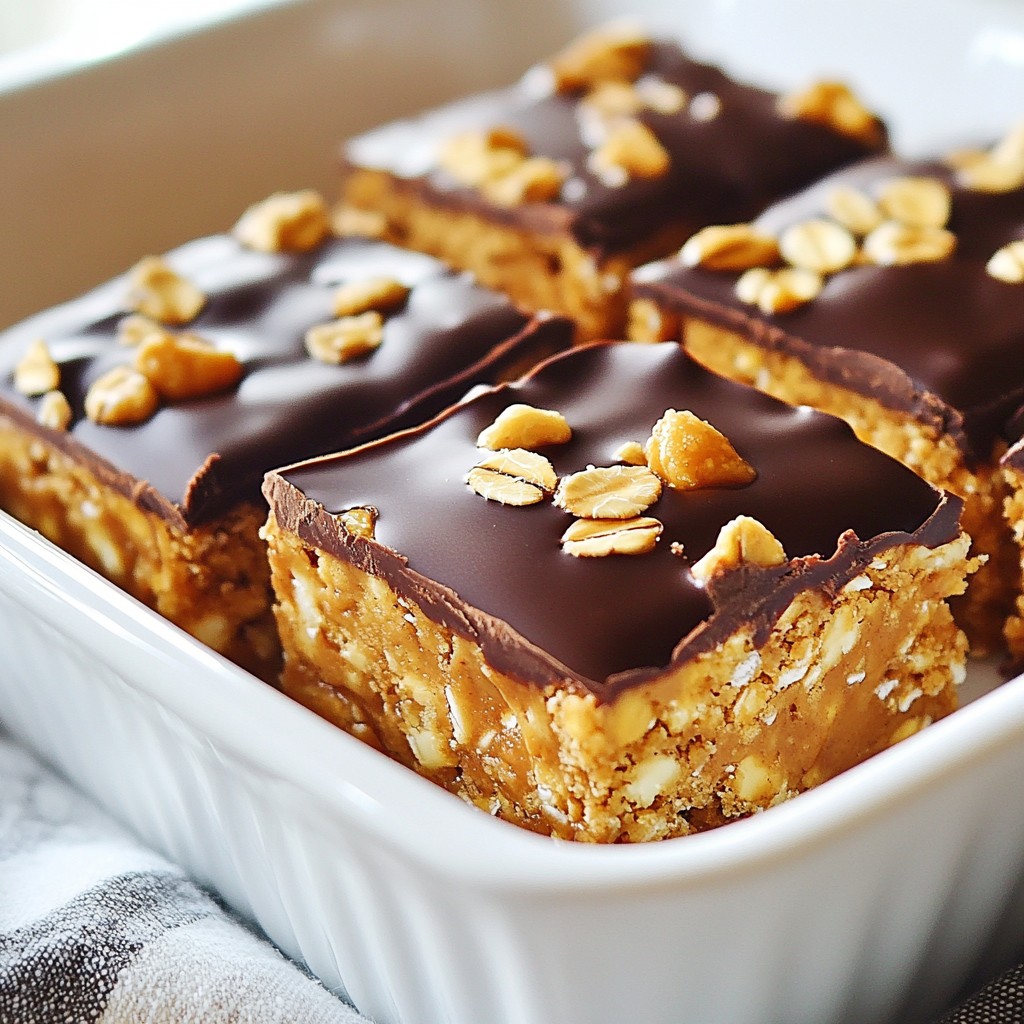
After baking, allow the bars to cool for 10 to 15 minutes in the dish. Use the parchment paper overhang to lift them out. For best results, place them in the fridge for at least 1 hour. This helps the chocolate set and makes cutting easier. Once set, cut into squares or bars. Store these tasty treats in an airtight container in the fridge to keep them fresh. Enjoy your delicious chocolate peanut butter oat bars!
Tips & Tricks
Achieving the Perfect Texture
To get the best texture, use rolled oats. They give a chewy feel. Mix the oats with peanut butter and honey until smooth. Press the mixture firmly into your baking dish. This helps the bars hold together. Bake until the edges turn golden. Let them cool before cutting.
How to Easily Cut the Bars
Cutting bars can be tricky. To make it easy, chill them first. After cooling, lift the bars using the parchment paper. Use a sharp knife for clean cuts. Wipe the knife between cuts for neat squares. This keeps your bars looking nice and tidy.
Best Practices for Melting Chocolate
Melting chocolate is simple but needs care. Use a microwave-safe bowl. Heat the chocolate in short bursts. Stir after each burst to avoid burning. You want it smooth and shiny. Once melted, spread it over the cooled bars. This adds a rich finish to each bite.
Pro Tips
- Storage Tip: Keep the bars in an airtight container in the refrigerator to maintain freshness and prevent them from becoming too soft.
- Substitution Tip: If you're allergic to peanuts, feel free to substitute almond butter or sunbutter for a nut-free version.
- Sweetness Tip: Adjust the sweetness to your liking by adding more or less honey or maple syrup based on your taste preference.
- Texture Tip: For added crunch, consider mixing in some crispy rice cereal or seeds along with the nuts.
Variations
Vegan Chocolate Peanut Butter Oat Bars
You can make these bars vegan easily. Just swap honey for maple syrup. Use a plant-based chocolate chip too. I love how the flavors still shine through. The oats and peanut butter give it a rich taste. You won't miss the honey one bit!
Gluten-Free Options
To make gluten-free bars, use certified gluten-free oats. This small change keeps the bars safe for those with gluten issues. The rest of the recipe stays the same. The texture remains chewy and delicious. Everyone can enjoy these tasty treats!
Flavor Enhancements
Want to mix it up? Add spices or extracts for new flavors. A pinch of cinnamon adds warmth and depth. You can also try a splash of almond extract for a nutty twist. Even a bit of sea salt on top can enhance the chocolate flavor. These tweaks make each batch special.
Storage Info
Best Storage Methods
To keep your chocolate peanut butter oat bars fresh, use an airtight container. This helps prevent moisture from making them soggy. You can stack the bars with parchment paper between layers. This will stop them from sticking together. Store them in the fridge for the best taste.
Shelf Life of the Bars
When stored well, these bars last about a week in the fridge. You might notice them getting drier after a few days. If you want them fresh longer, consider freezing them.
Freezing Instructions
To freeze your oat bars, wrap each one in plastic wrap. Place the wrapped bars in a freezer bag. Squeeze out as much air as you can before sealing. They will stay good for about three months. When you want to enjoy one, just take it out and let it thaw in the fridge.
FAQs
What can I use instead of honey or maple syrup?
You can use agave nectar or brown rice syrup. Both options are sweet and sticky. They will work well in the recipe. Just use the same amount as honey or maple syrup.
How do I know when the bars are done baking?
The bars are done when the edges turn a light golden color. You can also press lightly on the top. If it feels firm, it is ready. Don't forget to let them cool before cutting.
Can I make these without nuts?
Yes, you can skip the nuts if you prefer. Just add a bit more oats or chocolate chips. This will keep the balance right and still taste great!
This post covered the main ingredients and steps to make delicious bars. We explored substitutes for allergens and fun add-ins for flavor. I shared tips on achieving the right texture and how to cut your bars easily. You learned variations, including vegan and gluten-free options. Finally, I provided storage tips to keep your bars fresh.
With these insights, you can create tasty bars that suit your needs. Happy baking!


