Introduction to Garlicky Herbed Focaccia Breadsticks
There’s something incredibly comforting about the aroma of freshly baked bread wafting through your kitchen. It’s a sensory experience that can evoke memories of family gatherings, cozy dinners, and special occasions. Among the myriad of bread recipes, Garlicky Herbed Focaccia Breadsticks stand out as a delightful and versatile addition to any meal. These breadsticks not only promise a satisfying crunch on the outside but also a soft, pillowy interior that is infused with the vibrant flavors of garlic and fresh herbs.
Focaccia has its roots in Italian cuisine, celebrated for its simplicity and adaptability. Transforming this classic flatbread into convenient breadsticks opens up a world of culinary possibilities. Whether served as an appetizer, a side dish, or a snack, these Garlicky Herbed Focaccia Breadsticks can elevate any dining experience. They pair beautifully with a variety of dips, soups, and salads, making them a perfect choice for gatherings or a simple family dinner. The combination of garlic and herbs infuses the breadsticks with a fragrant aroma and rich flavor, ensuring that every bite is a delicious reminder of home-cooked comfort.
In this article, we will guide you through the process of making these delectable breadsticks, starting from understanding the essential ingredients to crafting the perfect dough. By the end, you will be equipped with the knowledge to create your own batch of Garlicky Herbed Focaccia Breadsticks, delighting your family and friends with a homemade treat that is sure to impress.
Understanding the Key Ingredients
All-Purpose Flour: The Foundation of Breadsticks
At the heart of any bread recipe lies flour, and for our Garlicky Herbed Focaccia Breadsticks, all-purpose flour is the foundation that gives structure and texture to the dough. This type of flour is versatile and readily available, making it a popular choice among home bakers. All-purpose flour contains a balanced amount of protein, which is crucial in forming gluten when mixed with water and kneaded. Gluten is what gives bread its elasticity and chewiness, allowing it to rise beautifully while maintaining a tender crumb.
When selecting all-purpose flour for your breadsticks, consider using a brand that is unbleached and high-quality. This ensures a better flavor and texture, leading to a more satisfying final product.
Instant Yeast: Quick Rising for Freshness
Yeast is a key player in the bread-making process, and using instant yeast can significantly simplify your baking experience. Unlike active dry yeast, which requires proofing, instant yeast can be mixed directly into the dry ingredients, saving you time and effort. This fast-acting yeast works quickly to ferment the dough, producing carbon dioxide that causes the dough to rise swiftly.
The quicker rising time is particularly beneficial for busy home cooks who want to create fresh bread without the extensive waiting periods typically associated with traditional yeast methods. When using instant yeast, be sure to store it in a cool, dry place to maintain its potency, and always check the expiration date for optimal results.
Olive Oil: Adding Richness and Flavor
Olive oil plays a dual role in our Garlicky Herbed Focaccia Breadsticks. Not only does it contribute to the overall flavor profile, but it also enhances the moisture content of the dough. Incorporating olive oil into the breadsticks adds richness and depth, creating a tender texture that is hard to resist.
Additionally, brushing the breadsticks with olive oil before baking not only adds flavor but also promotes a beautiful golden crust. Opt for high-quality extra virgin olive oil, as it provides robust flavor and health benefits, such as antioxidants and healthy fats.
Fresh Herbs: The Heart of the Recipe
Fresh herbs are essential to achieving the signature flavor of Garlicky Herbed Focaccia Breadsticks. The use of aromatic herbs like rosemary and thyme not only elevates the taste but also adds a beautiful visual appeal to your baked goods. Rosemary offers a pine-like fragrance and a hint of earthiness, while thyme adds a subtle floral note that complements the garlic perfectly.
Incorporating fresh herbs into your dough releases essential oils that infuse the breadsticks with an aromatic quality. When selecting herbs, look for vibrant, fragrant sprigs at your local market or grocery store. Using fresh herbs instead of dried ones ensures a more potent flavor and enhances the overall quality of your breadsticks.
Garlic: A Flavor Powerhouse
No garlic bread recipe would be complete without the robust flavor of garlic itself. In our Garlicky Herbed Focaccia Breadsticks, garlic serves as a powerful flavor enhancer, providing depth and richness to each bite. The addition of minced garlic to the dough infuses it with a savory quality that pairs beautifully with the herbs and olive oil.
Beyond its culinary appeal, garlic is also celebrated for its numerous health benefits. It is known for its potential to boost the immune system, reduce blood pressure, and promote heart health. Whether you’re a garlic aficionado or simply enjoy its flavor, rest assured that it plays a pivotal role in making these breadsticks a standout dish.
Step-by-Step Guide to Making Garlicky Herbed Focaccia Breadsticks
Preparing the Dough
Now that we’ve explored the key ingredients that make our Garlicky Herbed Focaccia Breadsticks so flavorful, it’s time to dive into the preparation process. The first step in making the dough is to activate the yeast. In a mixing bowl, combine warm water (approximately 110°F or 43°C) with sugar and instant yeast. Allow the mixture to sit for about five to ten minutes until it becomes frothy. This frothy appearance indicates that the yeast is alive and ready to work its magic.
Once the yeast is activated, add the all-purpose flour, salt, olive oil, minced garlic, and chopped fresh herbs to the bowl. Mix the ingredients together until they form a shaggy dough. The dough should be slightly sticky but manageable. If it feels too wet, you can add a little more flour, a tablespoon at a time, until you achieve the right consistency.
Kneading Techniques for Perfect Texture
Kneading is an essential step in developing the dough’s gluten structure, which contributes to the chewy and elastic texture of the breadsticks. Transfer the dough to a lightly floured work surface and begin kneading it by pressing it down with the heels of your hands, then folding it over and repeating the process. Continue kneading for about 8-10 minutes until the dough becomes smooth and elastic.
To check if your dough is ready, perform the “windowpane test.” Take a small piece of dough and stretch it between your fingers. If it forms a thin, translucent membrane without tearing, your dough is well-kneaded and ready for the next step. If it tears easily, continue kneading for a few more minutes.
The Importance of Rising Time
After kneading, it’s time to let the dough rise. This step is crucial for developing flavor and texture. Place the kneaded dough in a lightly greased bowl, cover it with a clean kitchen towel or plastic wrap, and let it rise in a warm, draft-free area for approximately 1 to 1.5 hours, or until it has doubled in size.
The ideal rising environment can be achieved by placing the bowl in a slightly warmed oven with the heat turned off or near a warm stovetop. During this time, the yeast will ferment the sugars in the dough, producing gas that causes it to rise. Patience is key, as allowing the dough to rise properly will result in a light and airy final product.
Shaping the Breadsticks
Once the dough has risen and doubled in size, it’s time to shape the breadsticks. Gently punch down the dough to release any trapped air bubbles and transfer it to a lightly floured surface. Divide the dough into equal portions, depending on how thick or thin you want your breadsticks to be. Roll each portion into long, cylindrical shapes, about 6-8 inches in length, and place them on a parchment-lined baking sheet.
To create the signature focaccia texture, you can use your fingers to make dimples on the surface of each breadstick. This technique not only adds visual interest but also helps the breadsticks hold onto the olive oil and garlic topping. Once shaped, cover the breadsticks with a towel and allow them to rise again for about 30-45 minutes. This second rise will enhance the fluffiness of your breadsticks.
Stay tuned for the next part, where we will cover the delicious topping preparations, baking instructions, and tips to ensure your Garlicky Herbed Focaccia Breadsticks turn out perfectly every time!
Techniques for Cutting and Rolling
Once your dough has risen beautifully, it’s time to shape it into perfect breadsticks. This step is crucial not only for aesthetic purposes but also for ensuring uniform baking. Here’s how to effectively cut and roll your focaccia dough:
1. Prepare Your Work Surface: Lightly flour your work surface to prevent the dough from sticking. This will make it easier to manipulate the dough without tearing it.
2. Divide the Dough: Gently punch down the risen dough to release some of the air. Use a sharp knife or a bench scraper to divide the dough into equal portions, aiming for about 12 to 16 pieces depending on your desired thickness.
3. Shape Each Piece: Take each piece of dough and roll it into a long, thin shape. You can use your hands to stretch and roll the dough, ensuring that each breadstick is about 1 inch wide and 10 inches long. Try to keep the thickness consistent across all pieces to ensure even baking.
4. Final Resting: Once shaped, place the breadsticks on a parchment-lined baking sheet, spacing them about an inch apart. Cover them lightly with a clean kitchen towel and let them rest for about 20 minutes. This final rise will make your breadsticks fluffier and more tender.
Creating Flavorful Toppings
The topping is where the real flavor of your Garlicky Herbed Focaccia Breadsticks comes to life. A well-balanced garlic and herb mixture enhances the dough’s natural flavors. Here’s how to prepare it:
1. Prepare the Herb Mixture: In a small bowl, combine minced garlic, finely chopped fresh rosemary, chopped fresh thyme, and a pinch of sea salt. You can adjust the amounts based on your preference for garlic intensity or herb flavor.
2. Infuse with Olive Oil: Pour a generous amount of high-quality extra virgin olive oil over the herb and garlic mixture. Aim for about ¼ cup of oil. Let the mixture sit for about 10 minutes, allowing the flavors to meld and the oil to absorb the aromatic qualities of the herbs.
3. Even Distribution: After the breadsticks have rested, use a brush to evenly coat each stick with the garlic and herb oil. Be generous, but also ensure each piece is coated evenly. This will help achieve a delightful flavor in every bite.
Baking Your Breadsticks to Perfection
Optimal Oven Temperature and Baking Time
Preheating your oven is a crucial step in baking, especially for bread. An adequately preheated oven ensures that your breadsticks bake evenly and achieve that desirable golden-brown crust. Follow these steps for the best results:
1. Preheat the Oven: Set your oven to 425°F (220°C) at least 30 minutes before you plan to bake. This allows the oven to reach the right temperature and ensures that heat circulates properly.
2. Baking Time: Once your breadsticks are topped and your oven is preheated, place the baking sheet in the oven. Bake for 15-20 minutes, or until the breadsticks are golden brown and sound hollow when tapped on the bottom. Keep an eye on them after the 15-minute mark to avoid over-baking.
Cooling and Presentation Techniques
After pulling the breadsticks from the oven, it’s essential to let them cool slightly before serving. This cooling period allows the interior to set and makes them easier to handle. Here’s how to present them beautifully:
1. Cooling: Transfer the breadsticks to a wire rack to cool for about 5-10 minutes. This prevents them from becoming soggy on the bottom.
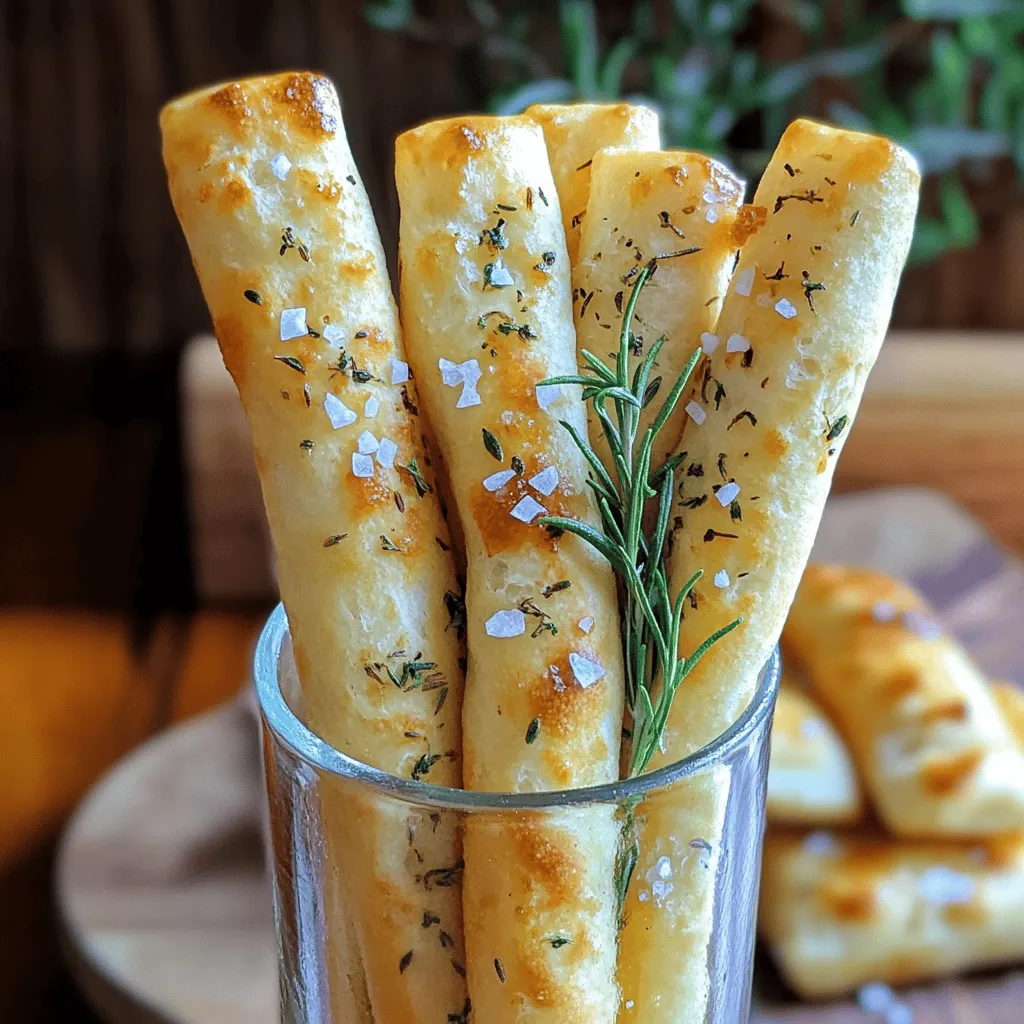
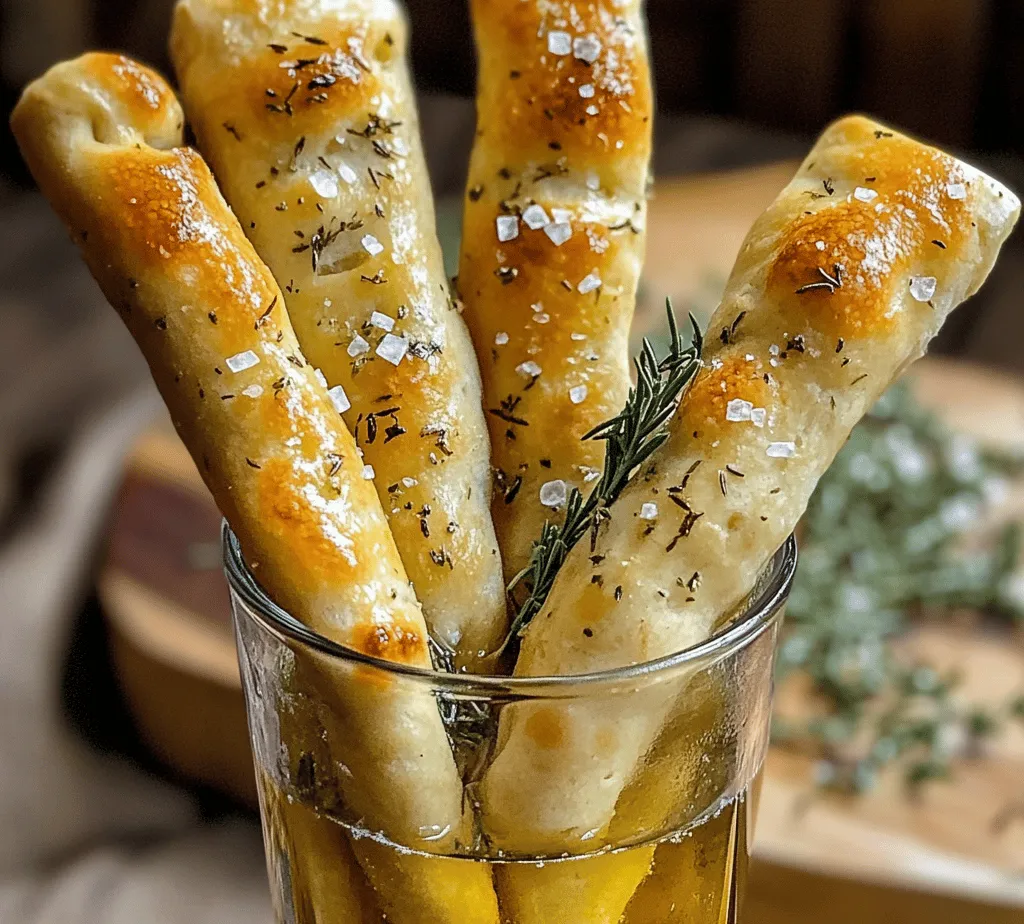
2. Presentation Ideas: For an appealing presentation, consider placing the breadsticks in a tall glass or jar for a rustic touch. You can also sprinkle some additional herbs or sea salt on top just before serving. Accompany the breadsticks with a small bowl of olive oil and balsamic vinegar for dipping, adding an interactive element to your serving.
Serving Suggestions and Pairing Ideas
Ideal Accompaniments for Breadsticks
Garlicky Herbed Focaccia Breadsticks are versatile and can be served in various ways. Here are some delicious pairing ideas:
1. Dips: A simple combination of balsamic vinegar and olive oil makes for a classic dip that complements the flavors of the breadsticks beautifully. You might also consider serving them with hummus, tzatziki, or a homemade marinara sauce.
2. Cheeses: Pair your breadsticks with a selection of cheeses such as fresh mozzarella, aged parmesan, or tangy goat cheese. This can elevate the breadsticks into a delightful appetizer spread.
3. Salads and Soups: Serve the breadsticks alongside a fresh garden salad or a comforting bowl of soup. They are perfect for dipping into a hearty minestrone or a creamy tomato soup.
Versatility in Meals
These breadsticks are not just a side dish; they can also enhance various meals:
1. Casual Family Dinners: Serve them with pasta dishes, grilled meats, or as part of a charcuterie board for a relaxed family gathering.
2. Elegant Gatherings: Dress up your dining experience by serving the breadsticks as an elegant appetizer at dinner parties. You can even wrap them in prosciutto or pair them with gourmet dips for a touch of sophistication.
Nutritional Information and Benefits
Nutritional Breakdown of Ingredients
The ingredients used in Garlicky Herbed Focaccia Breadsticks not only contribute to their delicious flavor but also provide various nutritional benefits:
– Flour: The base of your breadsticks, flour is a source of carbohydrates, essential for energy.
– Olive Oil: Rich in healthy fats, particularly monounsaturated fats, olive oil can help reduce inflammation and promote heart health.
– Garlic: This ingredient is known for its immune-boosting properties and can contribute to overall health.
– Fresh Herbs: Rosemary and thyme are both rich in antioxidants and can promote digestive health.
Health Benefits of Fresh Herbs and Garlic
Using fresh herbs and garlic in your breadsticks not only enhances flavor but also adds several health benefits:
– Garlic: Known for its antibacterial and antiviral properties, garlic can help strengthen the immune system. It may also aid in lowering blood pressure and cholesterol levels.
– Rosemary: This fragrant herb is linked to improved digestion and has anti-inflammatory properties. It may also enhance memory and concentration.
– Thyme: With its antiseptic and antibacterial qualities, thyme can support respiratory health and may help alleviate coughs and colds.
Conclusion: Enjoying Your Garlicky Herbed Focaccia Breadsticks
Making Garlicky Herbed Focaccia Breadsticks at home is not just about the delicious end result; it’s also about the joy and satisfaction that comes from baking. Embrace the process of kneading, shaping, and topping these breadsticks, as it offers a wonderful opportunity to engage with your food and create something special.
Whether you’re enjoying them at a family dinner, serving them at a festive gathering, or simply savoring them with a warm bowl of soup, these breadsticks elevate any meal. They invite connection and conversation around the dinner table, making every bite a cherished memory. So gather your ingredients, follow the steps, and indulge in the delightful experience of baking your own focaccia breadsticks. Your taste buds will thank you!