Irresistible Brown Butter Chocolate Chip Cookies Recipe

WANT TO SAVE THIS RECIPE?

If you love warm, gooey chocolate chip cookies, you’re in for a treat! My irresistibly rich Brown Butter Chocolate Chip Cookies will take your baking game to a whole new level. With deeply nutty flavors and a chewy texture, every bite is pure bliss. In this post, I’ll share my best tips and easy steps to create these mouthwatering cookies. Ready to impress your taste buds? Let’s dive in!

Why I Love This Recipe

  1. Rich Flavor: The brown butter adds a deep, nutty flavor that elevates the traditional chocolate chip cookie experience.
  2. Perfect Texture: These cookies are chewy on the inside and slightly crispy on the edges, providing a delightful contrast.
  3. Customizable: You can easily mix in your favorite nuts or even swap the chocolate chips for other types of chocolate.
  4. Easy to Make: This recipe is straightforward and requires minimal effort, perfect for bakers of all skill levels.

Ingredients

Essential Ingredients for Brown Butter Chocolate Chip Cookies

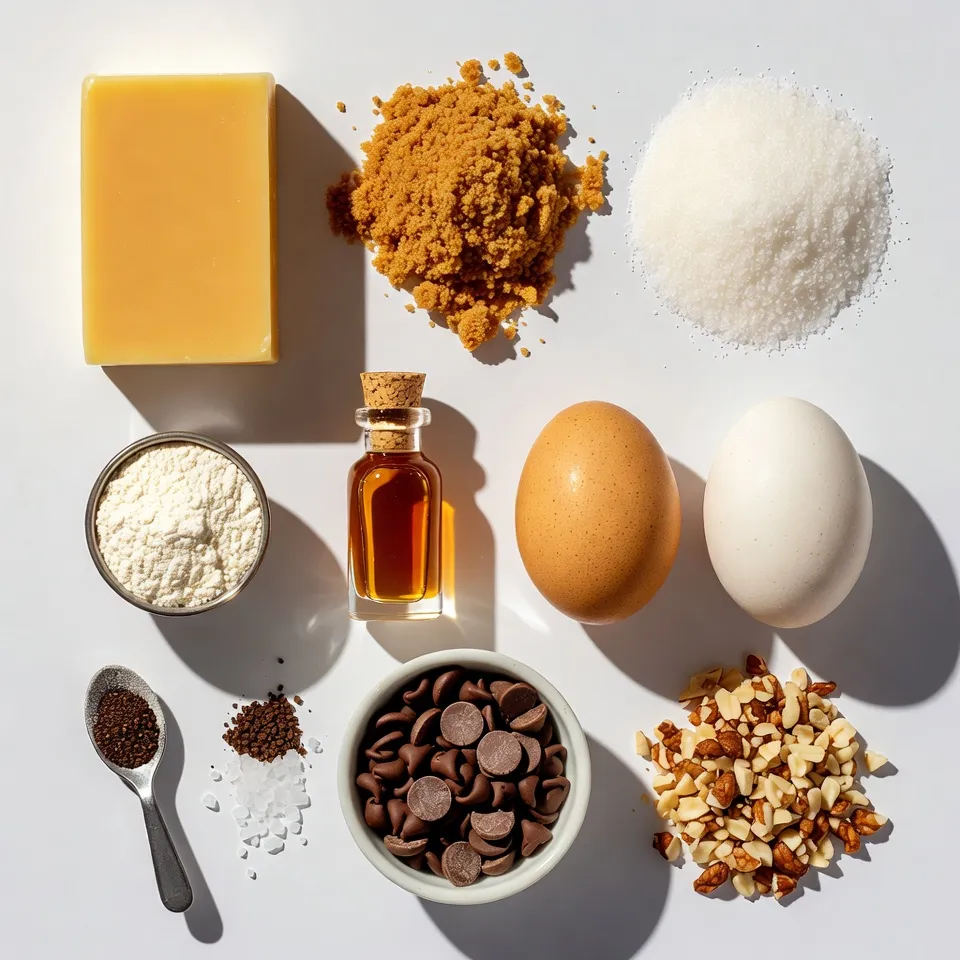
To bake these tasty cookies, you’ll need:

– 1 cup unsalted butter (2 sticks)

– 1 cup brown sugar, packed

– 1/2 cup granulated sugar

– 2 large eggs

– 2 teaspoons vanilla extract

– 2 1/4 cups all-purpose flour

– 1 teaspoon baking soda

– 1/2 teaspoon salt

– 2 cups semi-sweet chocolate chips

These ingredients work together to create a rich flavor and a chewy texture. The key here is the brown butter. It adds a nutty taste that makes these cookies special.

Optional Ingredients for Variations

You can mix it up with:

– 1/2 cup chopped nuts (like walnuts or pecans)

– A sprinkle of sea salt for topping

Nuts add crunch and flavor. Sea salt enhances sweetness and adds a nice touch.

Ingredient Substitutions

Do you need swaps? Here are some ideas:

– Replace unsalted butter with salted butter. Just omit the salt.

– Use coconut sugar instead of brown sugar for a different taste.

– Swap all-purpose flour with gluten-free flour for a gluten-free option.

These substitutions keep the cookies tasty and allow everyone to enjoy them. Adjusting ingredients can make this recipe fit your needs!

Step-by-Step Instructions

Melting and Browning the Butter

Start by placing 1 cup of unsalted butter in a medium saucepan. Heat it over medium heat. Stir it constantly until it turns a nice golden brown. This should take about 5 to 7 minutes. You will know it’s ready when you smell a nutty aroma. Be careful not to burn it. Once browned, take it off the heat and let it cool for a bit.

Mixing the Wet Ingredients

In a large mixing bowl, add 1 cup of brown sugar and 1/2 cup of granulated sugar. Pour the warm, browned butter over the sugars. Use a whisk to mix until it blends well. Add in 2 large eggs, one at a time, mixing well after each. Then add 2 teaspoons of vanilla extract. Keep whisking until everything is smooth and creamy.

Preparing the Dry Ingredients

In another bowl, whisk together 2 1/4 cups of all-purpose flour, 1 teaspoon of baking soda, and 1/2 teaspoon of salt. This will make sure your cookies rise well and taste great.

Combining the Mixtures

Now, slowly add the dry mix to the wet mix. Stir gently until just combined. Do not over-mix. Next, fold in 2 cups of semi-sweet chocolate chips. If you like nuts, add in 1/2 cup of chopped nuts too. Mix until it’s all evenly spread out.

Chilling the Dough

Cover the dough with plastic wrap or a lid. Place it in the refrigerator for at least 30 minutes. Chilling helps the flavors blend and keeps the cookies from spreading too much when baking.

Baking Instructions

Preheat your oven to 350°F (175°C). Line a baking sheet with parchment paper. Use a cookie scoop or a tablespoon to drop dough balls onto the sheet. Space them about 2 inches apart. Bake in your preheated oven for 10 to 12 minutes. The edges should be golden brown, and the centers will look slightly underbaked.

Cooling and Serving Suggestions

Once baked, take the cookies out and let them cool on the baking sheet for 5 minutes. After that, transfer them to a wire rack to cool completely. For a fun treat, serve them warm on a rustic platter. A sprinkle of sea salt on top makes them even better. Enjoy with a scoop of vanilla ice cream for a special touch!

Tips & Tricks

Achieving the Perfect Brown Butter

To make brown butter, cook the butter over medium heat. Stir it often. Watch for the color to change. It should turn golden brown. You will smell a nutty aroma. This means it is ready! Make sure not to burn it. Once done, let it cool a bit. You want it warm, not hot, when mixing.

Best Practices for Cookie Texture

For soft and chewy cookies, chill your dough. This helps the flavors mix better. Aim for at least 30 minutes in the fridge. When baking, keep space between the dough balls. This lets them spread evenly. Bake them until the edges are golden. The centers can look underbaked; they will firm up as they cool.

How to Store and Reheat Cookies

Store your cookies in an airtight container. They stay fresh for about a week. To reheat, pop them in the microwave for a few seconds. This brings back their softness. You can also freeze the cookies. Wrap them well in plastic wrap. They will keep for up to three months in the freezer.

Pro Tips

  1. Brown Butter Technique: Make sure to keep an eye on the butter while it’s melting to achieve the perfect golden-brown color without burning it.
  2. Chill the Dough: Refrigerating the dough for at least 30 minutes helps enhance the flavors and results in chewy cookies.
  3. Measuring Flour: For best results, spoon the flour into the measuring cup and level it off with a knife, rather than scooping directly from the bag.
  4. Perfect Baking Time: Keep an eye on your cookies as they bake; they should be golden around the edges but still soft in the center for that chewy texture.

Variations

Different Types of Chocolate (Dark, Milk, etc.)

You can change the chocolate to fit your taste. For a richer flavor, use dark chocolate chips. They offer a deep, intense taste. If you like sweet, try milk chocolate chips. They add a creamy touch. You can even mix both types for a fun blend. Remember, the type of chocolate can change the cookie’s vibe!

Add-In Ideas (Nuts, Sea Salt, etc.)

Adding extras makes your cookies special. Chopped nuts give a nice crunch. Walnuts or pecans work great here. You can also sprinkle sea salt on top. This makes a sweet and salty combo. For more flavor, try adding toffee bits or coconut flakes. Get creative! Your cookies can be as unique as you are.

Dietary Modifications (Gluten-Free, Vegan, etc.)

You can modify this recipe for different diets. To make it gluten-free, use gluten-free flour instead of all-purpose flour. If you prefer a vegan version, swap the butter for coconut oil. Use flax eggs as a substitute for regular eggs. These changes keep the cookies tasty while meeting your dietary needs. Enjoy the yummy goodness, no matter your diet!

Storage Info

How to Store Brown Butter Chocolate Chip Cookies

To keep your cookies fresh, store them in an airtight container. Place parchment paper between layers to prevent sticking. This method keeps them soft. You can also add a slice of bread in the container. The bread will help maintain moisture.

Freezing Cookie Dough and Baked Cookies

You can freeze both cookie dough and baked cookies. For dough, scoop it into balls and place them on a baking sheet. Freeze until solid, then transfer to a zip-top bag. This way, you can bake fresh cookies anytime. For baked cookies, let them cool completely. Store in an airtight container or freezer bag. They can last up to three months in the freezer.

Shelf Life and Best Practices

Brown butter chocolate chip cookies stay fresh for about one week at room temperature. For the best taste, eat them within this time. If you follow the storage tips, you can enjoy them longer. Always check for any signs of spoilage before eating. If they start to smell off, toss them out.

FAQs

What is the difference between regular chocolate chip cookies and brown butter chocolate chip cookies?

The main difference lies in the butter. Brown butter adds a rich, nutty flavor. Regular cookies use softened butter, which gives a more basic taste. The browning process enhances the cookies’ depth and makes them truly irresistible.

Can I bake these cookies without chilling the dough?

You can bake the cookies without chilling the dough, but I recommend chilling for the best results. Chilling the dough helps the flavors blend and gives a better texture. If you skip this step, your cookies may spread more and be flatter.

How do I know when the cookies are done baking?

Look for golden edges and slightly soft centers. The cookies will firm up as they cool. If the edges are brown and the centers look a bit underbaked, it’s time to take them out. Set a timer for 10-12 minutes to help you keep track.

What can I do if my cookies turn out flat?

If your cookies spread too much, check a few things. Ensure your butter is not too warm. Too much moisture can also cause flattening, so consider using a little less egg or flour. If you chill the dough next time, that can help too!

Can brown butter chocolate chip cookies be made ahead of time?

Yes, you can make the dough ahead of time! Store it in the fridge for up to three days. You can also freeze the dough for up to three months. Just scoop the dough onto a baking sheet and freeze until firm, then transfer to a bag.

Brown butter chocolate chip cookies are a treat you can perfect at home. We covered key ingredients, from the essential to exciting variations. I shared simple steps to create cookies with great texture and flavor. We also explored tips to achieve that perfect brown butter. Proper storage methods help keep your cookies fresh. With these insights, you can enjoy delicious cookies anytime. Baking is fun, and these cookies will surely impres

To bake these tasty cookies, you'll need: - 1 cup unsalted butter (2 sticks) - 1 cup brown sugar, packed - 1/2 cup granulated sugar - 2 large eggs - 2 teaspoons vanilla extract - 2 1/4 cups all-purpose flour - 1 teaspoon baking soda - 1/2 teaspoon salt - 2 cups semi-sweet chocolate chips These ingredients work together to create a rich flavor and a chewy texture. The key here is the brown butter. It adds a nutty taste that makes these cookies special. You can mix it up with: - 1/2 cup chopped nuts (like walnuts or pecans) - A sprinkle of sea salt for topping Nuts add crunch and flavor. Sea salt enhances sweetness and adds a nice touch. Do you need swaps? Here are some ideas: - Replace unsalted butter with salted butter. Just omit the salt. - Use coconut sugar instead of brown sugar for a different taste. - Swap all-purpose flour with gluten-free flour for a gluten-free option. These substitutions keep the cookies tasty and allow everyone to enjoy them. Adjusting ingredients can make this recipe fit your needs! {{ingredient_image_1}} Start by placing 1 cup of unsalted butter in a medium saucepan. Heat it over medium heat. Stir it constantly until it turns a nice golden brown. This should take about 5 to 7 minutes. You will know it's ready when you smell a nutty aroma. Be careful not to burn it. Once browned, take it off the heat and let it cool for a bit. In a large mixing bowl, add 1 cup of brown sugar and 1/2 cup of granulated sugar. Pour the warm, browned butter over the sugars. Use a whisk to mix until it blends well. Add in 2 large eggs, one at a time, mixing well after each. Then add 2 teaspoons of vanilla extract. Keep whisking until everything is smooth and creamy. In another bowl, whisk together 2 1/4 cups of all-purpose flour, 1 teaspoon of baking soda, and 1/2 teaspoon of salt. This will make sure your cookies rise well and taste great. Now, slowly add the dry mix to the wet mix. Stir gently until just combined. Do not over-mix. Next, fold in 2 cups of semi-sweet chocolate chips. If you like nuts, add in 1/2 cup of chopped nuts too. Mix until it’s all evenly spread out. Cover the dough with plastic wrap or a lid. Place it in the refrigerator for at least 30 minutes. Chilling helps the flavors blend and keeps the cookies from spreading too much when baking. Preheat your oven to 350°F (175°C). Line a baking sheet with parchment paper. Use a cookie scoop or a tablespoon to drop dough balls onto the sheet. Space them about 2 inches apart. Bake in your preheated oven for 10 to 12 minutes. The edges should be golden brown, and the centers will look slightly underbaked. Once baked, take the cookies out and let them cool on the baking sheet for 5 minutes. After that, transfer them to a wire rack to cool completely. For a fun treat, serve them warm on a rustic platter. A sprinkle of sea salt on top makes them even better. Enjoy with a scoop of vanilla ice cream for a special touch! To make brown butter, cook the butter over medium heat. Stir it often. Watch for the color to change. It should turn golden brown. You will smell a nutty aroma. This means it is ready! Make sure not to burn it. Once done, let it cool a bit. You want it warm, not hot, when mixing. For soft and chewy cookies, chill your dough. This helps the flavors mix better. Aim for at least 30 minutes in the fridge. When baking, keep space between the dough balls. This lets them spread evenly. Bake them until the edges are golden. The centers can look underbaked; they will firm up as they cool. Store your cookies in an airtight container. They stay fresh for about a week. To reheat, pop them in the microwave for a few seconds. This brings back their softness. You can also freeze the cookies. Wrap them well in plastic wrap. They will keep for up to three months in the freezer. Pro Tips Brown Butter Technique: Make sure to keep an eye on the butter while it's melting to achieve the perfect golden-brown color without burning it. Chill the Dough: Refrigerating the dough for at least 30 minutes helps enhance the flavors and results in chewy cookies. Measuring Flour: For best results, spoon the flour into the measuring cup and level it off with a knife, rather than scooping directly from the bag. Perfect Baking Time: Keep an eye on your cookies as they bake; they should be golden around the edges but still soft in the center for that chewy texture. {{image_2}} You can change the chocolate to fit your taste. For a richer flavor, use dark chocolate chips. They offer a deep, intense taste. If you like sweet, try milk chocolate chips. They add a creamy touch. You can even mix both types for a fun blend. Remember, the type of chocolate can change the cookie's vibe! Adding extras makes your cookies special. Chopped nuts give a nice crunch. Walnuts or pecans work great here. You can also sprinkle sea salt on top. This makes a sweet and salty combo. For more flavor, try adding toffee bits or coconut flakes. Get creative! Your cookies can be as unique as you are. You can modify this recipe for different diets. To make it gluten-free, use gluten-free flour instead of all-purpose flour. If you prefer a vegan version, swap the butter for coconut oil. Use flax eggs as a substitute for regular eggs. These changes keep the cookies tasty while meeting your dietary needs. Enjoy the yummy goodness, no matter your diet! To keep your cookies fresh, store them in an airtight container. Place parchment paper between layers to prevent sticking. This method keeps them soft. You can also add a slice of bread in the container. The bread will help maintain moisture. You can freeze both cookie dough and baked cookies. For dough, scoop it into balls and place them on a baking sheet. Freeze until solid, then transfer to a zip-top bag. This way, you can bake fresh cookies anytime. For baked cookies, let them cool completely. Store in an airtight container or freezer bag. They can last up to three months in the freezer. Brown butter chocolate chip cookies stay fresh for about one week at room temperature. For the best taste, eat them within this time. If you follow the storage tips, you can enjoy them longer. Always check for any signs of spoilage before eating. If they start to smell off, toss them out. The main difference lies in the butter. Brown butter adds a rich, nutty flavor. Regular cookies use softened butter, which gives a more basic taste. The browning process enhances the cookies' depth and makes them truly irresistible. You can bake the cookies without chilling the dough, but I recommend chilling for the best results. Chilling the dough helps the flavors blend and gives a better texture. If you skip this step, your cookies may spread more and be flatter. Look for golden edges and slightly soft centers. The cookies will firm up as they cool. If the edges are brown and the centers look a bit underbaked, it's time to take them out. Set a timer for 10-12 minutes to help you keep track. If your cookies spread too much, check a few things. Ensure your butter is not too warm. Too much moisture can also cause flattening, so consider using a little less egg or flour. If you chill the dough next time, that can help too! Yes, you can make the dough ahead of time! Store it in the fridge for up to three days. You can also freeze the dough for up to three months. Just scoop the dough onto a baking sheet and freeze until firm, then transfer to a bag. Brown butter chocolate chip cookies are a treat you can perfect at home. We covered key ingredients, from the essential to exciting variations. I shared simple steps to create cookies with great texture and flavor. We also explored tips to achieve that perfect brown butter. Proper storage methods help keep your cookies fresh. With these insights, you can enjoy delicious cookies anytime. Baking is fun, and these cookies will surely impress!

Brown Butter Chocolate Chip Cookies

Deliciously rich cookies made with brown butter and chocolate chips.
Prep Time 15 minutes
Cook Time 12 minutes
Total Time 1 hour
Course Dessert
Cuisine American
Servings 24
Calories 150 kcal

Ingredients
  

  • 1 cup unsalted butter
  • 1 cup brown sugar, packed
  • 1/2 cup granulated sugar
  • 2 large eggs
  • 2 teaspoons vanilla extract
  • 2 1/4 cups all-purpose flour
  • 1 teaspoon baking soda
  • 1/2 teaspoon salt
  • 2 cups semi-sweet chocolate chips
  • 1/2 cup chopped nuts (optional)

Instructions
 

  • In a medium saucepan, melt the butter over medium heat. Stir continuously until the butter turns golden brown and gives off a nutty aroma, about 5-7 minutes. Be cautious not to burn it. Once browned, remove from heat and let cool slightly.
  • In a large mixing bowl, combine the brown sugar and granulated sugar. Pour the browned butter over the sugars and whisk until well blended.
  • Add the eggs one at a time, followed by the vanilla extract, whisking well after each addition until the mixture is smooth.
  • In another bowl, whisk together the flour, baking soda, and salt. Gradually add the dry ingredients to the wet mixture, mixing until just combined.
  • Fold in the chocolate chips and nuts (if using) until evenly distributed.
  • Cover the dough and refrigerate for at least 30 minutes to allow the flavors to meld and the dough to firm up.
  • Preheat your oven to 350°F (175°C) and line a baking sheet with parchment paper.
  • Using a cookie scoop or tablespoon, drop dough balls onto the lined baking sheet, spacing them about 2 inches apart.
  • Bake in the preheated oven for 10-12 minutes or until the edges are golden brown and the centers look slightly underbaked (they will continue to cook while cooling).
  • Remove from the oven and let the cookies cool on the baking sheet for 5 minutes, then transfer them to a wire rack to cool completely.

Notes

Serve warm on a rustic wooden platter, dusted with sea salt for an extra touch. Pair with vanilla ice cream for an added treat.
Keyword chocolate chip, cookies, dessert

WANT TO SAVE THIS RECIPE?

Leave a Comment

Recipe Rating