
If you’re craving a sweet treat with a tangy twist, Key Lime Pie Bars are for you! These sun-kissed dessert bars pack all the zing of classic key lime pie, but in a perfect, sliceable form. With a buttery crust and smooth filling, they’re a breeze to make and sure to impress. Ready to dive into this delicious adventure? Let’s get started on whipping up your new favorite dessert!
Why I Love This Recipe
- Deliciously Tangy: The combination of key lime juice and zest provides a refreshing and tangy flavor that is perfect for dessert lovers.
- Easy to Make: This recipe is straightforward and requires minimal ingredients, making it accessible even for novice bakers.
- Perfect Texture: The bars have a creamy filling with a crumbly graham cracker crust, creating an enjoyable contrast in every bite.
- Great for Any Occasion: These key lime pie bars are ideal for gatherings, picnics, or a sweet treat at home, pleasing everyone with their vibrant flavor.
Ingredients
List of Ingredients
– Key ingredients for the crust:
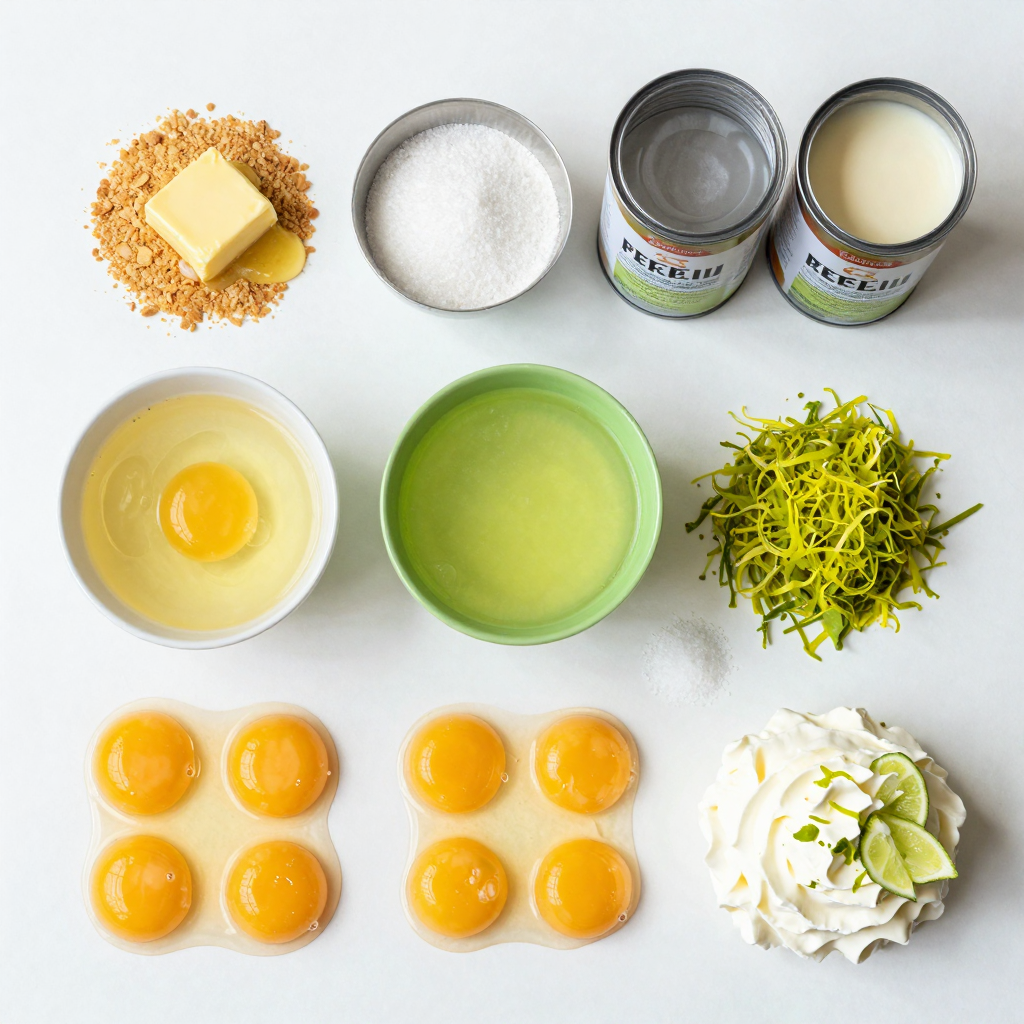
– 1 ½ cups graham cracker crumbs
– ½ cup unsalted butter, melted
– ¼ cup granulated sugar
– Key ingredients for the filling:
– 2 cans (14 oz each) sweetened condensed milk
– ½ cup freshly squeezed key lime juice
– 1 tablespoon lime zest
– 4 large egg yolks
– Pinch of salt
– Optional toppings and garnishes:
– Whipped cream, for topping
– Additional lime zest and lime slices, for garnish
Each ingredient plays a vital role in making these key lime pie bars a hit. The graham cracker crumbs give a nice crunch, while the melted butter helps bind everything. Sugar adds sweetness to the crust.
For the filling, sweetened condensed milk provides creaminess. Fresh key lime juice delivers that signature tangy taste. Lime zest adds extra flavor, while egg yolks help set the filling. Just a pinch of salt balances the sweetness.
You can customize your bars with whipped cream on top. Adding more lime zest or slices gives a pop of color and flavor. These ingredients come together to create a delicious dessert that everyone will love.
Step-by-Step Instructions
Prepping the Crust
To start, I mix graham cracker crumbs, melted butter, and granulated sugar in a bowl. Use about 1 ½ cups of crumbs, ½ cup of butter, and ¼ cup of sugar. Stir until the mix looks crumbly and well combined.
Next, I press this mixture firmly into the bottom of a greased 8×8-inch baking pan. Make sure it’s even. This step is key for a solid base. Bake the crust in a preheated oven at 350°F (175°C) for about 10 minutes. After that, let it cool slightly before adding the filling.
Making the Key Lime Filling
Now, I move on to the filling. In a separate bowl, I whisk together two cans of sweetened condensed milk, ½ cup of freshly squeezed key lime juice, 1 tablespoon of lime zest, 4 large egg yolks, and a pinch of salt. Make sure to mix until it’s smooth and creamy.
Once mixed, I pour this filling over the cooled crust. I smooth the top with a spatula for even baking. Bake again for 15 to 20 minutes. The filling should be set and slightly firm to the touch when done.
Finishing Touches
After baking, I let the bars cool at room temperature for about an hour. Then, I pop them in the fridge to chill for at least 3 hours. This step is vital for the best texture and flavor.
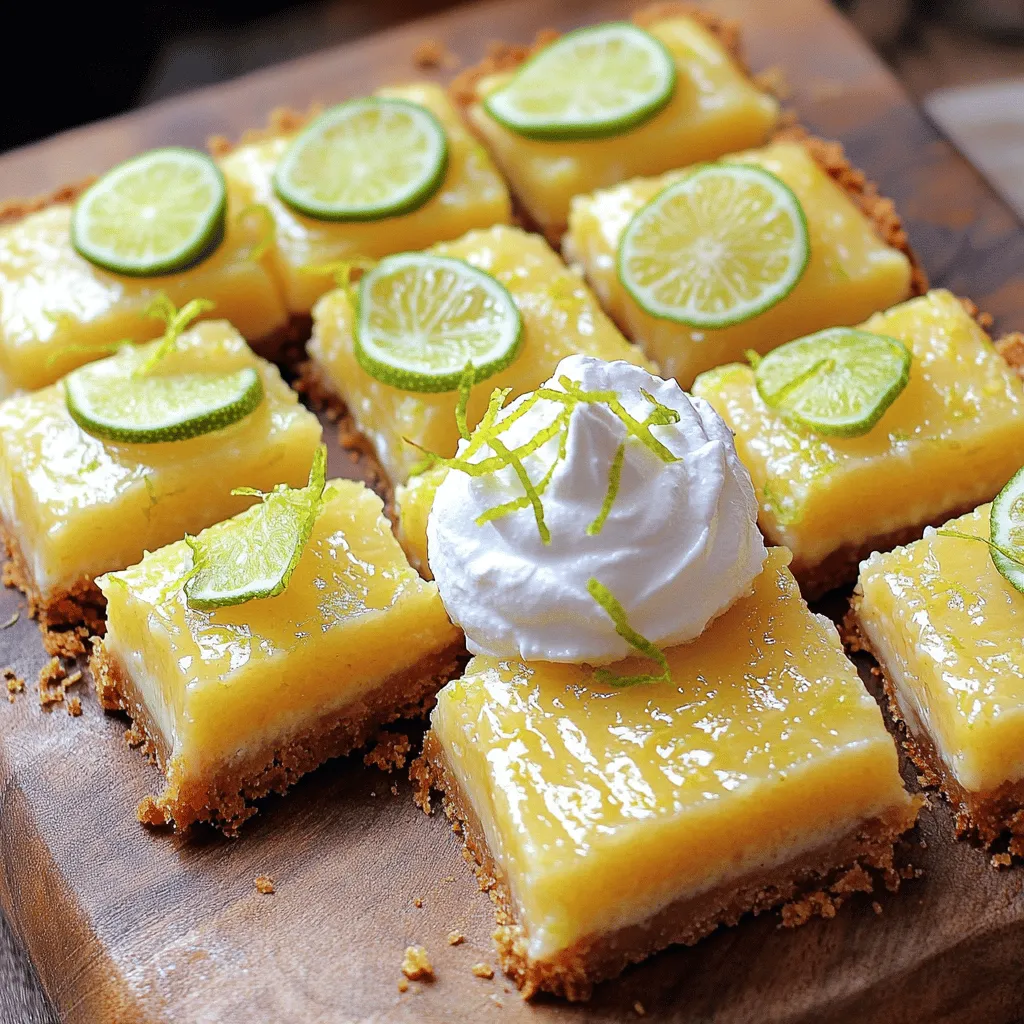
Once chilled, I cut the bars into neat squares. For a fun touch, I top them with whipped cream, extra lime zest, and lime slices. These additions not only look great but also enhance that tangy flavor.
Pro Tips
- Use Fresh Key Limes: For the best flavor, opt for fresh key limes instead of bottled juice. The freshness enhances the taste of your pie bars.
- Chill Before Serving: Allow the bars to chill in the refrigerator for at least 3 hours. This helps them set properly and makes them easier to cut into neat squares.
- Make Ahead: These bars can be made a day in advance. Just keep them covered in the fridge until ready to serve, which also allows the flavors to meld.
- Serving Suggestions: Serve your key lime pie bars with a dollop of whipped cream and a sprinkle of lime zest for that extra touch of freshness and presentation.
Tips & Tricks
Achieving the Perfect Crust
To get the ideal graham cracker crumb texture, use finely crushed crumbs. You can use a food processor or put the crackers in a zip-top bag and crush them with a rolling pin. Aim for a sandy texture with no large chunks.
Press the crumb mixture firmly into the pan. This step is vital for a sturdy crust. Use the bottom of a measuring cup or your hands to press down evenly. Make sure it sticks together and is packed tightly. This helps the crust hold its shape when you cut the bars.
Ensuring a Smooth Filling
To avoid lumps in the filling, whisk your ingredients well. Start with the sweetened condensed milk. Pour it into a bowl and whisk it alone first. This helps break down any lumps before adding other ingredients.
When mixing the egg yolks, lime juice, and zest, combine them slowly. Make sure every ingredient is mixed in well. A smooth filling results in a better texture for your bars.
Serving Suggestions
You can serve Key Lime Pie Bars in many fun ways. Try cutting them into small squares for a bite-sized treat. These bars also shine with a dollop of whipped cream on top.
Pair these with a refreshing drink like iced tea or lemonade. You can also serve them with fresh fruit for extra color and flavor. These creative touches make your dessert even more enjoyable!
Variations
Gluten-Free Key Lime Pie Bars
To make gluten-free key lime pie bars, you can swap out the graham cracker crumbs. Use gluten-free crumbs made from oats or nuts. This keeps the crust tasty and safe for those with gluten issues.
You may need to adjust the baking time slightly. Keep an eye on the crust. If it looks golden and firm, it is ready.
Vegan Key Lime Pie Bars
For a vegan version, replace the sweetened condensed milk with coconut cream. This change makes the bars creamy and rich. Use a flax egg instead of egg yolks for binding.
You may notice a change in texture. The coconut cream adds a slight coconut flavor, but it pairs well with lime.
Flavor Additions
You can also try other citrus juices for the filling. Lemon or orange juice can give a fun twist. If you want a unique taste, add fresh herbs like mint or basil.
These additions make the bars even more exciting. You can create your special flavor that your friends and family will love.
Storage Info
Storing Key Lime Pie Bars
To keep your Key Lime Pie Bars fresh, store them in the fridge. Place them in a sealed container to avoid drying out. If you cut them into squares, separate layers with parchment paper. This keeps them neat.
These bars last up to one week in the fridge. If you want to keep them longer, freezing is a great option.
Freezing Instructions
To freeze Key Lime Pie Bars, first, let them cool completely. Wrap each square in plastic wrap, then place them in a freezer-safe bag. This helps to prevent freezer burn.
When you want to enjoy them again, thaw in the fridge overnight. For a quick thaw, leave them at room temperature for about 30 minutes. Enjoy the tangy flavor whenever you like!
FAQs
What can I use instead of key lime juice?
You can use regular lime juice in place of key lime juice. It gives a similar tang. Lemon juice works too but has a stronger flavor. You might need to adjust the sugar if you choose lemons.
Can I make Key Lime Pie Bars ahead of time?
Yes, you can make these bars a day before serving. Just store them in the fridge. Let them chill for at least three hours after baking. This helps the flavors blend well.
How do I know when the filling is set?
Check for a slight jiggle in the center. The edges should look firm. When you touch it gently, it should feel set. If it wobbles too much, bake for a few more minutes.
What’s the best way to cut Key Lime Pie Bars?
Use a sharp knife for clean cuts. Wipe the knife with a damp cloth between cuts. This keeps the edges neat. For perfect squares, mark your cuts before slicing.
Can I skip the topping?
Yes, you can skip the whipped cream if you prefer. The bars are tasty on their own. If you want, try a sprinkle of lime zest. Fresh fruit slices also make a nice touch.
You now have all the tools to make delicious Key Lime Pie Bars. We covered the key ingredients, step-by-step instructions, and helpful tips. You can easily adjust the recipe for gluten-free or vegan options. Remember to refrigerate leftovers properly and enjoy them later. These bars are perfect for any gathering or as a tasty treat for yourself. The fun is in trying different flavors and serving ideas. Get ready to impress your friends and family with your new baking skills!


