
If you crave a sweet and tangy treat, you’re in the right place! Key lime pie bars are a fun and easy twist on a classic dessert. In this post, I’ll share my simple recipe that turns tart flavors into a creamy delight. We’ll cover everything from essential ingredients to handy tips that ensure your bars turn out perfect every time. Let’s make your taste buds dance with joy!
Why I Love This Recipe
- Refreshing Flavor: The tartness of key limes paired with the sweetness of the condensed milk creates a perfectly balanced dessert that’s refreshing and delightful.
- Easy to Make: With simple ingredients and straightforward steps, these bars are quick to whip up, making them perfect for any occasion.
- Perfect for Sharing: Cut into squares, these bars are easy to serve and share, making them an ideal treat for gatherings and parties.
- Beautiful Presentation: Topped with whipped cream and garnished with lime zest, these bars not only taste amazing but also look stunning on any dessert table.
Ingredients
Key Ingredients for Key Lime Pie Bars
To make these tasty key lime pie bars, you need some special ingredients. Here’s what you will need:
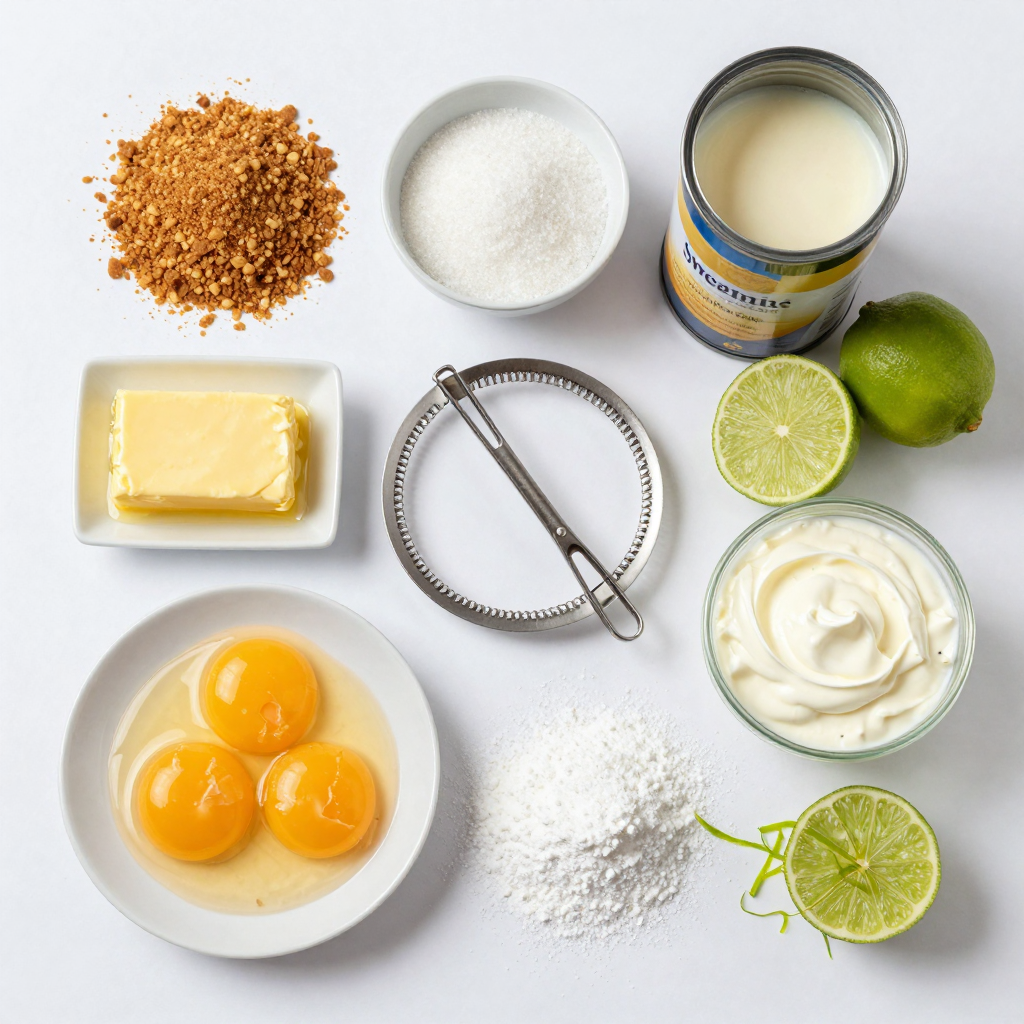
– 1 ½ cups graham cracker crumbs
– ½ cup unsalted butter, melted
– ⅓ cup granulated sugar (for crust)
– 1 can (14 oz) sweetened condensed milk
– ½ cup fresh key lime juice (about 5-6 key limes)
– 2 large egg yolks
– 1 tablespoon lime zest
– ½ cup heavy whipping cream (for topping)
– 2 tablespoons powdered sugar (for topping)
– Extra lime zest and lime slices for garnish
Each of these items adds a burst of flavor and texture. The graham cracker crumbs form a crunchy crust. The sweetened condensed milk gives the filling a creamy base. Fresh key lime juice brings a zesty taste that makes this dessert shine.
Optional Ingredients for Variations
You can also add some fun twists to your key lime pie bars. Here are some optional ingredients you might consider:
– Coconut flakes for a tropical touch
– A pinch of salt to balance the sweetness
– Fresh mint leaves for garnish
– Different citrus juices, like lemon or orange, for a unique flavor
These additions can change the taste and make your bars stand out even more.
Tools Needed for Preparation
To make these key lime pie bars, gather these tools:
– A mixing bowl for combining ingredients
– A whisk or fork for mixing
– A 9×9-inch baking dish to hold the bars
– A spatula for spreading the filling
– An oven for baking
Having the right tools makes the process easier and more fun. With these ingredients and tools, you will create a delicious dessert that everyone will love!
Step-by-Step Instructions
Preparing the Crust
To start, preheat your oven to 350°F (175°C). This step is crucial for a good bake. In a mixing bowl, combine the graham cracker crumbs, melted butter, and granulated sugar. Mix them well until they form a crumbly texture. Press this mixture firmly into the bottom of a greased 9×9-inch baking dish. Make sure it’s even. Bake the crust for 10 minutes. It should turn a light golden brown. After baking, remove it from the oven and let it cool completely before adding the filling.
Making the Key Lime Filling
While the crust cools, let’s make the filling. In a medium bowl, whisk together the sweetened condensed milk, fresh key lime juice, egg yolks, and lime zest. Make sure there are no lumps. The mixture should be smooth and creamy. This zesty filling is what makes the bars so special. Once mixed, set it aside until your crust is ready.
Baking and Cooling the Bars
Now, pour the key lime filling over the cooled crust. Spread it evenly with a spatula. Bake the bars in the oven for 15 to 18 minutes. The filling should be set but still slightly jiggly in the center. After baking, remove the bars from the oven. Allow them to cool at room temperature. For the best results, refrigerate the bars for at least 2 hours. This will help them set properly.
Pro Tips
- Use Fresh Key Limes: Fresh key lime juice gives the best flavor. If you can’t find key limes, regular limes will work, but the taste will be slightly different.
- Chill Properly: Allow the bars to cool completely at room temperature before refrigerating. This helps the filling set properly and enhances the texture.
- Whip Cream to Stiff Peaks: Make sure to whip the heavy cream until stiff peaks form for a stable topping that won’t collapse on your bars.
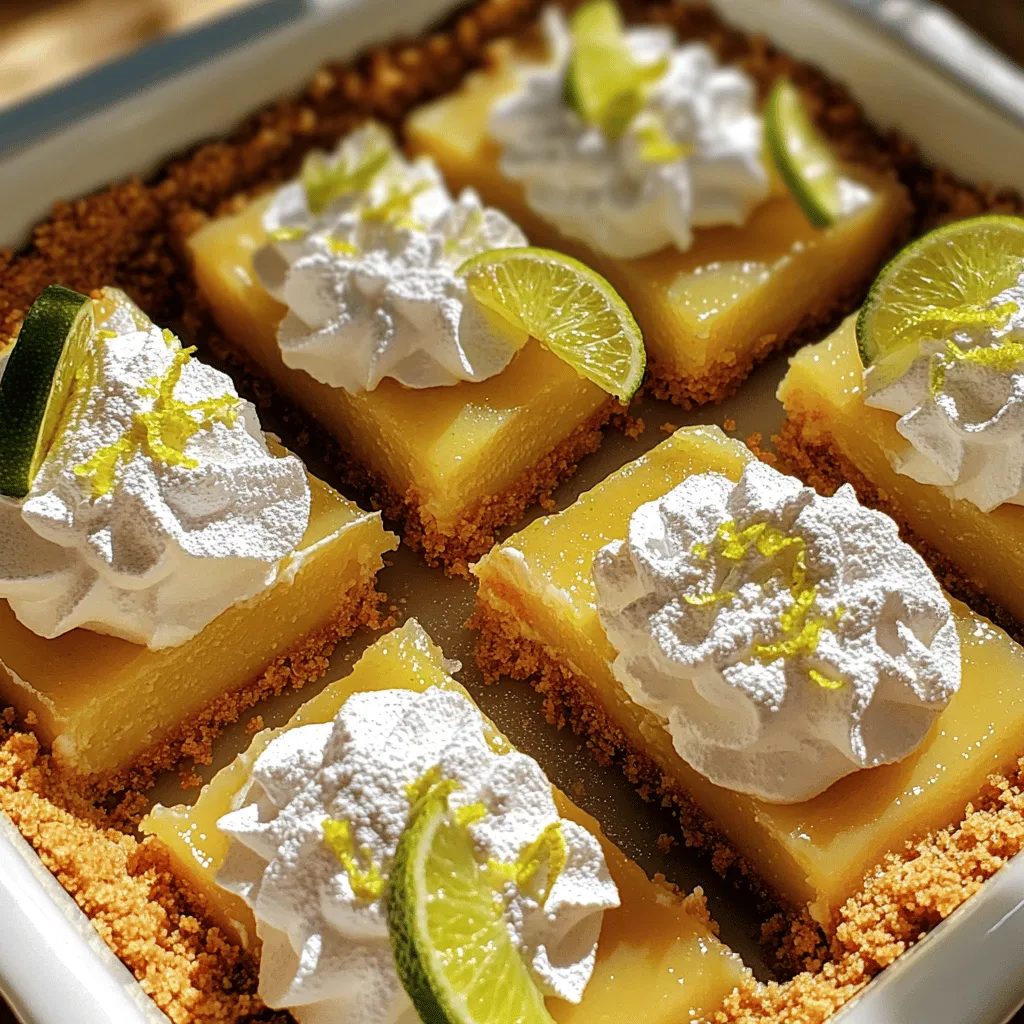
- Garnish Just Before Serving: Add lime zest and lime slices as a garnish just before serving to keep them looking fresh and vibrant.
Tips & Tricks
Achieving the Perfect Crust Texture
For the best crust, use fresh graham cracker crumbs. You can crush whole graham crackers in a food processor. Mix them with melted butter and sugar until it looks like wet sand. Press the mixture tightly into your baking dish. This helps the crust hold together. Bake it just until it’s lightly golden. This step adds a nice crunch. Let it cool before adding the filling.
Enhancing Flavor with Fresh Ingredients
Fresh key lime juice makes a big difference. It gives your bars a bright and tangy taste. You can juice the limes by hand or use a juicer. Make sure to zest the limes before juicing. The zest adds a lovely aroma. Use fresh heavy cream for the topping. It whips up nicely and tastes great. Fresh ingredients elevate the flavor and make your dessert shine.
Storing and Serving Suggestions
Once your bars cool, store them in the fridge. Cover them well so they stay fresh. They taste best chilled. Serve them cold for a refreshing treat. Cut them into squares or rectangles for easy serving. Top each piece with whipped cream, lime zest, and a slice of lime. This adds color and makes the bars look fancy. Enjoy your delicious key lime pie bars!
Variations
Gluten-Free Key Lime Pie Bars
You can make gluten-free key lime pie bars with a few simple swaps. Use gluten-free graham crackers for the crust. You can also use ground almonds or oats for a tasty crust. Just mix them with melted butter and sugar, just like the regular version. The filling stays the same, so you won’t lose any of that zesty flavor.
Vegan Key Lime Pie Bars
To make vegan key lime pie bars, skip the eggs and use a plant-based milk. You can use silken tofu blended until smooth instead of sweetened condensed milk. Add a bit of maple syrup for sweetness. Use dairy-free whipped cream for topping. These swaps keep the bars creamy and delicious while being plant-friendly.
Creative Serving Options
Serving key lime pie bars can be fun and creative. Try cutting them into fun shapes with cookie cutters. This works great for parties. You can also serve them with fresh fruit like berries or mint leaves for color. Drizzle some lime sauce or serve with a scoop of lime sorbet on the side. Each bite will be full of flavor and style.
Storage Info
Best Practices for Refrigeration
To keep your Key Lime Pie Bars fresh, store them in the fridge. Use an airtight container to protect them from odors. Make sure they are fully cooled before storing. If you want to keep them nice, add a layer of plastic wrap over the top. This helps keep the whipped cream from getting soggy.
Freezing Key Lime Pie Bars
You can freeze these bars for later. First, cut them into squares, but do not add the whipped cream yet. Wrap each bar tightly in plastic wrap, then place them in a freezer bag. This prevents freezer burn. When you are ready to eat, thaw them in the fridge overnight. Add whipped cream just before serving for the best taste.
How Long Will They Last?
In the fridge, your Key Lime Pie Bars will last about 4 to 5 days. If you freeze them, they can last up to 3 months. Just remember, the longer you keep them, the more the texture may change. Enjoy them while they’re fresh for the best flavor!
FAQs
Can I use regular lime juice instead of key lime juice?
Yes, you can use regular lime juice. However, the taste will change. Key limes are smaller and have a unique flavor. They add a tartness that regular limes do not match. If you want the classic taste, stick with key lime juice.
How do I know when the bars are done baking?
The bars are done when the filling looks set. It should be slightly jiggly in the center. This means they are ready to cool. If they look too wobbly, bake for a few more minutes. Keep an eye on them to ensure they do not overbake.
What can I substitute for sweetened condensed milk?
You can use coconut milk or almond milk mixed with sugar. This mixture will mimic the sweetness and creaminess of sweetened condensed milk. You may also try making your own by cooking milk and sugar together. This gives you a similar texture and taste.
Key lime pie bars are a fun treat to make and enjoy. We covered key ingredients, tools, and step-by-step instructions. I shared tips for the perfect crust and fresh flavor. You can even try different variations, like gluten-free or vegan options. Remember, proper storage ensures your bars stay fresh. Use these easy guidelines to impress your friends and family. Enjoy making and sharing this simple yet tasty dessert!


