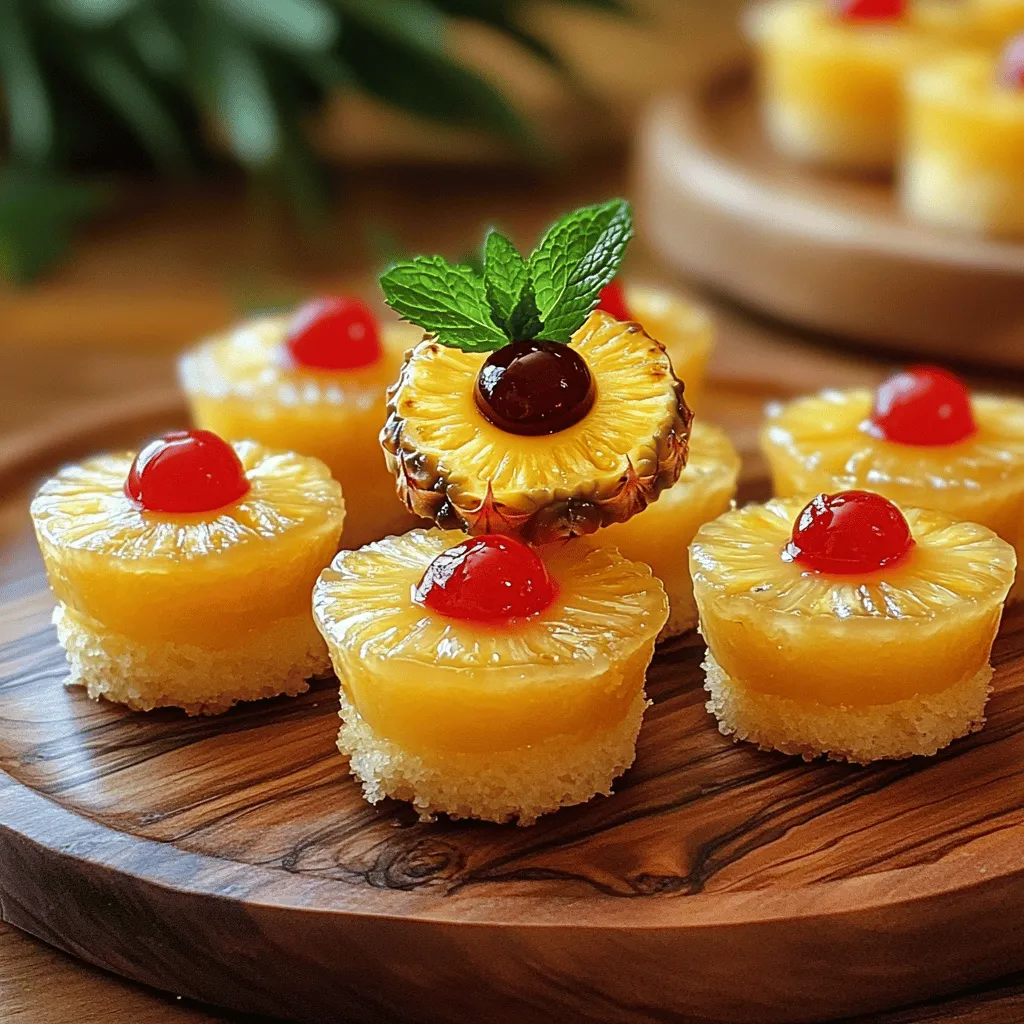
Craving a sweet treat that’s both cute and easy? Try my Mini Pineapple Upside Down Cakes! These delightful little desserts combine rich butter, juicy pineapple, and a hint of vanilla. With simple ingredients and easy steps, you’ll have a show-stopping dessert that impresses your friends and family. Let’s dive into this tasty recipe that will have everyone asking for seconds!
Ingredients
To make mini pineapple upside down cakes, gather these simple ingredients:
– 1 cup all-purpose flour
– 1/2 cup granulated sugar
– 1 teaspoon baking powder
– 1/4 teaspoon baking soda
– 1/4 teaspoon salt
– 1/2 cup unsalted butter, softened and divided
– 2 large eggs
– 1/2 cup crushed pineapple, drained
– 1/2 teaspoon vanilla extract
– 1/4 cup brown sugar
– 6 pineapple rings (canned or fresh)
– Maraschino cherries for garnish
Each ingredient plays an important role in creating the perfect mini cake. The flour gives structure, while sugar adds sweetness. Baking powder and soda help the cakes rise. The butter makes them moist and rich. Eggs bind everything together and add flavor. Crushed pineapple adds a tropical twist, and vanilla gives a warm aroma. Brown sugar adds a caramel-like taste, making the base extra delicious.
Using fresh or canned pineapple rings will give you that classic upside-down look. The maraschino cherries are the cherry on top, both in flavor and presentation.
Step-by-Step Instructions
Prepping the Oven and Muffin Tin
Start by preheating your oven to 350°F (175°C). This step is key for even baking. Next, take a 6-cup muffin tin and grease it with 2 tablespoons of softened butter. This helps the cakes slide out easily later.
Preparing the Topping
In a small bowl, mix 1/4 cup of brown sugar with 2 tablespoons of softened butter. Stir until it’s smooth. Evenly spread this mixture into the bottom of each muffin cup. This will create a sweet base. Place one pineapple ring in each cup, and put a maraschino cherry in the center of every ring. This adds a pop of color and flavor.
Making the Cake Batter
In a large mixing bowl, combine 1 cup of all-purpose flour, 1/2 cup of granulated sugar, 1 teaspoon of baking powder, 1/4 teaspoon of baking soda, and 1/4 teaspoon of salt. Whisk these dry ingredients together well. In another bowl, beat 2 large eggs. Add 1/2 cup of crushed pineapple and 1/2 teaspoon of vanilla extract. Mix until everything is combined. Gradually add the dry mix to the egg mix. Stir gently until just combined. Small lumps are okay.
Assembling and Baking
Spoon the cake batter over the pineapple rings in the muffin tin. Fill each cup about 3/4 full. This allows space for rising. Bake in your preheated oven for 20-25 minutes. To check if they’re done, insert a toothpick in the center. If it comes out clean, they are ready. Remove the mini cakes from the oven and let them cool in the tin for about 5 minutes. Then, invert the tin onto a platter. Gently tap to release the cakes. Allow them to cool slightly before serving. Enjoy these delightful treats!
Tips & Tricks
Perfecting Mini Cakes
To make the best mini pineapple upside down cakes, focus on your batter. Mix it gently. Overmixing can lead to tough cakes. Aim for small lumps in your batter. When filling the muffin tin, use a spoon to keep it even. This helps the cakes bake uniformly. Bake until a toothpick comes out clean. If you bake too long, the cakes can dry out.
Common Baking Mistakes to Avoid
One common mistake is not greasing the muffin tin well. If the tin is not greased, your cakes may stick. Always ensure you coat it with softened butter. Another mistake is using too much batter. Fill each cup only three-quarters full. This gives the cakes room to rise. Also, check your oven temperature. An oven that is too hot can burn the bottoms.
How to Serve and Garnish
Serve these mini cakes warm or at room temperature. They look great on a platter. For garnish, add a sprig of mint on top. You can also drizzle a glaze made from powdered sugar and pineapple juice. This adds a sweet touch. Fresh fruit can also make a nice garnish. Try adding slices of fresh pineapple or cherries for a pop of color.Enjoy your tasty desserts!
Variations
Tropical Twist: Adding Coconut
You can give these mini cakes a fun twist by adding coconut. Just mix in 1/4 cup of sweetened shredded coconut into the batter. This addition brings a nice chewiness and a tropical flavor that pairs well with pineapple. You can also sprinkle some coconut on top before baking for added texture.
Different Fruit Options
While pineapple is a classic, feel free to switch it up! You can use peaches, cherries, or even mango. Just make sure to cut the fruit into small pieces. If using fresh fruit, adjust the sugar to balance the sweetness. Each fruit brings its own unique taste, making every cake a new delight.
Gluten-Free Version
If you need a gluten-free treat, swap the all-purpose flour with a gluten-free flour blend. Many brands work well in baking. Make sure the blend you choose has a good mix of starches and flours. This change allows everyone to enjoy the mini cakes without missing out on flavor or texture.
These variations keep the recipe fresh and exciting. You can experiment with your favorite flavors and share your amazing creations with friends!
Storage Info
Storing Leftover Cakes
After you enjoy your mini pineapple upside down cakes, you may have some left. Store them in an airtight container. This keeps them fresh for up to three days at room temperature. If you want them to last longer, keep them in the fridge. They can stay good for about five days there. Just remember to let them cool first before sealing them up.
Freezing for Later Use
You can also freeze these mini cakes. First, let them cool completely. Then, wrap each cake in plastic wrap. After that, place them in a freezer-safe bag. This method keeps them fresh for up to three months. When you want to eat them, just take out a cake and let it thaw in the fridge overnight.
Best Practices for Reheating
To enjoy your mini cakes warm, you can reheat them. The best way is to use an oven. Preheat your oven to 350°F (175°C). Place the cakes on a baking sheet and heat for about 10 minutes. This makes the cakes warm and soft again. You can also use the microwave. Just heat each cake for about 15-20 seconds. Enjoy your delicious treat!
FAQs
Can I make these mini cakes ahead of time?
Yes, you can make these mini cakes ahead of time. Bake them and let them cool. Store them in an airtight container. They stay fresh for two days at room temperature. For longer storage, refrigerate them for up to a week. Just warm them up before serving.
How do I prevent the cakes from sticking to the pan?
To prevent sticking, grease the muffin tin well with softened butter. You can also use cooking spray. Be sure to coat the sides and bottoms of each cup. The brown sugar mixture will help create a nice release when you invert the cakes.
What can I substitute for pineapple?
If you want a twist, use peaches or cherries instead of pineapple. You can also use apples or pears. Just be sure to slice or chop them well for even cooking. The flavors will change, but the cakes will still be delicious.
How do I make a larger version of this recipe?
To make a larger cake, use a round 9-inch cake pan. Simply double the ingredients from the mini recipe. Bake for 30-35 minutes. Check with a toothpick in the center to see if it’s done. The baking time may vary, so keep an eye on it.
What’s the best way to check if they are done baking?
Insert a toothpick into the center of a cake. If it comes out clean, the cakes are done. If batter sticks to the toothpick, bake for a few more minutes. Keep checking every few minutes until they are ready.
This blog covered the ingredients, steps, and tips for making delightful mini pineapple upside-down cakes. You learned how to prep, bake, and store them. Remember, it’s all about the details. Use the right ingredients and follow each step carefully. Feel free to try different fruits or make them gluten-free. Your cakes will impress, whether for a party or a simple treat. Enjoy the process, and happy baking!