
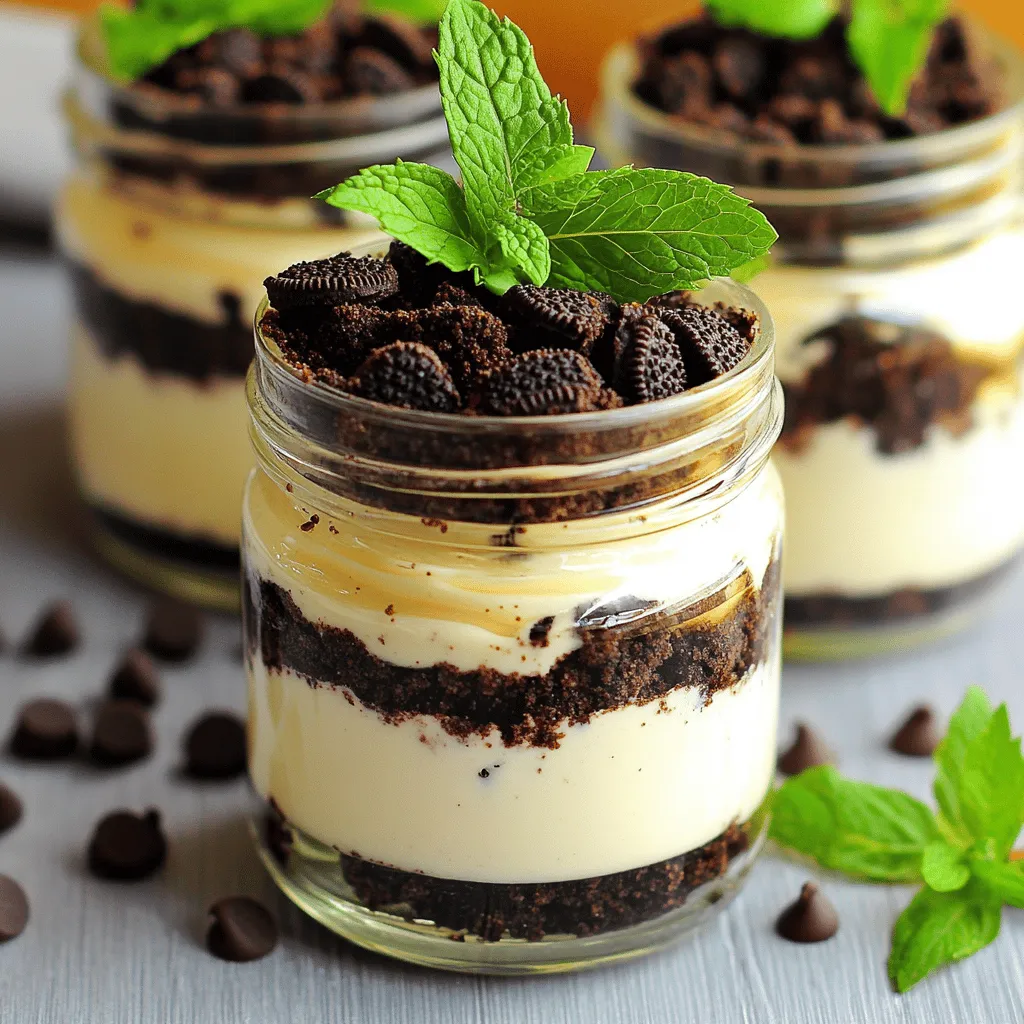
Indulge in a creamy delight with my No-Bake Oreo Cheesecake Jars! This easy recipe combines rich cream cheese, sweet Oreos, and fluffy whipped cream, all layered beautifully for a dessert that impresses. Whether you want a quick treat or a fun party dessert, these jars deliver. Ready in no time, let’s dive into the simple steps that will have you savoring each spoonful!
Why I Love This Recipe
- Easy to Prepare: This no-bake cheesecake is simple to make, requiring minimal ingredients and no oven time, making it perfect for beginners.
- Decadent Flavor: The combination of creamy cheesecake and crunchy Oreo cookies creates a delightful flavor and texture that everyone loves.
- Perfect for Any Occasion: These jars are not only delicious but also make for an impressive dessert for parties, gatherings, or casual nights in.
- Customizable: You can easily adjust the layers, add different toppings, or even substitute other cookies to suit your taste preferences.
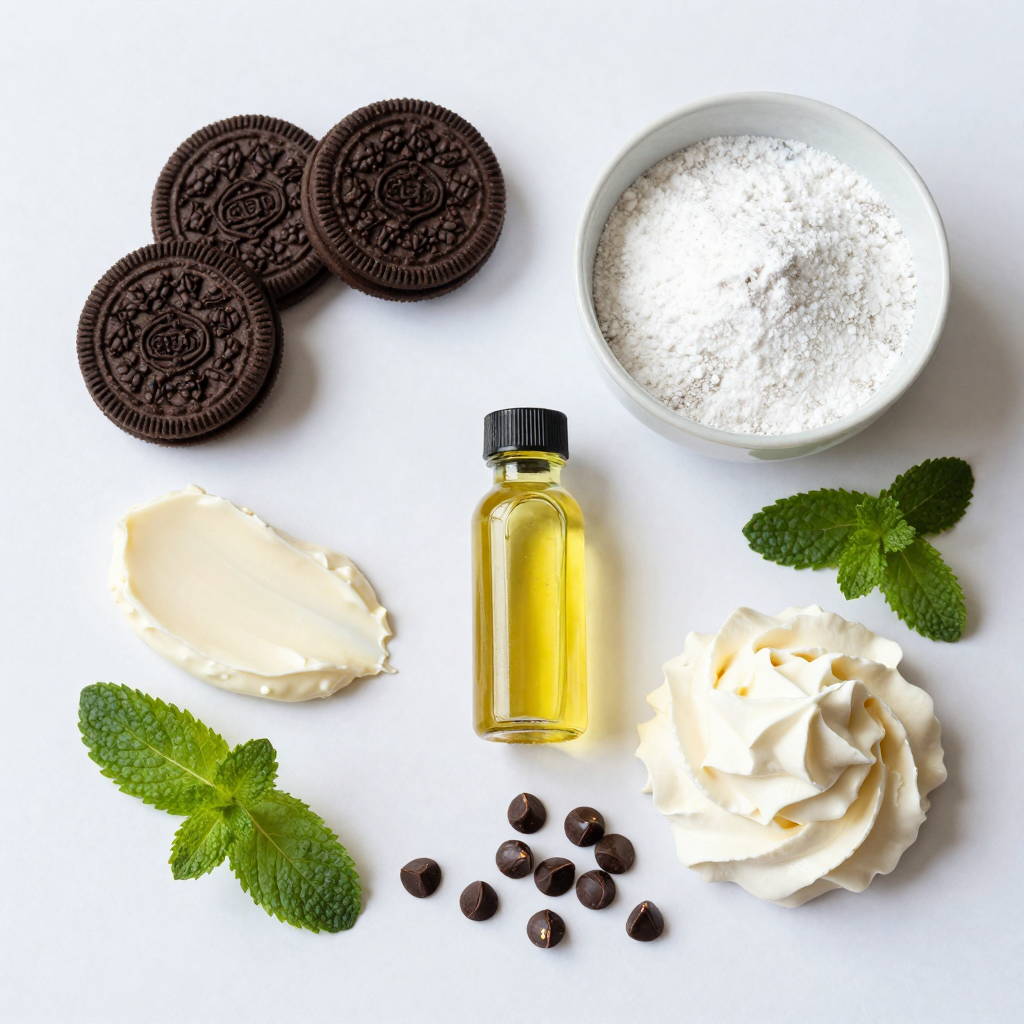
Ingredients
Main Ingredients
– 24 Oreo cookies (divided into halves)
– 1 cup cream cheese, softened
– 1/2 cup powdered sugar
– 1 cup heavy whipping cream
To make No-Bake Oreo Cheesecake Jars, you need a few key ingredients. First, you will need Oreo cookies. These provide a rich and chocolatey flavor. Use 24 cookies, and remember to divide them into halves.
Next, cream cheese is essential. It gives the cheesecake its creamy texture and tangy taste. Make sure to soften the cream cheese before mixing. You will need 1 cup for this recipe.
Powdered sugar adds sweetness and helps blend the cream cheese. You’ll need 1/2 cup. This sugar dissolves easily and gives a smooth finish.
Heavy whipping cream is what makes the dessert light and fluffy. You need 1 cup of this for the best results. Whipping it to stiff peaks is key to a perfect texture.
Optional Garnishes
– Chocolate chips
– Fresh mint leaves
Garnishes can elevate your dessert. You can add chocolate chips for extra sweetness. Just 1/4 cup will do. They add a nice crunch and look great on top.
Fresh mint leaves are another option. They give a touch of color and a burst of freshness. Use them if you want a pop of green on your jars.
Step-by-Step Instructions
Preparing the Oreo Crust
– Start by taking 12 Oreo cookies and place them in a food processor.
– Crush the cookies until they turn into fine crumbs.
– Set these crumbs aside in a bowl.
Making the Cheesecake Mixture
– In a mixing bowl, add 1 cup of softened cream cheese.
– Sprinkle in 1/2 cup of powdered sugar and 1 teaspoon of vanilla extract.
– Beat the mixture until it is smooth and creamy.
– In a separate bowl, pour in 1 cup of heavy whipping cream.
– Whip the cream until stiff peaks form.
– Gently fold the whipped cream into the cream cheese mixture.
Assembling the Jars
– Take small jars or cups and start layering your dessert.
– Begin with a tablespoon of Oreo crumbs at the bottom of each jar.
– Next, add about 2 tablespoons of the cheesecake mixture over the crumbs.
– Repeat these layers until the jars are filled.
– Finish with a layer of the cream cheese mixture on top.
– Crush the remaining Oreo cookies and sprinkle them on top for decoration.
– Place the jars in the fridge for at least 2 hours.
– This chilling time helps the cheesecake to set perfectly.
– Before serving, add chocolate chips on top and a mint leaf if you like.
Pro Tips
- Crush Evenly: Ensure that the Oreo cookies are crushed into fine, even crumbs for a consistent texture in your layers.
- Chill the Cream Cheese: For a smoother mixture, make sure your cream cheese is at room temperature before mixing, as this helps it blend well without lumps.
- Stiff Peaks: When whipping the heavy cream, aim for stiff peaks to ensure the cheesecake filling has a light, fluffy texture.
- Layering Technique: For a beautiful presentation, use a piping bag to layer the cream cheese mixture into the jars, creating a neater look.
Tips & Tricks
Perfecting the Cheesecake Texture
To make your cheesecake smooth, start with soft cream cheese. Cold cream cheese will not mix well. Leave it out for about 30 minutes before you use it. This helps you avoid lumps in your cheesecake.
Next, let’s talk about stiff peaks. When you whip the heavy cream, beat it until stiff peaks form. This means the cream will hold its shape when you lift the whisk. It should not fall back into the bowl. Gently fold the whipped cream into the cream cheese mix. This keeps your dessert light and fluffy.
Serving Suggestions
Pair your No-Bake Oreo Cheesecake Jars with fresh fruit, like strawberries or raspberries. They add a nice pop of color and flavor. You can also serve it with a drizzle of chocolate sauce for extra sweetness.
Serve the jars chilled for the best taste. The coolness makes each bite refreshing. Enjoy them straight from the fridge, or let them sit out for about 10 minutes before serving. This slight warming can enhance the flavors.
Variations
Flavor Variations
You can change the flavor of your no-bake Oreo cheesecake jars easily. Try using different cookies. Instead of Oreos, use chocolate chip cookies or graham crackers. This twist gives a new taste to the dessert.
You can also add fruit flavors. Try mixing in crushed strawberries or blueberries. These fruits add a fresh, sweet touch. For a chocolate boost, add cocoa powder to the cream cheese mix. You could also use chocolate cookies for a double chocolate delight.
Dietary Adjustments
If you need gluten-free options, choose gluten-free cookies. Many brands offer tasty gluten-free Oreos. You can also use almond flour for the crust if you want to skip the cookies.
For dairy-free alternatives, use vegan cream cheese. Coconut cream is a great substitute for heavy whipping cream. This way, you still enjoy a rich and creamy dessert without dairy.
Storage Info
Keeping the Jars Fresh
To keep your No-Bake Oreo Cheesecake Jars fresh, store them in the fridge. Use an airtight container to cover the jars. This prevents air from getting in and keeps the dessert creamy. Avoid stacking jars to prevent crushing the layers. If you want to freeze them, it’s simple. Just make sure to use freezer-safe jars. Leave some space at the top for expansion. Thaw them in the fridge before serving.
Shelf Life
These jars can last up to five days in the fridge. Always check for any signs of spoilage. If you see any discoloration or mold, it’s best to discard them. If the cheesecake smells off or has an unusual texture, don’t eat it. Keeping an eye on freshness helps you enjoy every delicious bite!
FAQs
Can I use different cookies?
Yes, you can use other cookies. Some tasty alternatives include chocolate chip cookies, graham crackers, or even peanut butter cookies. Each option will give a unique twist to your cheesecake jars. For a fun mix, try using half Oreos and half chocolate chip cookies. The flavors will blend well together, creating a new dessert favorite.
How long does it take to set?
The cheesecake jars need at least two hours to chill. This allows the mixture to firm up and set properly. If you have more time, letting them chill overnight makes them even better. The flavors deepen, and the texture becomes perfect for serving.
Can I prepare these jars in advance?
Yes, you can make these jars ahead of time. They store well in the fridge for up to three days. This is great for parties or meal prep. Just layer the jars and cover them tightly with a lid or plastic wrap. Before serving, add the chocolate chips and mint leaves for a fresh touch.
In this blog post, we explored how to make delicious Oreo cheesecake jars. You learned about key ingredients like Oreos, cream cheese, and heavy cream. We walked through each step, from the crust to the perfect layer. I shared tips for great texture and tasty garnishes. You also discovered ways to adjust the recipe for different diets and flavors.
Now, you have the tools to create a simple, tasty dessert. Enjoy your cheesecake jars and your time in the kitchen!


